jdk1.7中fork-join并发框架源码浅析及具体实例分析

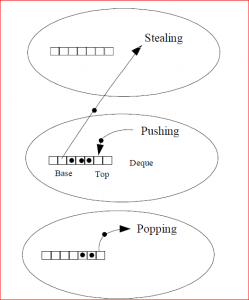
  java7中的fork-join的基本思想就是创立线程池然后试图进行Work Stealing:

  所以任务的创建和线程的触发顺序就显得比较微妙而需要额外小心线程同步的问题,若子任务无返回值,尽量使用invorkAll方法。也可以参考源码中invokeAll的使用方法学习forkinvorkjoin的使用规范:

invorkAlljava.util.concurrent.ForkJoinTask.java
1
2
3
4
5
6
7
8
9
10
11
12
13
14
15
16
17
18
19
20
21
22
23
24
25
26
27
28
29
30
31
32
33
34
35
36
37
38
39
40
41
 /**
* Forks the given tasks, returning when {@code isDone} holds for
* each task or an (unchecked) exception is encountered, in which
* case the exception is rethrown. If more than one task
* encounters an exception, then this method throws any one of
* these exceptions. If any task encounters an exception, others
* may be cancelled. However, the execution status of individual
* tasks is not guaranteed upon exceptional return. The status of
* each task may be obtained using {@link #getException()} and
* related methods to check if they have been cancelled, completed
* normally or exceptionally, or left unprocessed.
*
* @param tasks the tasks
* @throws NullPointerException if any task is null
*/
public static void invokeAll(ForkJoinTask<?>... tasks) {
Throwable ex = null;
int last = tasks.length - 1;
for (int i = last; i >= 0; --i) {//从last到1依次fork,而0则直接invork。
ForkJoinTask<?> t = tasks[i];
if (t == null) {
if (ex == null)
ex = new NullPointerException();
}
else if (i != 0)//不为0则fork
t.fork();
else if (t.doInvoke() < NORMAL && ex == null)//为0则invork
ex = t.getException();
}
for (int i = 1; i <= last; ++i) {//注意此处是从1开始, 依次join
ForkJoinTask<?> t = tasks[i];
if (t != null) {
if (ex != null)
t.cancel(false);
else if (t.doJoin() < NORMAL && ex == null)
ex = t.getException();
}
}
if (ex != null)
UNSAFE.throwException(ex);
}

输入为两个任务的源码例子:

1
2
3
4
5
6
7
8
9
10
11
12
13
14
15
16
17
18
19
20
21
22
23
24
25
/**
* Forks the given tasks, returning when {@code isDone} holds for
* each task or an (unchecked) exception is encountered, in which
* case the exception is rethrown. If more than one task
* encounters an exception, then this method throws any one of
* these exceptions. If any task encounters an exception, the
* other may be cancelled. However, the execution status of
* individual tasks is not guaranteed upon exceptional return. The
* status of each task may be obtained using {@link
* #getException()} and related methods to check if they have been
* cancelled, completed normally or exceptionally, or left
* unprocessed.
*
* @param t1 the first task
* @param t2 the second task
* @throws NullPointerException if any task is null
*/
public static void invokeAll(ForkJoinTask<?> t1, ForkJoinTask<?> t2) {
int s1, s2;
t2.fork();
if ((s1 = t1.doInvoke() & DONE_MASK) != NORMAL)
t1.reportException(s1);
if ((s2 = t2.doJoin() & DONE_MASK) != NORMAL)
t2.reportException(s2);
}

两个任务的时候也是先fork t2->invork t1->join t2这样的流程。


fork操作是把任务放入workQueue的尾部(push):

1
2
3
4
5
6
7
8
public final ForkJoinTask<V> fork() {
Thread t;
if ((t = Thread.currentThread()) instanceof ForkJoinWorkerThread)
((ForkJoinWorkerThread)t).workQueue.push(this);//放入尾部
else
ForkJoinPool.common.externalPush(this);
return this;
}

join操作:

1
2
3
4
5
6
7
8
9
10
11
12
13
14
15
16
/**
* Implementation for join, get, quietlyJoin. Directly handles
* only cases of already-completed, external wait, and
* unfork+exec. Others are relayed to ForkJoinPool.awaitJoin.
*
* @return status upon completion
*/
private int doJoin() {
int s; Thread t; ForkJoinWorkerThread wt; ForkJoinPool.WorkQueue w;
return (s = status) < 0 ? s :
((t = Thread.currentThread()) instanceof ForkJoinWorkerThread) ?
(w = (wt = (ForkJoinWorkerThread)t).workQueue).
tryUnpush(this) && (s = doExec()) < 0 ? s :
wt.pool.awaitJoin(w, this, 0L) :
externalAwaitDone();
}

综上所述,整个标准的调用流程应该是先反序fork(除了第一个任务),把任务(this)放入队列尾部,调用第一个任务,再顺序join(也除了第一个任务)。


下面是一个比较复杂、具体的求double数组平方和的过程。恰当的组织可以让运算保持分而治之的理念,而不是仅仅只是递归。

1
2
3
4
5
6
7
8
9
10
11
12
13
14
15
16
17
18
19
20
21
22
23
24
25
26
27
28
29
30
31
32
33
34
35
36
37
38
39
40
41
42
43
44
45
46
47
48
49
50
51
52
53
54
55
56
57
58
59
60
61

import java.util.concurrent.ForkJoinPool;
import java.util.concurrent.RecursiveAction;

public class Applyer extends RecursiveAction {
static double sumOfSquares(ForkJoinPool pool, double[] array) {
int n = array.length;
Applyer a = new Applyer(array, 0, n, null);
pool.invoke(a);
return a.result;
}

final double[] array;
final int lo, hi;
double result;
Applyer next; // keeps track of right-hand-side tasks

Applyer(double[] array, int lo, int hi, Applyer next) {
this.array = array;
this.lo = lo;
this.hi = hi;
this.next = next;
}

double atLeaf(int l, int h) {
double sum = 0;
for (int i = l; i < h; ++i) // perform leftmost base step
sum += array[i] * array[i];
return sum;
}

protected void compute() {
int l = lo;
int h = hi;
Applyer right = null;
while (h - l > 1 && getSurplusQueuedTaskCount() <= 3) {
int mid = (l + h) >>> 1;//无符号右移(除以2)(若(l+h)为负数,mid就变成整数了)
right = new Applyer(array, mid, h, right);
right.fork();
h = mid;
}
double sum = atLeaf(l, h);
while (right != null) {
if (right.tryUnfork()) // directly calculate if not stolen
sum += right.atLeaf(right.lo, right.hi);
else {
right.join();
sum += right.result;
}
right = right.next;
}
result = sum;
}

public static void main(String[] args) {
ForkJoinPool forkJoinPool = new ForkJoinPool();
double[] array = { 1, 2, 3 };
System.out.println(sumOfSquares(forkJoinPool, array));
}

}

Applyer作为一个RecursiveAction,从最初的一个Applyer(array, 0, n, null),分裂为多个任务,放置于任务列表中,空闲的工作线程从列表中取出任务运行compute方法,计算一个叶节点后, 优先再去寻找右边的叶节点进行计算,若靠右的叶节点们先结束运算,再去任务列表中窃取任务进行计算。

其中getSurplusQueuedTaskCount方法用于判断当前过剩的任务数量,例如当工作线程数量为10,而划分的任务数量为14,则不会有空闲的线程来进行任务窃取,大家都很忙,所以就没必要继续划分任务了。反之,若有空闲的工作线程,而且任务足够大,则应该先把任务划分一下,以方便其他空闲线程窃取自己的任务,加快所有任务的完成。

compute函数第一个while循环先对任务数量和当前工作线程数量进行权衡,如果过剩的任务数量小于3,则进行二分。一直到任务数量足够了,跳出循环。使用atLeaf()函数直接计算(l,f)范围内的平方和。

计算完当前叶节点的任务后,检查右边叶节点的任务是否被其他线程窃取。若被窃取了则等待其完成,反之则自己计算该任务。然后继续往右遍历任务。

所有任务分布在树的叶节点上,并且以链表的形式串联起来,以便相互窃取任务。(注意到由于线程的工作速度不同,叶节点的深度很可能不是一致的。)

参考:

[1] http://www.molotang.com/articles/694.html
[2] http://www.iteye.com/topic/643724 (其中fork和join用法不符合jdk源码使用规范)
java异常

类继承关系上:
Throwable分为Error和Exception.

语义上:
异常分为受检异常和非检异常.
(checked和unchecked)

#非检异常(unckecked exception):

Error 和 RuntimeException 以及他们的子类。

编译器不提示和发现这种异常.不要求在程序处理这些异常.
因为一般是在代码写得有问题才会出现这种异常.
如除0:ArithmeticException;
类型转换: ClassCastException;
数组越界: ArrayIndexOutOfBoundsException;
空指针: NullPointerException.

#受检异常
运行环境导致的.
如:
SQLException , IOException,ClassNotFoundException.

自定义异常:

按照国际惯例,自定义的异常应该总是包含如下的构造函数:
1.一个无参构造函数
2.一个带有String参数的构造函数,并传递给父类的构造函数。
3.一个带有String参数和Throwable参数,并都传递给父类构造函数
4.一个带有Throwable 参数的构造函数,并传递给父类的构造函数。

1
2
3
4
5
6
7
8
9
10
11
12
13
14
15
16
17
18
19
20
21
22
23
24
25
public class IOException extends Exception
{
static final long serialVersionUID = 7818375828146090155L;

public IOException()
{
super();
}

public IOException(String message)
{
super(message);
}

public IOException(String message, Throwable cause)
{
super(message, cause);
}


public IOException(Throwable cause)
{
super(cause);
}
}

异常与线程

Java中的异常是线程独立的,线程的问题应该由线程自己来解决,而不要委托到外部,也不会直接影响到其它线程的执行。

Java程序可以是多线程的。每一个线程都是一个独立的执行流,独立的函数调用栈。如果程序只有一个线程,那么没有被任何代码处理的异常 会导致程序终止。如果是多线程的,那么没有被任何代码处理的异常仅仅会导致异常所在的线程结束。

try,catch,finally

finally中的return 会覆盖 try 或者catch中的返回值。
实际上,当try或catch中的代码要离开方法或跳出之前,会暂且按下,去finally去完整执行一圈,因此finally中的控制流会优先表达.因此如果在finally里return 100;则方法的返回值就永远是100,而且不会抛出任何异常.(除非finally里抛了.)

hbase笔记

http://hbase.apache.org/1.1/book.html
http://blog.csdn.net/u010270403/article/details/51648462

  • 命令
    1
    2
    3
    4
    5
    6
    7
    8
    9
    10
    11
    12
    13
    14
    15
    16
    17
    18
    19
    20
    21
    22
    23
    24
    25
    26
    27
    28
    29
    30
    31
    32
    33
    34
    35
    36
    37
    38
    39
    40
    41
    42
    43
    44
    45
    46
    47
    48
    49
    50
    -- cli启动
    hbase shell
    -- 列出表:
    list
    list 'pipe.*' -- 可以使用正则,列出pipe开头的表.
    -- 建表mytable,族名是cf:
    create 'mytable','cf'
    -- 写数据:
    put 'mytable', 'first','cf:message','hello HBase'
    # 在mytable表的插入rowkey为first的数据,列族为cf,列名message,具体数据为hello HBase.
    put 'mytable', 'second','cf:foo',0x0
    put 'mytable', 'third','cf:bar',3.15159
    put 'mytable', 'forth','cf:kk','kk',3.15159
    -- 最后一个kk的3.15159被识别成timestamp写入了.
    -- 看得出出来字符串需要单引号,数字则不需要
    -- 不加字符串,不会被识别为表名或者列名,会被识别为函数名

    -- 读数据:
    get 'mytable','first'
    -- 读整表:
    scan 'mytable'
    -- 输出:
    hbase(main):031:0> scan 'MYTABLE'
    ROW COLUMN+CELL
    112233bbbcccc column=NEWCF:attr, timestamp=1497410919789, value=data

    -- 表名不一定大写,行键112233bbbcccc,列族为NEWCF,列名(qualifier)为attr,值为data.

    -- 删除指定数据
    delete ‘scores','Jim','grade'
    delete ‘scores','Jim'
    -- 删除整行:
    deleteall ‘scores','Jim'
    -- 删除整个表:
    truncate ‘scores'
    -- 更改表结构:
    disable ‘scores'
    alter ‘scores',NAME=>'info'
    enable ‘scores'
    -- 增加列族名
    alter 'zmtest1', NAME => 'cf'
    -- 删除一个列族
    hbase> alter ‘t1′, NAME => ‘f1′, METHOD => ‘delete'
    hbase> alter ‘t1′, ‘delete' => ‘f1′

    -- 执行脚本
    hbase shell test.hbaseshell


    --

HBASE写数据先写Memstore和WAL,最后由Memstore生成HFile.
每个列族可能有多个HFile,但每个HFile只能属于一个列族.
不清楚为什么WAL在Memstore前. 可能因为MemStore需要rpc,比较慢吧.
写操作生成:

  1. 数据= Memstore+HFile(StoreFile)
  2. 日志= WAL (HLog)

读操作使用LRU算法,缓存名为BlockCache,与Memstore在一个JVM中.
HFile的物理存放形式是一个Block的序列外加这些Block的索引.
读路径包括:BlockCache,Memstore,HFile,将缓存的\未缓存未写入的\已写入的,三部分数据凑在一起返回客户端.

#表设计:

Row key行键 (Row key)可以是任意字符串(最大长度是 64KB,实际应用中长度一般为 10-100bytes),在hbase内部,row key保存为字节数组。
存储时,数据按照Row key的字典序(byte order)排序存储。设计key时,要充分排序存储这个特性,将经常一起读取的行存储放到一起。(位置相关性)
注意:
字典序对int排序的结果是1,10,100,11,12,13,14,15,16,17,18,19,2,20,21,…,9,91,92,93,94,95,96,97,98,99。要保持整形的自然序,行键必须用0作左填充。
列名都以列族作为前缀,例如courses:history , courses:math 都属于 courses 这个列族.

python api:happybase

首先在master上启动thrfit接口,注意happybase只能访问thrift接口,因此不是start thrift2:

1
./hbase-daemon.sh start thrift

python安装库:

1
pip install happybase

python代码:

1
2
3
4
5
6
7
8
9
10
11
12
13
14
15
16
#!/usr/bin/env python
# encoding: utf-8
import sys
import traceback
from happybase import Connection

reload(sys)
sys.setdefaultencoding('utf8')

c = Connection('master')
t = c.table('MYTABLE')
count = 0
for _ in t.scan(filter='FirstKeyOnlyFilter() AND KeyOnlyFilter()'):#filter='FirstKeyOnlyFilter() AND KeyOnlyFilter()'
count += 1

print count

#建立结构相同的表
habse没有传统数据库中类似create table like的语句.
如果要建立一个与现有表结构相同的表,只能使用如下步骤:(假设要达到的目的是create table 'pipe:zeb_log' like 'pipe_day')

1
2
3
4
5
6
7
8
9
// 1. 获取原表结构:
desc 'pipe_day'
// 2.
把从{name=>...}开始的部分做如下处理:
(1) TTL => 'FOREVER' 替换成 TTL => org.apache.hadoop.hbase.HConstants::FOREVER
(2) {name=>...} 之间加上逗号
(3) 整条语句变成一行,句首加上 create 'pipe:zeb_log'

// 3.

HBase导出数据

  1. 导出成SequenceFile:// 没啥用,无法解析.
    1
    2
    3
    4
     hbase org.apache.hadoop.hbase.mapreduce.Export pipe:zeb_log /user/fengmq01/zeb_log
    # 把 pipe:zeb_log 导出到了 /user/fengmq01/zeb_log 文件夹
    # 命令格式:
    # hbase org.apache.hadoop.hbase.mapreduce.Export <tablename> <outputdir> [<versions> [<starttime> [<endtime>]]]

数据结构

使用上可以简单得想象成一个树形结构:
Table(Rows) –通过row key 索引到=> Row ;
Row –通过column family索引到CF;
CF – 通过column qualifier 索引到最新版本的Value.
不同timestamp的value组成Cell.

1
Table(Rows)->CF->Cell->Value.

每一级都是一个KV存取.

初探apt-get工作机制

首先通过apt-get update命令,读取/etc/apt/source.list文件和/etc/apt/source.list.d文件夹下的*.list文件。文件中大部分是http服务器地址,以其中一个archive为例,安装lrsz时:

1
get http://cn.archive.ubuntu.com/ubuntu/ precise/universe lrzsz amd64 0.12.21-5

通过读取服务器http://cn.archive.ubuntu.com/ubuntu/dists/precise/universe/source/Sources.gz文件,文件中书写了所有能下载的软件包的版本和依赖。
(ubuntu12.04 的即从precise目录下查找)
查找到包的实际路径是:
pool/universe/l/lrzsz/lrzsz_amd64_0.12.21-5.deb
即:
http://cn.archive.ubuntu.com/ubuntu/pool/universe/l/lrzsz/lrzsz_amd64_0.12.21-5.deb

  • 使用第三方源时经常遇到gpg证书认证通不过的情况,可以强行忽略危险:
    1
    apt-get --allow-unauthenticated update

apt-get本地源

上次安装ambari,由于网速问题下载包下载了好久。如果反复这样的话太浪费时间了,又找不到能用的国内镜像源,决定自己建一个本地源。

首先有一台服务器用官方的ambari.list

1
2
sudo apt-get install ambari-server
sudo apt-get install ambari-agent

下载好了相关的deb包。
接下来要做的工作就是想要复用这些文件。

1.apt-get安装的软件都保存在/var/cache/apt/archives/目录下,所以先把它们拷贝到别的目录下:

1
2
3
4
5
6
sudo mkdir ~/data/soft -p 
sudo cp -p /var/cache/apt/archives/*.deb ~/data/soft/
cd ~/data/soft/
#修改一下拥有者和组,方便之后缩小权限:
chown -R am-server ~/data/
chgrp -R am-server ~/data/

2.安装一下依赖扫描工具:

1
sudo apt-get install  dpkg-dev -y

3.生成Packages.gz

1
dpkg-scanpackages soft/ |gzip > soft/Packages.gz

4.nginx对于静态资源并发比较好:

1
2
3
4
5
6
7
8
9
10
11
12
13
14
15
16
17
18
19
20
21
22
23
24
25
26
27
28
29
30
31
32
33
34
35
36
# 安装nginx:
sudo apt-get install nginx
# 配置一下nginx的启动用户:
vi /etc/nginx/nginx.conf
# 把user从www-data改为自己的用户am-server
user am-server;
:wq
vi /etc/nginx/sites-available/default
# 更改根目录和location:
server {
listen 80; ## listen for ipv4; this line is default and implied
#listen [::]:80 default ipv6only=on; ## listen for ipv6

root /home/am-server/data;
index index.html index.htm;

# Make site accessible from http://localhost/
server_name localhost;

location / {
# First attempt to serve request as file, then
# as directory, then fall back to index.html
try_files $uri $uri/ /index.html;

# Uncomment to enable naxsi on this location
# include /etc/nginx/naxsi.rules
}
location /soft{
autoindex on;
allow all;
}
}
这里我顺手把index文件也拷进了data/
cp /usr/share/nginx/www/index.html /data
#保存之后重启nginx即可:
service nginx restart

在浏览器上检查是否可以访问:
http://10.2.14.120/
http://10.2.14.120/soft

如果出现问题的话,可以通过检查两个log文件寻找原因:

1
2
3
4
# 访问日志:
cat /var/log/nginx/access.log;
# 错误日志:
cat /var/log/nginx/error.log;

有可能是权限等问题。

5.配置后本地源的服务器后,可以在其他机器上测试一下apt-get能否正常识别:

1
2
3
4
5
6
sudo vi /etc/apt/source.list.d
#添加以下内容:
deb http://10.2.14.120 soft/
# 保存退出后执行
sudo apt-get update
sudo apt-get install ambari-server

这个时候应该可以看到飞驰的下载速度了。

感动吧.XD

ambari安装笔记

终于闲下来可以学点新东西。学习一下ambari
http://www.linuxidc.com/Linux/2014-05/101531p2.htm

  • 首先弄四个干净ubuntu系统,安装ssh和jdk:

    1
    2
    3
    4
    5
    6
    7
    8
    9
    10
    11
    12
    13
    14
    15
    16
    17
    sudo passwd
    root
    sudo apt-get -y install openssh-server
    # 这里掉坑里了,HDP2.2用的是jdk1.7,所以如果这里用了jdk1.8后面就只能安装HDP2.3了。以后试下jdk1.7。
    tar zxvf jdk-8u60-linux-x64.tar.gz
    sudo mkdir /usr/lib/jdk/
    sudo mv jdk1.8.0_60/ /usr/lib/jdk/jdk1.8.0_60
    cd /usr/lib/jdk/
    sudo ln -s jdk1.8.0_60/ jdk_current
    cd /etc/profile.d
    sudo vi java.sh
    i
    # ESC :wq
    export JAVA_HOME=/usr/lib/jdk/jdk_current
    export CLASSPATH=.:%JAVA_HOME%/lib/dt.jar:%JAVA_HOME%/lib/tools.jar
    export PATH=$PATH:$JAVA_HOME/bin
    source java.sh
  • 挑一台安装ambari-server:

    1
    2
    3
    4
    5
    6
    7
    8
    cd /etc/apt/sources.list.d
    wget http://public-repo-1.hortonworks.com/ambari/ubuntu12/2.x/updates/2.1.2/ambari.list
    apt-key adv --recv-keys --keyserver keyserver.ubuntu.com B9733A7A07513CAD
    apt-get update
    apt-get install ambari-server
    # 这里下载起来很慢,可配置一个本地源,节省下次的时间。
    ambari-server setup
    ambari-server start

1.配置完成启动服务后,在同网段内一台机器的浏览器上访问:
10.2.2.184:8080
默认帐号密码都是admin,可以登录进去以后改密码。

2.创建集群前,需要配置主节点到所有节点免密码登录:下次可以试试ssh-agent,听说比手动配方便。

1
2
3
4
5
6
7
8
9
10
11
12
13
14
15
16
17
18
19
20
# 所有机器上运行: 配置自身无密码登录
ssh-keygen -t rsa
cat ~/.ssh/id_rsa.pub >> ~/.ssh/authorized_keys

# 集群之间共享公钥:
# 从第一台机器到最后一台机器执行一圈,最后把authorized_keys传回第一台机器
# 从第一台机器传到所有其他机器上。
# 第一台开始:
scp ~/.ssh/authorized_keys 10.2.2.185:~/.ssh/authorized_keys1
# 此后依次到最后一台(n-1次),一直到传回第一台:
cat ~/.ssh/authorized_keys1 >>~/.ssh/authorized_keys
scp ~/.ssh/authorized_keys 10.2.2.184:~/.ssh/authorized_keys
#第一台传到所有机器上:
scp ~/.ssh/authorized_keys 10.2.2.185:~/.ssh/authorized_keys
scp ~/.ssh/authorized_keys 10.2.2.188:~/.ssh/authorized_keys
scp ~/.ssh/authorized_keys 10.2.2.189:~/.ssh/authorized_keys

# master: try to login every slaver
ssh slave1
ssh 10.2.2.185

最后把ambari-server那台机器的ssh私钥粘贴到网页端。

3.首次尝试,所以配置的都是root用户。如果在slaver上创建了hadoop用户,安装的时候还是会提示让我们删掉,所以干脆还是用root先。
4.ubuntu12.04.4下自动安装失败,改为手动安装ambari-agent

1
2
3
4
5
# 在每个slaver上:
sudo apt-get install ambari-agent
# 安装后以后
sudo ambari-agent start
# 然后回到网页端继续配置。

5.host需要配置完全。

1
2
3
vi /etc/hosts
# ... 略
sudo /etc/init.d/networking restart

6.ntp时间服务需要配置:

1
2
sudo apt-get install ntp
service --status-all | grep ntp #查看是否启动([+])

7.居然还要自己配置jdk…:(可能是因为master上自己配置了jdk,下次还是用它的。)
8.配置失败后重新配置的命令:

1
2
3
4
5
# master:
ambari-server stop
ambari-server reset
# slaver:
python /usr/lib/python2.6/site-packages/ambari_agent/HostCleanup.py --silent --skip=users

9.注册完成后,选择要安装的服务就可以慢慢等着安装好了,这一步也是在线安装所以很慢的。第一次可以少选一点服务,以后再慢慢添加服务,集群的节点也是可以动态扩展的。
10.默认配置:
ambari-server的pid放在:
/var/run/ambari-server/ambari-server.pid
日志输出在:
/var/log/ambari-server/ambari-server.out
错误日志:
/var/log/ambari-server/ambari-server.log
资源组织文件:
/var/lib/ambari-server/resources
数据库名:ambari
schema名:ambari
用户名: ambari
密码: bigdata
网页端的话用户名密码默认都是admin.
可以通过查看日志信息,寻找出错原因。
祝好XD~

java里的一些技巧

一开始在quora上看到tricks:
https://www.quora.com/What-are-some-cool-Java-tricks
我是拒绝的,然而定语是cool,所以我就很cool地点进去了。

  • 注解:
    java6+以来,注解处理器一直是一个未被充分利用的trick,它能在编译期就找出错误,而不是等到运行时(这样会增大找出错误的难度)。
    然后答主Chris Hansen还推荐使用Dragger框架进行依赖注入。
  • 注释中运行代码:
    后续的答案除了使用JMX检测死锁的线程、如何序列化一个枚举类等,还有一个是讲如何在注释中插入能运行的部分的:
    1
    2
    3
    4
        public static void main(String... args) {   
    // The comment below is no typo.
    // \u000d System.out.println("This Comment Executed!");
    }

比如这里注释中的System.out.println输出语句就是可以运行的。XD简直是无比邪恶的技巧。其他比较好懂的:

  • 类型推断:
    还有一个tricks就是类型推断,例如:
    1
    2
    3
    4
    5
    6
    7
    public <T> Set<T> hashSet() {
    return (Set<T>)(new HashSet<T>());
    }
    {
    Set<String> set1 = hashSet();
    Set<Long> set2 = hashSet();
    }
    这对于数据类型参数化是很有用的。
  • 变长参数列表:

    1
    void example(String...strings) {};
  • 在泛型参数上使用联合:其中Bar为接口,Foo可为类或接口。

    1
    public class Baz<T extends Foo & Bar> {}
  • 使用标号进行流程控制:

    1
    2
    3
    4
    5
    6
    7
    8
    outer: 
    for (i = 0; i < arr.length; i++) {
    for (j = 0; j < arr[i].length; j++) {
    if (someCondition(i, j)) {
    break outer;
    }
    }
    }
  • google java编程风格指南:
    http://www.topthink.com/topic/12834.html

使用JMX轮询发现死锁

ThreadMXBean是Java虚拟机线程系统的管理接口,可以使用其中的findDeadlockedThreads方法自动发现死锁的线程,jdk1.6下包括:

  1. owner locks(java.util.concurrent)引起的死锁;
  2. monitor locks(例如,同步块)引起的死锁。
1
2
3
4
5
6
7
8
9
10
11
12
13
14
15
public static class DeadLockDetector extends Thread {
@Override
public void run() {
while(true) {
ThreadMXBean threadMXBean = ManagementFactory.getThreadMXBean();
long[] ids = threadMXBean.findDeadlockedThreads();
if (ids != null) {
System.exit(127);
}
try {
Thread.sleep(1000);//定期轮询
} catch (InterruptedException e) { }
}
}
}
1
2
3
4
5
6
7
8
9
10
11
12
13
14
15
16
17
public static void main(String[] args) throws Exception {
Process process = null;
int exitcode = 0;
try {
while (true) {
process = Runtime.getRuntime().exec("java -cp . DeadlockedApp");
exitcode = process.waitFor();
System.out.println("exit code: " + exitcode);
if (exitcode == 0)
break;
}
} catch (Exception e) {
if (process != null) {
process.destroy();
}
}
}

然而轮询和检测死锁显然都是相当耗费资源的操作,尽量还是自己做好线程的管理。

mybatis批量插入和更新

  1. 批量插入:
    mysql下批量插入的sql语句:

    1
    2
    3
    insert into user_info (uname,unumber) values 
    ('xiaoyue1','1'),
    ('xiaoyue2','2');

    似乎很简单,
    然而,经过复杂的条件判断和动态构造就变成了这样:

    1
    2
    3
    4
    5
    6
    7
    8
    9
    10
    11
    12
    13
    14
    15
    16
    17
    <insert id="insertMass" useGeneratedKeys="true" keyProperty="id">
    insert into user_info
    <trim prefix="(" suffixOverrides="," suffix=")">
    <if test="list[0].id != null">id,</if>
    <if test="list[0].uname!= null">uname,</if>
    <if test="list[0].unumber!= null">unumber,</if>
    </trim>
    values
    <foreach collection="list" item="item" index="index"
    separator=",">
    <trim prefix="(" suffixOverrides="," suffix=")">
    <if test="item.id != null">#{item.id},</if>
    <if test="item.uname!= null">#{item.uname},</if>
    <if test="item.unumber!= null">#{item.unumber},</if>
    </trim>
    </foreach>
    </insert>
    • useGeneratedKeyskeyProperty接收自增主键返回的id,而且此处返回的是第一个插入的记录的id,而不是最后一条记录的id。注意调用代码传入的map中必须有id这一项以接收返回值。
    • trim标签消除末尾的逗号,同时在首尾加上括号。
    • foreach标签遍历传入的list, 传入的mapkeylist的对象即为userInfo数组。
    • list[0]表示对象数组的第一项。
  1. 对应的调用代码:
    1
    2
    3
    4
    5
    6
    7
    8
    9
    10
    11
    12
    @Override
    public void insertMass(List<UserInfo> users) {
    Map<String, Object> paraMap = new HashMap<>();
    paraMap.put("list", users);
    paraMap.put("id", 0);//note
    userInfoMapper.insertMass(paraMap);
    int beginId = (int) paraMap.get("id");
    for (UserInfo userInfo : users) {
    userInfo.setId(beginId);
    ++beginId;
    }
    }

  1. 批量更新:
    本来是打算用case when语句写的,然而太过复杂没能写出来,可能得用java拼接好sql语句再传给mybatisreplace into虽然简练但可能改变其他不想改变的字段;最后折中写了insert into..on duplicate key UPDATE...
1
2
3
4
5
6
7
8
9
10
11
12
13
14
15
16
17
18
19
20
<insert id="updateMass"> <!--on duplicate key, mysql特有语法 -->
insert into user_info
(
<if test="list[0].unumber != null"> unumber,</if>
uname,
id<!-- id is necessary -->
)
values
<foreach collection="list" item="item" index="index"
separator=",">
(
<if test="item.unumber!= null"> #{item.unumber},</if>
<if test="item.uname!= null">#{item.uname},</if>
#{item.id}
)
</foreach>
on duplicate key UPDATE
<if test="list[0].unumber != null">unumber=values(unumber),</if>
uname=values(uname) <!-- 至少更新一项 -->
</insert>
  • 这次没使用trim标签,可读性好了一点点,可以和上面对比一下;
  • 传入参数没设置类型,因为mybatis自己会判断, 其实类型是mapmaplist项中存着要更新的对象数组。

RTTI与反射

  • RTTI:
    运行期类型鉴定。在编译期通过载入和检查.class文件,从而鉴定类型。
  • 反射:
    运行期类信息。应用场景:反序列化,远程调用(RM),访问私用变量和方法。编译期.class文件不可用,只能在运行期获得.class文件,在运行期载入和检查.class文件。

1.RTTI:

1
2
3
4
5
6
7
8
//RTTI的例子:
if(boolean.class==Boolean.TYPE)
System.out.println("boolean true");
Gun gun=new Gun();
if//(Gun.class.isInstance(gun))//方式1;
(Class.forName("test1.RTTI$Gun").isInstance(gun ))//方式2反射。
System.out.println("gun is instance of Gun");
//此处Gun是test1包下RTTI类中的一个内部类。

2.反射:
http://blog.csdn.net/stevenhu_223/article/details/9286121

1
2
3
4
5
6
7
8
9
10
11
12
Class<?> class1 = Class.forName("test1.RTTI$Gun");
Method[] methods = class1.getMethods();
for (Method method : methods)
out.println(method);
out.println("constructos:--");
Constructor[] constructors=class1.getConstructors();
for (Constructor method : constructors)
out.println(method);
Method me1=class1.getMethod("getdata", int.class);
Type returnType=me1.getReturnType();
Object output=me1.invoke(class1.newInstance(),3);
out.println(output);

getFields方法获取所有public属性;
getDeclaredFields方法获取所有属性,包括private
getMethods方法获取所有public方法;
getDeclaredMethods方法获取所有方法,包括private

可通过getDeclaredMethods获取私有方法;
然后nameMethod.setAccessible(true);
然后就可以执行private方法了。

此外,获取方法时,除了指定方法名,还要指定参数类型列表,多个参数时可这样写:

1
2
Class<?> clazz=Gun.class;
Method allValuesMethod = clazz.getDeclaredMethod("setAllValues", new Class[]{String.class, int.class, float.class});