Netty-in-action第14-15章案例研究-笔记

文件上传案例: Droplr

需求:

上传文件到S3,返回一个下载url。

数据流: 客户端=>服务端=>S3

原始方案:

  1. 服务器接受上传,存成文件;
  2. 服务器上传到S3;
  3. 服务器回复url给客户端。

缺点:

  1. 每个上传开销大占用大量内存,导致并发低;
  2. 上传完整个文件才开始上传S3,而瓶颈恰恰在于S3。
  3. 有磁盘IO。

改进方案

流式上传,只在内存,不过磁盘。

  1. 服务器接受上传,每块数据实时传输到S3;
  2. 接受和上传做速度适配,保持低内存消耗,高并发;
  3. 最后返回url给客户端。

并发达到10K。

要点

  1. IdelStateHandler关闭不活跃的连接,回滚历史进度(速度控制失败时);
  2. 并发达到上限时,返回503;
  3. 需要保证HttpChunk的顺序(线程池)。
    (注: 503: 服务不可用(服务器资源耗尽,拒绝服务))

http-client库:
https://github.com/akka/akka-http
https://github.com/AsyncHttpClient/async-http-client

实时数据同步:FireBase(被谷歌收购)

需求1:

在各个用户和设备之间实时同步数据。
(服务器同步到各个客户端)

解决方案

长轮询+WebSocket.
先使用长轮询连接,当WebSocket可用时切换到WebSocket。

难点在于长轮询。

具体细节

轮询 : 客户端每隔N秒轮询一次;实时性不强,开销大(空转);
长轮询 : 客户端询问一次服务器,然后等待服务器响应,收到响应以后才继续轮询。
在服务端没有回复客户端的期间,如果客户端此时想发送数据给服务端,它会先阻塞。
此时,客户端手头的数据会堆积在缓冲区。
换言之,限制是: 未完成请求数<=1。(同一个客户端)

长轮询

优点: 没有新数据时,服务器可以不回应客户端,这样客户端就不会接着轮询,减少空转;
缺点: 客户端发送数据可能被阻塞。

改进

客户端: 限制改成未完成请求数<=2。(从1上调到2)
服务端: 如果当前有1个未完成请求A,此时又收到了同一个客户端的第二个请求B(一般第二个是发送数据的请求),会先对A进行空响应,然后处理请求B

引入新问题: 消息的有序性;
解决方案: 元数据加入消息序列号。

引入新问题: 连接断开检测
解决方案:
客户端: 超时重试(以区分于慢速网络)。
服务端: 超时判断为连接断开。

要点: Netty支持一个端口多个协议(HTTP,Websocket,长轮询,TCP)

需求2:

加密环境(SSLHandler)下,基于带宽计费。

方案:

  1. 解密前统计字节数;
  2. 解密后得到账户名,计入该账户的账单。

要点: 统计字节数提前到解密前,提高性能。

app推送通知: Urban Airship案例

需求

实时推送通知

方案

  1. app维护一条到后端服务的连接;
  2. 借助第三方推送服务中转,服务器把消息传输给第三方平台,然后转交给app。

其中苹果的APNS推送服务的使用流程:

  1. 生产者: 通过TCP+SSLv3连接到APNS服务器,使用X.509证书进行身份认证;
  2. 生产者: 按APNS规定的格式,发送消息(二进制);
  3. 生产者: 读取(消息id,错误码)或成功。(因为有消息id,这里可以异步)

其中消息格式是大端字节序,可以如下显式指定:

1
ByteBuf buf = Unpooled.buffer(size).order(ByteOrder.BIG_ENDIAN);

初始化,设置允许重新协商密钥:

1
2
3
4
5
final ChannelPipeline pipeline = channel.pipeline();
final SslHandler handler = new SslHandler(clientEngine);
handler.setEnableRenegotiation(true);// 重新协商
pipeline.addLast("ssl", handler);
pipeline.addLast("decoder", new ApnsResponseDecoder());

需要注意的经验

  1. 运营商可能不允许TCP的keep-alive特性,会积极剔除空闲的TCP会话;
  2. 移动运营商可能禁止UDP.

第15章 案例研究,第二部分

服务通信案例: Nifty和Swift(Facebook)

Thrift: facebook开发的跨语言rpc远程调用、服务通信的框架。
组件:

  1. IDL: 定义通信的格式;
  2. 协议;
  3. 传输接口;
  4. 编译器: 从IDL生成服务端和客户端的存根代码(不同语言);
  5. 客户端和服务端实现。

场景:

由于Thrift是跨语言的远程调用。
其中C++版本基于libevent\ Folly开发,性能很高;
Java版本(Nifty)基于Netty开发,性能与C++版本不相上下。

Nifty

基于NettyThriftjava实现。

需求1: 按顺序响应

客户端可能会要求:
服务器端并行处理请求,但是返回响应必须是顺序的。

解决方案: 服务器端并行处理请求, 返回前排序响应。(缓冲处理好的请求结果)
开销: 缓冲响应的内存。(所以如果客户端不要求顺序响应,可以免除这部分开销)

Netty4的实现支持: EventExecutor
Netty3的实现支持: OrderedMemoryAwareThreadPoolExcecutor

Swift

用注解来定义模型,无效IDL文件和存根。
底层使用Nifty作为I/O引擎。
https://github.com/facebookarchive/swift
已经不再维护。
还在维护的类似开源项目是:
https://github.com/airlift/drift

超时处理

问题: 每个请求维护一个超时事件的话,代价很昂贵。

方案1: 超时集。
每个客户端维护一个计时器,或者每组相同超时间隔的请求,维护一个计时器。
每次超时结束以后,进行下一个超时计时器。
优点: 开销小;
缺点: 要求超时间隔长度一致。

方案2: 使用NettyHashedWheelTimer工具类。(空间换时间)
算法来自:
http://www.cs.columbia.edu/~nahum/w6998/papers/sosp87-timing-wheels.pdf
示例代码:

1
2
3
4
5
6
7
8
HashedWheelTimer timer = new HashedWheelTimer(100, TimeUnit.MILLISECONDS, 16);
System.out.println(LocalTime.now());
timer.newTimeout((timeout) -> {
System.out.println(LocalTime.now());
System.out.println(timeout);
}, 5, TimeUnit.SECONDS);
//阻塞main线程
System.in.read();

RPC框架案例: Finagle(Twitter)

前端api端点<=>Finagle<=>后端服务们(提供:用户信息、twitter、时间线)
(大部分是scala开发。原先是ruby on rails)
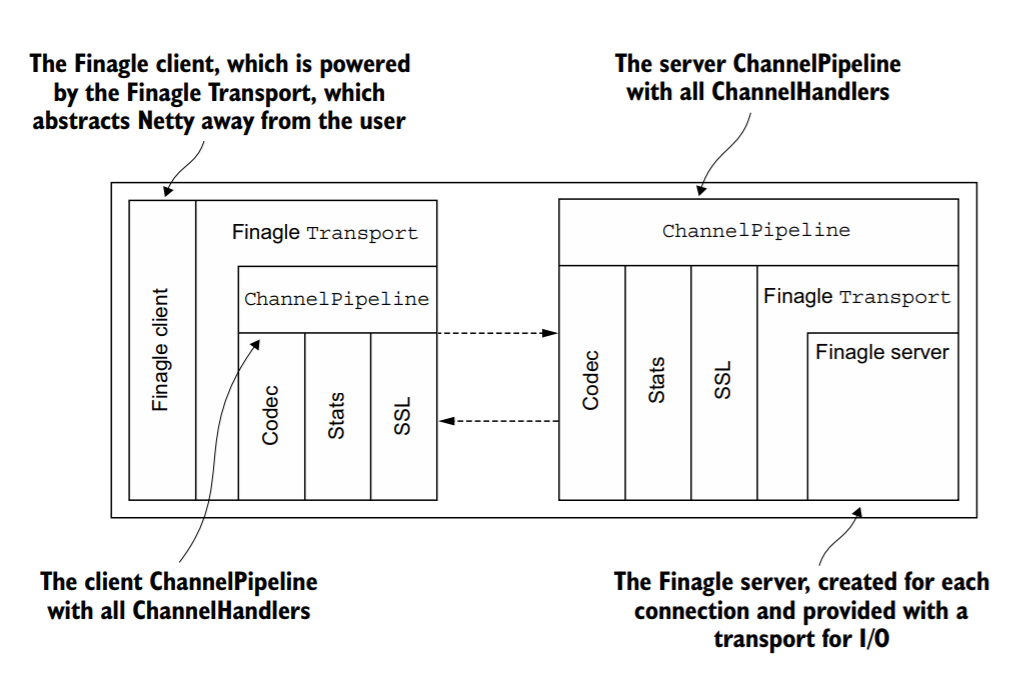
主要功能包括: SSL、打日志(统计)、负载均衡

负载均衡(故障管理)

客户端统计所有服务器的延迟、未完成请求数(负载),
每次选择最低负载的主机派发请求。

失败请求=>从列表中移除对应服务器=>后台不断尝试重连。

Netty-in-action-第十一章-SSL等预置实现-笔记

这章主要讲内容:

  1. SSL/TLS;
  2. HTTP/HTTPS;
  3. 空闲的连接和超时;
  4. 基于分隔符和长度的协议(处理粘包,半包);
  5. 写大型数据。
  6. 序列化

SSL/TLS

安全协议:SSL/TLS
用例: HTTPS, SMTPS
实现: jdk实现(javax.net.ssl), openssl(性能更好)
Netty中的支持:
SslHandler

SslHandler的声明:

1
2
3
4
-- SslHandler:
public class SslHandler extends ByteToMessageDecoder implements ChannelOutboundHandler
-- 其中的ByteToMessageDecoder:
public abstract class ByteToMessageDecoder extends ChannelInboundHandlerAdapter

由声明看出,它是一个编解码器(入站事件和出站事件都处理)。
入站: 字节=>消息(解密)
出站: 消息=>字节(加密)
具体使用则和以前的编解码器都不同:

1
2
3
4
5
6
7
8
9
10
11
12
13
14
15
public class SslChannelInitializer extends ChannelInitializer<Channel> {
private final SslContext context;
private final boolean startTls;

public SslChannelInitializer(SslContext context,boolean startTls){
this.context = context;
this.startTls = startTls;
}
@Override
protected void initChannel(Channel ch) throws Exception {
SSLEngine engine = context.newEngine(ch.alloc());
ch.pipeline().addFirst("ssl"
, new SslHandler(engine, startTls));
}
}

总结:
需要借用: SslContext

两个要注意的点:

  1. 对于每个 SslHandler 实例,都使用 ChannelByteBufAllocatorSslContext 获取一个新的 SSLEngine(ch.alloc());
  2. startTls: 如果设置为 true,第一个写入的消息将不会被加密;(客户端应该设置为 true)
  3. https://github.com/devsunny/netty-ssl-example/blob/master/src/main/java/com/asksunny/ssl/StreamReader.java

HTTP相关的handler

4个解码器、编码器:

1
2
3
4
5
6
7
8
9
10
11
12
13
14
15
16
17
18
19
20
public class HttpPipelineInitializer extends ChannelInitializer<Channel> {

private final boolean client;

public HttpPipelineInitializer(boolean client) {
this.client = client;
}

@Override
protected void initChannel(Channel ch) throws Exception {
ChannelPipeline pipeline = ch.pipeline();
if (client) {
pipeline.addLast("decoder", new HttpResponseDecoder()); //1
pipeline.addLast("encoder", new HttpRequestEncoder()); //2
} else {
pipeline.addLast("decoder", new HttpRequestDecoder()); //3
pipeline.addLast("encoder", new HttpResponseEncoder()); //4
}
}
}

消息聚合:

这回是编解码器Codec:

1
2
3
4
5
6
7
8
9
10
11
12
13
14
15
16
17
18
19
public class HttpAggregatorInitializer extends ChannelInitializer<Channel> {

private final boolean client;

public HttpAggregatorInitializer(boolean client) {
this.client = client;
}

@Override
protected void initChannel(Channel ch) throws Exception {
ChannelPipeline pipeline = ch.pipeline();
if (client) {
pipeline.addLast("codec", new HttpClientCodec()); //1
} else {
pipeline.addLast("codec", new HttpServerCodec()); //2
}
pipeline.addLast("aggegator", new HttpObjectAggregator(512 * 1024)); //3 512kb
}
}

HTTP 压缩

客户端加解压器,服务端加压缩器:

1
2
3
4
5
6
7
8
9
10
11
12
13
14
15
16
17
18
public class HttpAggregatorInitializer extends ChannelInitializer<Channel> {

private final boolean isClient;
public HttpAggregatorInitializer(boolean isClient) {
this.isClient = isClient;
}
@Override
protected void initChannel(Channel ch) throws Exception {
ChannelPipeline pipeline = ch.pipeline();
if (isClient) {
pipeline.addLast("codec", new HttpClientCodec()); //1
pipeline.addLast("decompressor",new HttpContentDecompressor()); //2
} else {
pipeline.addLast("codec", new HttpServerCodec()); //3
pipeline.addLast("compressor",new HttpContentCompressor()); //4
}
}
}

HTTPS

http部分加上sslHandler就是https。不过本质上还是需要SslContext:

1
2
3
4
5
6
7
8
9
10
11
12
13
14
15
16
17
18
19
20
21
22
23
public class HttpsCodecInitializer extends ChannelInitializer<Channel> {

private final SslContext context;
private final boolean client;

public HttpsCodecInitializer(SslContext context, boolean client) {
this.context = context;
this.client = client;
}

@Override
protected void initChannel(Channel ch) throws Exception {
ChannelPipeline pipeline = ch.pipeline();
SSLEngine engine = context.newEngine(ch.alloc());
pipeline.addFirst("ssl", new SslHandler(engine)); //1

if (client) {
pipeline.addLast("codec", new HttpClientCodec()); //2
} else {
pipeline.addLast("codec", new HttpServerCodec()); //3
}
}
}

WebSocket

http仅让客户端向服务端请求数据,服务端无法主动推数据给客户端。一种解决方案是让客户端轮询,另一种解决方案是WebSocket
WebSocket的话,底层是tcp双向连接,服务端可以主动发消息给客户端。

WebSocket帧类型

三种数据帧:

1
2
3
BinaryWebSocketFrame: 二进制;
TextWebSocketFrame: 文本;
ContunuationWebSocketFrame: 后续数据;

三种控制帧:

1
2
3
PingWebSocketFrame: ping,对方会回pong;
PongWebSocketFrame: pong;
CloseWebSocketFrame: 关闭。

服务端示例:

1
2
3
4
5
6
7
8
9
10
11
12
13
14
15
16
17
18
19
20
21
22
23
24
25
26
27
28
29
30
31
32
33
34
35
36
37
38
39
40
41
42
43
44
public class WebSocketServerInitializer extends ChannelInitializer<Channel> {
@Override
protected void initChannel(Channel ch) throws Exception {
ch.pipeline().addLast(
new HttpServerCodec(),
//为握手提供聚合的 HttpRequest
new HttpObjectAggregator(65536),
//如果被请求的端点是"/websocket",则处理该升级握手
new WebSocketServerProtocolHandler("/websocket"),
//TextFrameHandler 处理 TextWebSocketFrame
new TextFrameHandler(),
//BinaryFrameHandler 处理 BinaryWebSocketFrame
new BinaryFrameHandler(),
//ContinuationFrameHandler 处理 ContinuationWebSocketFrame
new ContinuationFrameHandler());
}

public static final class TextFrameHandler extends
SimpleChannelInboundHandler<TextWebSocketFrame> {
@Override
public void channelRead0(ChannelHandlerContext ctx,
TextWebSocketFrame msg) throws Exception {
// Handle text frame
}
}

public static final class BinaryFrameHandler extends
SimpleChannelInboundHandler<BinaryWebSocketFrame> {
@Override
public void channelRead0(ChannelHandlerContext ctx,
BinaryWebSocketFrame msg) throws Exception {
// Handle binary frame
}
}

public static final class ContinuationFrameHandler extends
SimpleChannelInboundHandler<ContinuationWebSocketFrame> {
@Override
public void channelRead0(ChannelHandlerContext ctx,
ContinuationWebSocketFrame msg) throws Exception {
// Handle continuation frame
}
}
}

空闲事件、超时事件

WebSocket协议中多了几种事件:

触发时机 事件 处理方法 预置handler
空闲时间超过配置 IdleStateEvent userEventTriggered() IdleStateHandler
指定时间间隔内没有收到入站数据 ReadTimeoutException exceptionCaught() ReadTimeoutHandler
指定时间间隔内没有出站数据 WriteTimeoutException exceptionCaught() WriteTimeoutHandler

具体使用方法:

  1. 注册预置的handler,截获对应的事件;(IdleStateHandler,ReadTimeoutHandler,WriteTimeoutHandler)
  2. 实现一个自定义handler注册到pipeline,处理对应的事件。

空闲事件示例:

  1. 注册IdleStateHandler,负责截获空闲事件,它会调用fireUserEventTriggered方法,触发userEvent事件;
  2. 实现自定义handler,处理userEvent:一种可能的处理逻辑是进行心跳检测,检测到是空闲事件就发送心跳,发送失败就关闭连接; 如果不是空闲事件,则抛出去,让下一级处理。
    1
    2
    3
    4
    5
    6
    7
    8
    9
    10
    11
    12
    13
    14
    15
    16
    17
    18
    19
    20
    21
    22
    23
    24
    25
    26
    27
    28
    29
    30
    31
    32
    33
    34
    public class IdleStateHandlerInitializer extends ChannelInitializer<Channel>
    {
    @Override
    protected void initChannel(Channel ch) throws Exception {
    ChannelPipeline pipeline = ch.pipeline();
    pipeline.addLast(
    //(1)IdleStateHandler 将在被触发时发送一个IdleStateEvent事件:
    new IdleStateHandler(0, 0, 60, TimeUnit.SECONDS));
    //(2)将一个HeartbeatHandler添加到ChannelPipeline中:
    pipeline.addLast(new HeartbeatHandler());
    }

    //(3)实现userEventTriggered()方法以发送心跳消息:
    public static final class HeartbeatHandler
    extends ChannelInboundHandlerAdapter {
    //发送到远程节点的心跳消息
    private static final ByteBuf HEARTBEAT_SEQUENCE =
    Unpooled.unreleasableBuffer(Unpooled.copiedBuffer(
    "HEARTBEAT", CharsetUtil.ISO_8859_1));
    @Override
    public void userEventTriggered(ChannelHandlerContext ctx,
    Object evt) throws Exception {
    //(4)发送心跳消息,并在发送失败时关闭该连接
    if (evt instanceof IdleStateEvent) {
    ctx.writeAndFlush(HEARTBEAT_SEQUENCE.duplicate())
    .addListener(
    ChannelFutureListener.CLOSE_ON_FAILURE);
    } else {
    //若不是IdleStateEvent事件,所以将它传递给下一个ChannelInboundHandler
    super.userEventTriggered(ctx, evt);
    }
    }
    }
    }

工具:解决粘包和半包(数据帧的划分问题)

netty主要是字节流层传输,并不关心应用层对数据的划分(并不关心帧是如何划分的)。
但是netty提供了很多帮助分隔帧的工具类,来解决粘包和半包的问题。
数据帧的划分问题一般有三种解决方案:

  1. 定长帧;
  2. 指定分隔符;
  3. head-body结构,header中规定body长度。(HTTP)比较灵活,比较常见。

指定分隔符

相关工具类: DelimitedBasedFrameDecoder,LineBasedFrameDecoder

定长帧

相关工具类: FixedLengthFrameDecoder

head-body结构

相关工具类: LengthFieldBasedFrameDecoder

高级特性: 写大文件(或大数据)

两种实现:

  1. 直接写文件: FileRegion;
  2. 借助预置实现:ChunkedWriteHandler

FileReion

直接在channel中写入FileRegion即可:(还可以用ChannelProgressivePromise来获取传输进度)

1
2
3
4
5
6
7
8
9
10
11
12
13
14
15
16
17
FileInputStream in = new FileInputStream(file);
//以该文件的完整长度创建一个新的 DefaultFileRegion
FileRegion region = new DefaultFileRegion(
in.getChannel(), 0, file.length());
//发送该 DefaultFileRegion,并注册一个 ChannelFutureListener
channel.writeAndFlush(region).addListener(
new ChannelFutureListener() {
@Override
public void operationComplete(ChannelFuture future)
throws Exception {
if (!future.isSuccess()) {
//处理失败
Throwable cause = future.cause();
// Do something
}
}
});

ChunkedWriterHandler

数据流是:
数据源=>ChunkedInput=>自定义的StreamHandler=>ChunkedWriteHandler=>出站

其中ChunkedInput有4种实现:

实现名称 数据源 备注
ChunkedFile 文件 当平台不支持零拷贝,或需要转换数据时使用
ChunkedNioFile 文件 使用FileChannel
ChunkedStream InputStream
ChunkedNioStream ReadableByteChannel

示例代码:

1
2
3
4
5
6
7
8
9
10
11
12
13
14
15
16
17
18
19
20
21
22
@Override
protected void initChannel(Channel ch) throws Exception {
ChannelPipeline pipeline = ch.pipeline();
//将 SslHandler 添加到 ChannelPipeline 中
pipeline.addLast(new SslHandler(sslCtx.newEngine(ch.alloc())));
//添加 ChunkedWriteHandler 以处理作为 ChunkedInput 传入的数据
pipeline.addLast(new ChunkedWriteHandler());
//一旦连接建立,WriteStreamHandler 就开始写文件数据
pipeline.addLast(new WriteStreamHandler());
}

public final class WriteStreamHandler
extends ChannelInboundHandlerAdapter {
@Override
//当连接建立时,channelActive() 方法将使用 ChunkedInput 写文件数据
public void channelActive(ChannelHandlerContext ctx)
throws Exception {
super.channelActive(ctx);
ctx.writeAndFlush(
new ChunkedStream(new FileInputStream(file))); // ChunkedStream => ChunkedInput
}
}

序列化数据

这里介绍3种方法:

  1. JDK的ObjectOutputStream;
  2. JBoss marshalling;
  3. Protocol buffers.

    JDK序列化

    只要实现了Serializable接口的对象,就可以使用ObjectOutputStream
    示例代码:
    1
    2
    3
    4
    FileOutputStream fos = new FileOutputStream("t.tmp");
    ObjectOutputStream oos = new ObjectOutputStream(fos);
    oos.writeObject(new Date());
    oos.close();

Netty提供的速度优化:
ObjectInputStream =>ObjectDecoder
ObjectOutputStream=>ObjectEncoder

JBoss Marshalling序列化

比JDK序列化快3倍。
MarshallingDecoder
MarshallingEncoder

示例代码:

1
2
3
4
5
6
7
8
9
10
11
12
13
14
15
16
17
18
19
20
21
22
23
24
25
26
27
28
29
30
31
32
public class MarshallingInitializer extends ChannelInitializer<Channel> {
private final MarshallerProvider marshallerProvider;
private final UnmarshallerProvider unmarshallerProvider;

public MarshallingInitializer(
UnmarshallerProvider unmarshallerProvider,
MarshallerProvider marshallerProvider) {
this.marshallerProvider = marshallerProvider;
this.unmarshallerProvider = unmarshallerProvider;
}

@Override
protected void initChannel(Channel channel) throws Exception {
ChannelPipeline pipeline = channel.pipeline();
//添加 MarshallingDecoder 以将 ByteBuf 转换为 POJO
pipeline.addLast(new MarshallingDecoder(unmarshallerProvider));
//添加 MarshallingEncoder 以将POJO 转换为 ByteBuf
pipeline.addLast(new MarshallingEncoder(marshallerProvider));
//添加 ObjectHandler,以处理普通的实现了Serializable 接口的 POJO
pipeline.addLast(new ObjectHandler());
}

public static final class ObjectHandler
extends SimpleChannelInboundHandler<Serializable> {
@Override
public void channelRead0(
ChannelHandlerContext channelHandlerContext,
Serializable serializable) throws Exception {
// Do something
}
}
}

其中provider的创建代码:

1
2
3
4
5
6
7
8
9
10
11
12
13
14
15
public static MarshallingDecoder buildMarshallingDecoder() {
//首先通过Marshalling工具类的getProvidedMarshallerFactory静态方法获取MarshallerFactory实例
//参数“serial”表示创建的是Java序列化工厂对象,它由jboss-marshalling-serial-1.3.0.CR9.jar提供。
final MarshallerFactory marshallerFactory = Marshalling.getProvidedMarshallerFactory("serial");
//创建了MarshallingConfiguration对象
final MarshallingConfiguration configuration = new MarshallingConfiguration();
//将它的版本号设置为5
configuration.setVersion(5);
//然后根据MarshallerFactory和MarshallingConfiguration创建UnmarshallerProvider实例
UnmarshallerProvider provider = new DefaultUnmarshallerProvider(marshallerFactory, configuration);
//最后通过构造函数创建Netty的MarshallingDecoder对象
//它有两个参数,分别是UnmarshallerProvider和单个消息序列化后的最大长度。
MarshallingDecoder decoder = new MarshallingDecoder(provider, 1024);
return decoder;
}

Protocol Buffer序列化

google的序列化方案。
主要是4个类:

1
2
3
4
5
6
// 解码:
ProtobufVarint32FrameDecoder: bytes=>msg; 解析出头部的长度字段,以正确划分帧;
ProtobufDecoder: msg=>msg;
// 编码:
ProtobufVarint32LengthFieldPrepender: msg=>bytes; 头部添加长度字段.
ProtobufEncoder: msg=>msg.

示例代码:
服务端:

1
2
3
4
5
6
7
8
9
10
11
12
.childHandler(new ChannelInitializer<SocketChannel>() {
@Override
protected void initChannel(SocketChannel ch) throws Exception {
ch.pipeline()
.addLast(new ProtobufVarint32FrameDecoder())
.addLast(new ProtobufDecoder(
ProtoObject.Req.getDefaultInstance()))
.addLast(new ProtobufVarint32LengthFieldPrepender())
.addLast(new ProtobufEncoder())
.addLast(new ServerHandler());
}
})

客户端:

1
2
3
4
5
6
7
8
9
10
11
12
.childHandler(new ChannelInitializer<SocketChannel>() {
@Override
protected void initChannel(SocketChannel ch) throws Exception {
ch.pipeline()
.addLast(new ProtobufVarint32FrameDecoder())
.addLast(new ProtobufDecoder(
ProtoObject.Resp.getDefaultInstance()))
.addLast(new ProtobufVarint32LengthFieldPrepender())
.addLast(new ProtobufEncoder())
.addLast(new ClientHandler());
}
})

ProtobufDecoder实际上可以接受MessageLite或者Builder
MessageMessageLite的子接口,因此可以用Message代替MessageLite。(基类指针存放子类对象)

1
public interface Message extends MessageLite, MessageOrBuilder {...}

通俗理解SSL/TLS协议区别与原理

区别(历史)

TLS 1.0又被叫做SSL 3.1
换算关系:

1
2
3
TLS 1.0 = SSL 3.1
TLS 1.1 = SSL 3.2
TLS 1.2 = SSL 3.3

综上,简单说,它们的区别只是版本更迭而已。
展开说的话,历史:

1994年,NetScape公司设计了SSL协议(Secure Sockets Layer)的1.0版,但是未发布。
1995年,NetScape公司发布SSL 2.0版,很快发现有严重漏洞。
1996年,SSL 3.0版问世,得到大规模应用。
1999年,互联网标准化组织ISOC接替NetScape公司,发布了SSL的升级版TLS 1.0版。
2006年和2008年,TLS 1.1版和TLS 1.2版发布。(TLS1.2已经获得主流浏览器支持)
2008年8月,TLS 1.3版发布,性能好。移除了很多东西,速度快了很多,少了一次握手。

TLS1.2: 兼容性高;握手需要2RTT;(重连需要1RTT)
TLS1.3: 安全、性能高;握手需要1RTT;(重连需要0RTT)

综上,可以先用TLS 1.2获得最大的兼容性。

原理

和以前莉姐课上说的PGP协议差不多,都是三板斧:摘要、非对称加密、对称加密。

要解决的问题

1. 窃听。解决方案:加密
2. 篡改。解决方案:摘要 (解决数据完整性)
3. 冒充。解决方案:数字签名 (解决中间人攻击)

架构

ISO七层协议:
TCP : 传输层
TLS : 会话层
表示层略
HTTP: 应用层
TLS+HTTP=>HTTPS

所以是先进行3次握手建立TCP,然后4次握手建立TLS,然后进行HTTP数据传输。

如果在TCP层抓包的话,里头是TLS加密过的数据。(中间人无法知道内容)
如果在HTTP层(应用层)收取数据的话,是已经解密过的明文。(但是中间人不太可能在应用层,除非已经嵌入到业务层代码了。)

这个分层架构的划分其实不太合理,quic重新做了分层,详见:
http://xiaoyue26.github.io/2022/02/17/2022-02/http3-quic%E4%BC%98%E7%BC%BA%E7%82%B9%E5%8F%8A%E5%8E%9F%E5%9B%A0/

简化版加密通信

假设用三个算法做一下加密通信,可以怎么实现呢?
定义如下:
RSA: 一种非对称加密算法
AES: 一种对称加密算法
SHA1: 一种摘要算法

方案1:AES(K,data)

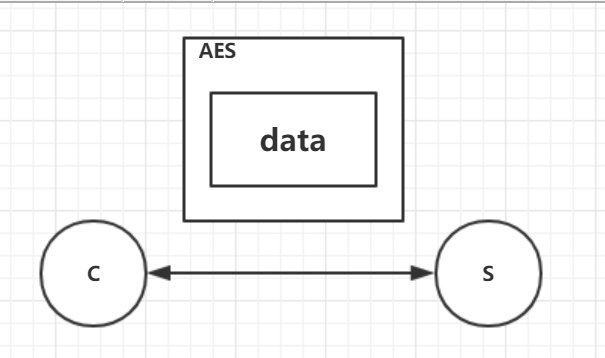
假如客户端是C,服务端是SCS要传输的数据data
直接传明文肯定是不行,可以加密一下。用一个密钥K,加密成AES(K,data)
这里为啥用AES呢,不用RSA呢,因为非对称加密(RSA)太慢了。

  • 问题:
    虽然别人不知道你俩传输了啥,但是可能悄悄得在中间篡改了数据,双方察觉不到。
  • 解决方案:
    加上摘要算法。

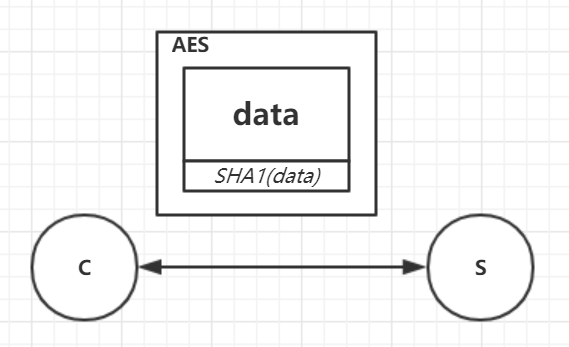
方案2:AES(K,data+SHA1(data))

可以在数据后面加上数据的摘要,然后再加密,这样中间人一旦乱改东西马上就会被检测出来,类似于校验位。

  • 问题:
    上述方案都有一个前提,就是通信双方使用同一个K进行加解密。
    那么一开始的时候怎么约定、协商这个密钥K呢?
  • 解决方案:
    先用RSA协商出一个对称密钥K。

协商密钥

最安全的方法当然是线下见面,约定一个密钥K。但是这个通信效率太低了,并发也不高。
为了避免中间人攻击,这个问题的关键点在于确认对方的身份。对于CS架构来说,最关键的是客户端确认服务端的身份。因此一个很自然的思路是让每个服务端有自己的身份证。

计算机领域的话,身份证就是数字证书,颁发身份证的机构就是CA。
具体原理就是非对称加密:
服务端通过数字签名向客户端证明自己的身份,客户端定义一个对称密钥K,然后用服务端的公钥加密一下发给服务端,因为只有服务端能用私钥解开,因此协商密钥的过程是安全的。(即使别人截获到也没关系)

相关原理:

对称加密:

加密时候用密钥K,解密时候也用密钥K,是对称的,因此叫对称加密。

非对称加密:

加密时候用公钥K1,解密时候用私钥K2,不是同一个密钥,不对称,因此叫非对称加密。
msg = RSA(K1,data);
data = RSA(K2,msg)

也就是说,把数据用K1加密一下,可以且仅可以用K2解开;反之用K2加密消息,也可以且仅可以用K1解开,这个特性就很厉害了,正好可以用于身份认证的需求。

回到刚才的需求,需要有一种数字证书的机制。
简单实现就是服务端先去CA申请一对密钥(K1,K2),他选K1作为公钥,另一个K2作为私钥。
当他需要向别人证明自己的身份的时候,他用私钥加密一下消息发给客户端(RSA(K2,data),数字签名)。客户端可以用公钥K1解开消息,确认他的身份。客户端可以用公钥K1加密一份数据发出去,这份数据也就服务端能解开,因为只有服务端有私钥K2。

总结:

数字签名: RSA(私钥K2,data)
加密一份只有指定人能解开的数据: RSA(公钥K1,data)。

这个过程中客户端如何得到公钥K1呢?
可以由服务端发给客户端数字证书,证书由CA签名证明服务端的公钥确实是K1。

客户端是因为信任CA,所以信任CA作保的服务端公钥K1,所以才可以用K1验证服务端的数字签名。(信任传递)
也就是说即使是网络世界,也还是需要签发证书的机构的。类似于一种官方机构。如果没有这种信任的基础,匿名的网络世界是很难建立起互信机制的。

TLS组成部分

握手协议+记录协议

1。握手协议包括:

  • 握手:证书认证、协商算法和密钥;
  • 密码规格变更协议:v1.3删除了;
  • 警告协议: 错误的时候通知对方;
  • 应用数据协议: 传输数据协议;
    2。记录协议:负责使用对称密码对消息进行加密;

TLS运行流程

简单地说就是2个步骤:先协商一个密钥,之后的通信就用这个密钥加密数据。
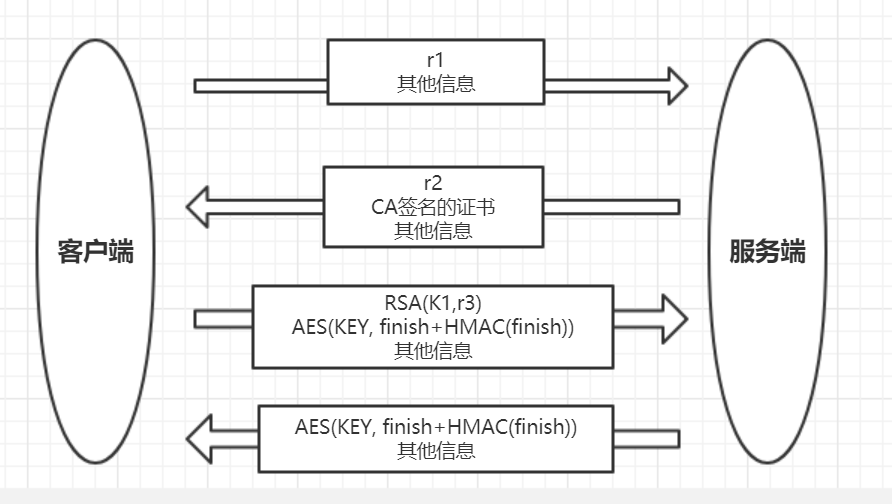
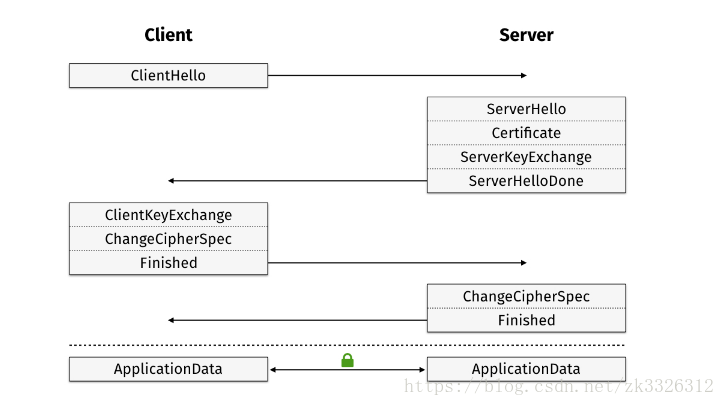
TLS 1.2:
协商: 4次握手,协商出一个对称加密的密钥K;
通信:双方用K加密数据以后通信。

如上图所示,这4次握手就是想要协商出一个对称加密的密钥KEY,以及摘要算法的密钥。
图中的变量定义:

1
2
3
4
5
6
7
r1: 随机数1;
r2: 随机数2;
r3: 随机数3;
AES(KEY,data): 密钥是KEY,对称加密data;
RSA(K1,data): 密钥是K1, 非对称加密data;
finish: finish信息
HMAC(data): 用HMAC算法对data做摘要(key省略了)。

其中对称加密的KEY是根据3个随机数r1,r2,r3生成出来的。之所以需要这么多随机数,是为了保证这个KEY的随机性。

具体展开来说的话4次握手:
1.客户端=>服务端:

(1)随机数r1;
(2)客户端支持的协议版本、算法版本;

2.服务端=>客户端:

(1)随机数r2;
(2)确定用的协议、算法版本;
(3)CA签名的证书(里面有服务器公钥K1);
(4)服务端数字签名。

3.客户端=>服务端: 先确认服务端的身份、生成r3, 生成对称加密的key,然后发送数据:

(1)用服务器公钥K1非对称加密后的随机数r3;
(2)对称加密过的finish信息以及摘要。
(此时客户端已经有了r1,r2,r3,可以生成对称加密密钥key)

4.服务端=>客户端: 先解开非对称加密的数据,得到r3,然后生成对称加密的key,然后解开finish信息,发现确实能用,也就是客户端进行的对称加密是符合预期的,然后发送:

(1)对称加密过的server finish信息以及摘要。

如果客户端和服务端都能对Finish信息进行正常加解密且消息正确的被验证,则说明握手通道已经建立成功,接下来,双方可以进行对称加密的数据传输了。

几个小细节

  1. 上面的HMAC摘要算法也是有key的,而且也是由r1,r2,r3算出来的;
  2. 大部分时候只需要认证服务端身份(http),有时候也需要认证客户端身份,这个时候就需要客户端也有CA证书。
  3. 实际代码实现中,三个随机数都是有名字的:
    1
    2
    3
    r1: 随机数1; => random_C(random number)
    r2: 随机数2; => random_S(random number)
    r3: 随机数3; => pre-master key(random number)
    r3是关键的加密保护的随机数,r1,r2,r3一起生成key。
    r1,r2的主要用途是为了避免中间人攻击、重放攻击。(用摘要确保r1,r2无篡改,然后又是随机数的话,就不会因为是重复的key被碰撞到相同的r3,从而生成相同的key)
    此外其他术语也略有不同:

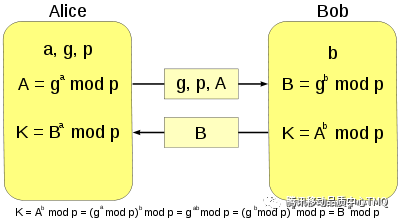
DH密钥交换算法(怎么用3个随机数算出密钥)

如上图所示:
客户端计算密钥:

1
2
A= g^a mod p 
K = B^a mod p

服务端计算密钥: b

1
2
B = g^b mod p
K = A^b mod p

同模推导:

1
2
3
4
5
K = A^b mod p 
= (g^a mod p) ^ b mod p
= g^ab mod p
= (g^b mod p ) ^ a mod p
= B^a mod p

三个随机数中,有一个是本地随机生成的,不用网络传输;
(对于服务端来说是a,客户端是b,而网络传输的是A和B,因此中间人进行反向破解难度大)
由于网络上传输的只是p,g和A,B,难以破解出a,b,因此中间人也难以破解出K。

tls1.2实际加密方式

实际上加密算法是需要padding的,最早的padding方法是:
AES(text+MAC(text)+padding)
后来因为这种方式容易遭遇padding攻击,因此tls1.3采用了更安全的padding方法:
E=AES(text+padding)
然后: E+MAC(E)

padding攻击,通过反复修改部分内容、并触发解密过程,从而探测猜测加密算法的密钥;

tls1.3的前向安全性

前向安全: 当前会话的密钥泄露后,不能用来解密以前会话的消息,也就是不影响以前会话的安全性。
例如如果每次会话都用ECDHE协商新的密钥,这次会话的密钥无法用于以前的会话解密,则可以达到前向安全性。

Ephemeral Secret (ES):每个连接新鲜的 ECDHE 协商得出的值。凡是从 ES 得出的值,都是前向安全的(当然,在 PSK only模式下,不是前向安全的)。
Static Secret (SS):从静态,或者半静态key得出的值。例如psk,或者服务器的半静态 ECDH 公钥。

如果用Session ticket或者server config机制来实现0RTT的快速建立连接,本质上是客户端缓存了一部分上次建连的密钥信息;
因此tls1.3虽然提高了性能,但是牺牲了一定时间(配置过期时间内)的前向安全性。

可能的优化

TLS1.2的4次握手可以优化成近似3次握手。
因此协商过程中唯一不会被中间人破译的是客户端第三次握手发送的随机数r3,只要确保这一性质即可。这个r3之所以不会被破译,是因为是用服务端公钥加密的,只有服务端私钥能解开。
因此如果客户端事先知道服务端的公钥,可以在第一次握手的时候,就发送由服务端公钥加密的r3。(对于以前曾经通信过的服务端,这一前提是可行的)

因此整个流程就是:
1.客户端=>服务端:
(1)r1; //防重放
(2)RSA(K1,r3+hash(r3)); //可以把自己支持的所有协议的随机数都算好,加密好。
(3)支持的协议、算法;
2.服务端=>客户端:
(1)RSA(对r1的回应),顺便签名证明自己的身份,也消除了重放攻击;
(2)r2; 明文即可
(3)确定的协议、算法;
(4)AES(Key,finish信息+HMAC(finish信息)); // 客户端知道上述两个信息,就能算出对称加密的key了。

3.客户端=>服务端: AES(Key,finish信息+HMAC(finish信息))

TLS 1.3实际的优化

回顾TLS1.2:
第1个RTT:协商用什么协议,client hello + server hello;
第2个RTT:协商对应协议下,用什么随机数,client key exchange + server key exchange;

TLS1.3的选择:
牺牲兼容性,去掉第一次rtt的密钥协议协商,直接按自己选择的成熟安全的密钥套件生成对应参数,然后发送给服务端;
如果失败,再走HelloRetryRequest。
因此Tls1.3只需要1RTT就可以建连。(第二次建立是甚至0RTT,连协商过程都省了,直接告诉服务器用上次的密钥)

参考链接:
https://www.cnblogs.com/lovesong/p/5186200.html
https://blog.soaer.com/1/3eac1f9d9045410fb249dbc81cff6b22.html
http://www.ruanyifeng.com/blog/2014/02/ssl_tls.html

Netty in action-第十章-编解码器-笔记

编码器: encoder , 出站handler;
解码器: decoder, 入站handler。

用途包括:
POP3,IMAP,SMTP协议。(邮件服务器)

资源管理

编码器和解码器的消息被消费后,会自动调用ReferenceCountUtil.release(message)进行释放。
如果要阻止这种自动释放,可以显式调用ReferenceCountUtil.retain(message)保留消息。(后续再自己手动释放)

解码器

两种:
1.字节=>消息:ByteToMessageDecoder,ReplayingDecoder;
2.消息=>消息:MessageToMessageDecoder。(不需要检查readableBytes)

解码器包括:

1
2
3
4
5
6
7
// 1.字节=>消息: (解码)
ByteToMessageDecoder: 抽象类;
LineBasedFrameDecoder: 行分割消息数据, 实际类。
HttpObjectDecoder: Http数据解析。抽象类。
// 2.消息=>消息: (格式转换)
MessageToMessageDecoder: 消息=>消息;
HttpObjectAggregator: Http数据转换。实际类。

相应的声明:

1
2
3
4
5
6
7
public class LineBasedFrameDecoder extends ByteToMessageDecoder;

public abstract class HttpObjectDecoder extends ByteToMessageDecoder;

public class HttpObjectAggregator extends MessageAggregator<HttpObject, HttpMessage, HttpContent, FullHttpMessage>;

public abstract class MessageAggregator<I, S, C extends ByteBufHolder, O extends ByteBufHolder> extends MessageToMessageDecoder<I>;

ByteToMessageDecoder(抽象类)

处理流程是字节=>消息,也就是ByteBuf in=>List<Object>out
需要注意每次从in读之前,需要确认可读字节数量:in.readableBytes()
具体代码:

1
2
3
4
5
6
7
8
9
10
11
12
public class ToIntegerDecoder extends ByteToMessageDecoder {
@Override
public void decode(ChannelHandlerContext ctx
,ByteBuf in // 1.输入
,List<Object> out) // 2.输出
throws Exception {
//检查是否至少有 4 字节可读(一个 int 的字节长度)
if (in.readableBytes() >= 4) {
out.add(in.readInt());
}
}
}

ByteToMessageDecoder有俩api:

1
2
decode:     必须实现,解析每条消息;
decodeLast: 可选,处理最后一条消息,默认是调用decode。

ReplayingDecoder(抽象类)(尽量不用)

使用上比ByteToMessageDecoder省略readableBytes的调用,但是速度稍慢。

1
2
3
4
5
6
7
8
9
public class ToIntegerDecoder2 extends ReplayingDecoder<Void> {
@Override
public void decode(ChannelHandlerContext ctx, ByteBuf in,
//传入的 ByteBuf 是 ReplayingDecoderByteBuf
List<Object> out) throws Exception {
//从入站 ByteBuf 中读取 一个 int,并将其添加到解码消息的 List 中
out.add(in.readInt());
}
}

尽可能使用ByteToMessageDecoder而不是ReplaingDecoder
两个原因:

  1. ReplaingDecoder比较慢;
  2. 内部用的是ReplayingDecoderByteBuf,并没有支持所有ByteBuf的操作。(api不全)

MessageToMessageDecoder(抽象类)

消息=>消息。
如果声明是MessageToMessageDecoder<Integer>,那么输入就是Integer类型。
具体签名是:

1
2
public abstract class MessageToMessageDecoder<I>
extends ChannelInboundHandlerAdapter

实际案例:

1
2
3
4
5
6
7
8
9
10
public class IntegerToStringDecoder extends
MessageToMessageDecoder<Integer> {
@Override
public void decode(ChannelHandlerContext ctx
, Integer msg // 1.输入
, List<Object> out // 2.输出
) throws Exception {
out.add(String.valueOf(msg));
}
}

可以发现这种消息转换不需要检查readableBytes。(毕竟输入已经不是byte了)

TooLongFrameException类

解码前,解码器会缓冲大量的数据。如果发现缓冲太多,可以抛出异常来报告这种情况:

1
2
3
4
5
6
7
8
9
10
11
12
public class SafeByteToMessageDecoder extends ByteToMessageDecoder {
private static final int MAX_FRAME_SIZE = 1024;
@Override
public void decode(ChannelHandlerContext ctx, ByteBuf in,
List<Object> out) throws Exception {
int readable = in.readableBytes();
if (readable > MAX_FRAME_SIZE) {
in.skipBytes(readable); // 一种可能的处理
throw new TooLongFrameException("Frame too big!");// 抛出异常
}
}
}

抛异常的用意:
1.可能是上游生产太快,因此需要识别这种情况;
2.可能是下游消费太慢,也需要识别这种情况。

后续可以用exceptionCaught来捕获这个异常,可能的处理包括:
1.向生产端返回一个特殊的响应;
如HTTP:
413 错误 – 请求实体太大 (Request entity too large)
414 错误 – 请求 URI 过长 (Request URI too long)
2.关闭对应的连接。
3.其他处理方案。

编码器

两种:
1.消息=>字节:MessageToByteEncoder;
2.消息=>消息:MessageToMessageEncoder。
// 主要是入站出站方向不同,不然和前面的消息转换差不多。

编码器包括:

1
2
3
4
MessageToByteEncoder<I>: 消息=>字节
MessageToMessageEncoder: 消息=>消息
Websocket08FrameEncoder: 消息=>消息
ProtobufEncoder: 消息=>消息

具体代码:

1
2
3
4
5
6
7
8
9
10
public class IntegerToStringEncoder
extends MessageToMessageEncoder<Integer> {
@Override
public void encode(ChannelHandlerContext ctx
, Integer msg // 1.输入
, List<Object> out // 2.输出
) throws Exception {
out.add(String.valueOf(msg));
}
}

解码器:decode,decodeLast
编码器:encode

编解码器(编码器+解码器复合)

编解码复合,也有两种:

  1. 字节<=>消息: ByteToMessageCodec;
  2. 消息<=>消息: MessageToMessageCodec.

可以发现就是多了一个Codec后缀。

ByteToMessageCodec(抽象类)

ByteToMessageCodec的方法就是把编码器和解码器的api都加上:

1
2
3
decode(ctx,ByteBuf in,List<Object>out)
decodeLast(ctx,ByteBuf in,List<Object>out)
encode(ctx,I msg,ByteBuf out)

MessageToMessageCodec(抽象类)

这是一个参数化的类,声明如下;

1
2
public abstract class MessageToMessageCodec<INBOUND_IN, OUTBOUND_IN> extends ChannelDuplexHandler
public class ChannelDuplexHandler extends ChannelInboundHandlerAdapter implements ChannelOutboundHandler

看到这里大致可以发现一个规律,这些编码器、解码器最重要的是定义输入数据的数据类型,而输出数据的数据类型一般都是List<Object>
MessageToMessageCodec本质上是一个可以处理入站事件和出站事件的handler,因此需要定义入站和出站的数据类型:

1
2
INBOUND_IN:  入站数据参数的数据类型
OUTBOUND_IN: 出站数据参数的数据类型

它的两个接口:

1
2
3
4
5
6
7
8
9
protected abstract void encode(ChannelHandlerContext ctx
, OUTBOUND_IN msg -- 输入
, List<Object> out) -- 输出,实际上一般会是INBOUND_IN类型
throws Exception;

protected abstract void decode(ChannelHandlerContext ctx
, INBOUND_IN msg -- 输入
, List<Object> out) -- 输出,实际上一般会是OUTBOUND_IN类型
throws Exception;

CombinedChannelDuplexHandler类

编解码器是从头写一个,实现双向转换。
CombinedChannelDuplexHandler是从已经写好的编码器和解码器,生成一个双向转换的封装类。
声明:

1
2
3
public class CombinedChannelDuplexHandler<I extends ChannelInboundHandler
, O extends ChannelOutboundHandler>
extends ChannelDuplexHandler {

传入两个类,I是inbound,O是outbound。具体样例如下:

1
2
3
4
5
6
7
public class CombinedByteCharCodec extends
CombinedChannelDuplexHandler<ByteToCharDecoder, CharToByteEncoder> {
public CombinedByteCharCodec() {
//将委托实例传递给父类
super(new ByteToCharDecoder(), new CharToByteEncoder());
}
}

传进来后调用父类默认写好的构造函数即可。

个人理解编解码器和DuplexHandler类都是高级用法,不一定实用。
个人偏好直接使用编码器、解码器就好了。

Netty in action第九章-单元测试-笔记

EmbeddedChannel(测试Handler)

实际应用中,我们大概率需要编写各种inboundHandler,outboundHandler,这个时候可以使用EmbeddedChannel来测试处理逻辑。
(测Handler用的)

api 作用
writeInbound 往测试channel里写数据.测试入站事件。如果这条数据能够通过所有InboundHandler,则返回true
writeOutbound 往测试channel里写数据.测试出站事件。如果这条数据能够通过所有OutboundHandler,则返回true
readInbound 读入站消息,无则返回null
readOutbound 读出站消息,无则返回null
finish 关闭写。还可以读。

示例代码:

1
2
3
4
5
6
7
8
9
10
11
12
13
14
15
16
17
18
19
20
21
22
23
24
25
26
27
28
29
30
@Test
public void testFramesDecoded() {
//创建一个 ByteBuf,并存储 9 字节
ByteBuf buf = Unpooled.buffer();
for (int i = 0; i < 9; i++) {
buf.writeByte(i);
}
ByteBuf input = buf.duplicate(); // 1
EmbeddedChannel channel = new EmbeddedChannel(
new FixedLengthFrameDecoder(3));

assertTrue(channel.writeInbound(input.retain())); // 2. 数据量够,能够传到末端
assertTrue(channel.finish()); // 3. 还有可读数据,返回true

// 读3帧(3个入站消息):
ByteBuf read = (ByteBuf) channel.readInbound();
assertEquals(buf.readSlice(3), read); // 4
read.release(); // 5

read = (ByteBuf) channel.readInbound();
assertEquals(buf.readSlice(3), read);
read.release();

read = (ByteBuf) channel.readInbound();
assertEquals(buf.readSlice(3), read);
read.release();

assertNull(channel.readInbound());
buf.release();
}

可以结合JUnit编写单元测试。
上述代码中标了几个要注意的地方:

  • 1.duplicate和copy:

    duplicate: 浅拷贝buf,生成input。数据是共享的,writerIndex和readerIndex是隔离的。
    copy: 深拷贝,数据和index都是隔离的。

  • 2.retain和release:

    retain: 引用计数器+1;
    release: 引用计数器-1。
    因为进行了浅拷贝,把引用传递给方法之前必须调一次retain
    (如果只是和父ByteBuf同生命周期范围,不传递,可以不调。大部分时候还是调一下为好。)
    最后使用结束记得要release。

  • 3.channel.finish():

    channel.finish():
    标记这个channel已经不能再写入数据了。(但是可以读)

  • 4.buf.readSlice(3);

    返回值类似于buf.slice(3), 但是有一个read前缀,说明这个方法调用结束后会增加readerIndex。(消费行为)
    作用是读出3个字节来。

  • 5.release:

    使用结束记得release。

上述代码是测试入站事件,所以样例用的是inbounddecoder
如果要测试出站事件,只要类似改成outboundencoder即可。

异常测试

除了出站入站事件,还可以测试异常捕捉(exceptionCaught)。

  • 如果写了exceptionCaught,期望的结果是测试中不能捕捉到异常;
  • 反之如果没写,期望的结果是测试中能捕捉到异常。

前者:期望不能捕捉到(被exceptionCaught处理了)

1
2
3
4
5
6
try {
channel.writeInbound(input.readBytes(4));
} catch (TooLongFrameException e) {
Assert.fail();// 期望不能抵达这里
}
}

后者:期望能捕捉到:

1
2
3
4
5
6
try {
channel.writeInbound(input.readBytes(4));
Assert.fail();// 期望不能抵达这里。
} catch (TooLongFrameException e) {
}
}

主要还是逻辑上的控制流测试。

Netty in action第八章-引导-笔记

AbstractBootstrap

引导: Bootstrapp
可以理解成一个对外的接口,可以把前面几章提到的内部组件封装起来,对外提供服务使用。

服务端: ServerBootstrap,一个父Channel创建多个子Channel;
客户端: Bootstrap,一个普通Channel用于所有网络通信。

BootstrapServerBootstrap都继承自AbstractBootstrap,具体声明如下:

1
2
3
4
5
public abstract class AbstractBootstrap<B extends AbstractBootstrap<B, C>, C extends Channel> implements Cloneable {}

public class Bootstrap extends AbstractBootstrap<Bootstrap, Channel> {}

public class ServerBootstrap extends AbstractBootstrap<ServerBootstrap, ServerChannel> {}
  1. 为什么语法看起来有点复杂呢?
  • 其实是为了配置类的接口能返回自身的类型的引用。
  1. 为什么需要这样呢? (配置类的接口能返回自身的类型的引用)
  • 根本目的是为了配置的时候实现流式语法糖,类似于builder的设计模式:
    1
    2
    3
    4
    5
    6
    7
    8
    9
    10
    bootstrap.group(group)
    .channel(NioSocketChannel.class)
    .handler(new SimpleChannelInboundHandler<ByteBuf>() {
    @Override
    protected void channelRead0(
    ChannelHandlerContext channelHandlerContext,
    ByteBuf byteBuf) throws Exception {
    System.out.println("Received data");
    }
    });

不理解的话,具体看接口就理解了。
两者继承自AbstractBootstrap的接口有两类。

第一类, 返回B的,参照上面的声明,这里的B类型其实就是自身的类型,具体映射如下:
Bootstrap: B=Bootstrap,C=Channel;
ServerBootstrap:B=ServerBootstrap,C=ServerChannel:
记住这个映射关系,就能看懂下面的源码了:(Netty4)

1
2
3
4
5
6
7
8
9
10
11
12
13
14
15
16
17
18
19
20
21
22
23
24
25
26
27
28
29
30
31
32
public B channel(Class<? extends C> channelClass) {// 设置Channel
if (channelClass == null) {
throw new NullPointerException("channelClass");
}
return channelFactory(new ReflectiveChannelFactory<C>(channelClass));
}
public B group(EventLoopGroup group);// 设置EventLoop实现
public B localAddress(SocketAddress localAddress) {// 设置本地地址
this.localAddress = localAddress;
return (B) this;
}
public B localAddress(String inetHost, int inetPort) {// 设置本地地址
return localAddress(SocketUtils.socketAddress(inetHost, inetPort));
}
public <T> B option(ChannelOption<T> option, T value) { // 设置全局ChannelOption
if (option == null) {
throw new NullPointerException("option");
}
if (value == null) {
synchronized (options) {
options.remove(option);
}
} else {
synchronized (options) {
options.put(option, value);
}
}
return (B) this;
}
public <T> B attr(AttributeKey<T> key, T value);// 设置Channel的属性,后文会具体提到

public B handler(ChannelHandler handler)// 设置添加到pipeline的handler

另一类接口是返回ChannelFuture的:

1
2
public ChannelFuture bind(); // 绑定channel
public ChannelFuture connect(); // 连接到远程节点

综上大致有两类接口:

  1. 进行全局配置;
  2. 进行具体action。

Bootstrap: 客户端/无连接服务端

Bootstrap一般用于客户端,也可以用于无连接协议的服务端。
程序员可以通过Bootstrap上的接口设置一些程序需要的组件具体实现是什么。

两种引导行为:
bind: (服务端) 绑定本地服务到某个端口, 然后创建一个Channel,准备接受连接;
connect: (客户端) 创建一个Channel,连接远端服务。

简单客户端:
要点:
配置: 必须配置好group,channel和handler, 然后connect
// channel或者channelFactory

1
2
3
4
5
6
7
8
9
10
11
12
13
14
15
16
17
18
19
20
21
22
23
24
25
26
27
28
29
30
31
public void bootstrap() {
//设置 EventLoopGroup,提供用于处理 Channel 事件的 EventLoop
EventLoopGroup group = new NioEventLoopGroup();
//创建一个Bootstrap类的实例以创建和连接新的客户端Channel
Bootstrap bootstrap = new Bootstrap();
bootstrap.group(group)
.channel(NioSocketChannel.class) // NIO
.handler(new SimpleChannelInboundHandler<ByteBuf>() {
@Override
protected void channelRead0(
ChannelHandlerContext channelHandlerContext,
ByteBuf byteBuf) throws Exception {
System.out.println("Received data");
}
});
//连接到远程主机
ChannelFuture future = bootstrap.connect(
new InetSocketAddress("xxx.com", 80));
future.addListener(new ChannelFutureListener() {
@Override
public void operationComplete(ChannelFuture channelFuture)
throws Exception {
if (channelFuture.isSuccess()) {
System.out.println("Connection established");
} else {
System.err.println("Connection attempt failed");
channelFuture.cause().printStackTrace();
}
}
});
}

ServerBootstrap: 服务端

ServerBootstrap比普通的Bootstrap多了几个接口:

1
2
3
childOption: 后续accept的子Channel的配置; // bind后生效
childAttr: 设置给 已经accept 的子Channel属性;
childHanlder: 设置给 已经accept 的子Channel的pipeline。

作为对比的三个接口:

1
2
3
option: 后续新建的serverChannel的配置; // bind后生效
attr: 设置给当前serverChannel的属性;
handler: 设置给当前serverChannel的pipeline。

容易混淆的就是Option用于配置固定的几个参数比如超时时间,Attr用于存自定义属性。

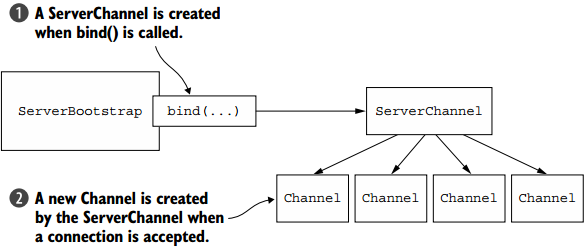
ServerChannel

accept新连接后,ServerChannel创建子Channel
// 子Channel代表已被接受的连接

工程过程:

  1. 调用bind,创建ServerChannel, 绑定到本地端口开始提供服务;
  2. 接受1个新连接, ServerChannel创建1个新的子Channel

简单服务端:
要点: 配置group,channel,childHandler,然后bind

1
2
3
4
5
6
7
8
9
10
11
12
13
14
15
16
17
18
19
20
21
22
23
24
25
26
27
28
29
30
31
32
/**
* 代码清单 8-4 引导服务器
* */
public void bootstrap() {
NioEventLoopGroup group = new NioEventLoopGroup();
ServerBootstrap bootstrap = new ServerBootstrap();
// 1. 设置:
bootstrap.group(group)
.channel(NioServerSocketChannel.class)
.childHandler(new SimpleChannelInboundHandler<ByteBuf>() {
@Override
protected void channelRead0(ChannelHandlerContext channelHandlerContext,
ByteBuf byteBuf) throws Exception {
System.out.println("Received data");
}
});
// 2. bind: 通过配置好的 ServerBootstrap 的实例绑定该 Channel
ChannelFuture future = bootstrap.bind(new InetSocketAddress(8080));
// 3. listener future:
future.addListener(new ChannelFutureListener() {
@Override
public void operationComplete(ChannelFuture channelFuture)
throws Exception {
if (channelFuture.isSuccess()) {
System.out.println("Server bound");
} else {
System.err.println("Bind attempt failed");
channelFuture.cause().printStackTrace();
}
}
});
}

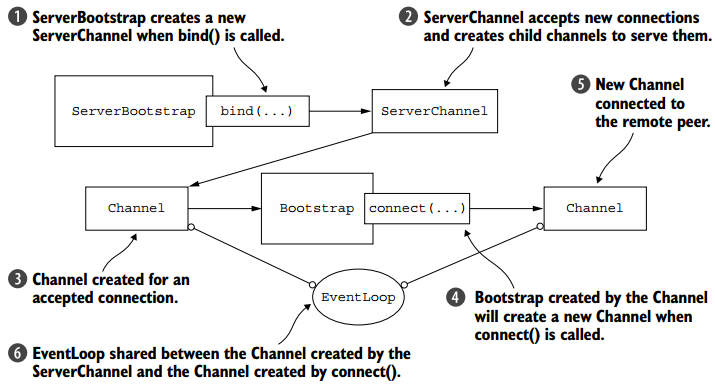
从Channel引导客户端(ServerBootstrap需要connect别的Server时)

假设我们有一个ServerBootstrap,提供服务,收到一个请求,发现需要另一个服务的帮助。(相当于我们需要提供代理)
两种解决方案:

  1. 再起一个Bootstrap,去connect另一个服务,获得结果再返回;
  2. 和1类似,稍有不同的时, 当前链路复用同一个EventLoop

方案2的优点:

  1. 避免创建额外的线程;
  2. 减少上下文切换开销.

示意图如下:

相关代码如下。
要点其实只有一句话:
bootstrap.group(ctx.channel().eventLoop());
这里用EventLoop填充EventLoopGroup,类似于子类对象填入基类指针。
因为EventLoopEventLoopGroup的关系如下:

1
2
3
4
public interface EventLoop extends OrderedEventExecutor, EventLoopGroup {
@Override
EventLoopGroup parent();
}

代理服务器代码:

1
2
3
4
5
6
7
8
9
10
11
12
13
14
15
16
17
18
19
20
21
22
23
24
25
26
27
28
29
30
31
32
33
34
35
36
37
38
39
40
41
42
43
44
45
46
47
48
49
50
51
52
53
public void bootstrap() {
ServerBootstrap bootstrap = new ServerBootstrap();
// 1. 配置:
bootstrap.group(new NioEventLoopGroup(), new NioEventLoopGroup())
.channel(NioServerSocketChannel.class)
.childHandler(// 注意是childHandler
new SimpleChannelInboundHandler<ByteBuf>() {
ChannelFuture connectFuture; // handler的成员变量
@Override
public void channelActive(ChannelHandlerContext ctx)
throws Exception {
// 1.1 新建boostrap
Bootstrap bootstrap = new Bootstrap();
bootstrap.channel(NioSocketChannel.class).handler(
// 注意是Handler
new SimpleChannelInboundHandler<ByteBuf>() {
@Override
protected void channelRead0(
ChannelHandlerContext ctx, ByteBuf in)
throws Exception {
System.out.println("Received data");
}
});
// 1.2 bootstrap配置: 使用channel的eventLoop引用:
bootstrap.group(ctx.channel().eventLoop());
connectFuture = bootstrap.connect(
new InetSocketAddress("xxx.com", 80));
}
@Override
protected void channelRead0(
ChannelHandlerContext channelHandlerContext,
ByteBuf byteBuf) throws Exception {
if (connectFuture.isDone()) {
// 1.3: 当连接完成时,执行一些数据操作(如代理)
}
}
});

// 2. bind:
ChannelFuture future = bootstrap.bind(new InetSocketAddress(8080));
future.addListener(new ChannelFutureListener() {
@Override
public void operationComplete(ChannelFuture channelFuture)
throws Exception {
if (channelFuture.isSuccess()) {
System.out.println("Server bound");
} else {
System.err.println("Bind attempt failed");
channelFuture.cause().printStackTrace();
}
}
});
}

可以注意到还有一个与之前不同的奇异点:

1
bootstrap.group(new NioEventLoopGroup(), new NioEventLoopGroup())

这里其实为ServerChannel子Channel设置了不同的EventLoopGroup。以前都是设置成同一个的。
查看源码:

1
2
3
4
5
6
7
8
9
10
11
12
13
14
15
16
@Override
public ServerBootstrap group(EventLoopGroup group) {
return group(group, group);
}

public ServerBootstrap group(EventLoopGroup parentGroup, EventLoopGroup childGroup) {
super.group(parentGroup);
if (childGroup == null) {
throw new NullPointerException("childGroup");
}
if (this.childGroup != null) {
throw new IllegalStateException("childGroup set already");
}
this.childGroup = childGroup;
return this;
}

此外,客户端使用handler,服务端使用childhandler

ChannelInitialize

如果有多个ChannelHandler,一般会使用ChannelInitialize来添加:

  1. childHandler里传入一个ChannelInitialize:

    1
    2
    3
    bootstrap.group(new NioEventLoopGroup(), new NioEventLoopGroup())
    .channel(NioServerSocketChannel.class)
    .childHandler(new ChannelInitializerImpl());
  2. ChannelInitializerImpl里依次添加真正的handler:

    1
    2
    3
    4
    5
    6
    7
    8
    final class ChannelInitializerImpl extends ChannelInitializer<Channel> {
    @Override
    protected void initChannel(Channel ch) throws Exception {
    ChannelPipeline pipeline = ch.pipeline();
    pipeline.addLast(new HttpClientCodec());
    pipeline.addLast(new HttpObjectAggregator(Integer.MAX_VALUE));
    }
    }

这里用的是ChannelInitializer<Channel>,所以方法会应用到SocketChannelChannel
如果只想应用到SocketChannel,可以用ChannelInitializer<SocketChannel>

ChannelOption,Attr

ChannelOption:

bootstrapoption方法可以用来设置之后创建的channel公用的配置项:

1
2
bootstrap.option(ChannelOption.SO_KEEPALIVE, true)
.option(ChannelOption.CONNECT_TIMEOUT_MILLIS, 5000);

可以设置底层连接的超时时间以及缓冲区设置。

Attr

attr则用来存储一些Channel公用自定义属性:

1
2
3
4
5
6
7
8
9
10
11
12
// 1. 声明:
final AttributeKey<Integer> id = AttributeKey.newInstance("ID");
Bootstrap bootstrap = new Bootstrap();
// 2. 赋值:
bootstrap.attr(id, 123456);
// 2. 使用:(某个handler里头:)
@Override
public void channelRegistered(ChannelHandlerContext ctx)
throws Exception {
Integer idValue = ctx.channel().attr(id).get();
// do something with the idValue
}

可以看出两者都是整个bootstrap共用的,换言之是所有Channel共用的。

// 对于服务端来说可以使用childOptionchildAttr

DatagramChannel/无连接

FileChannel:文件通道,用于文件的读写
DatagramChannel:用于UDP连接的接收和发送
SocketChannel:TCP客户端
ServerSocketChannel:TCP服务端

1
2
3
4
5
6
7
8
9
10
11
12
13
14
15
16
17
18
19
20
21
22
23
24
25
26
27
28
29
30
31
32
33
34
35
// 1. OIO版本:
Bootstrap bootstrap = new Bootstrap();
bootstrap.group(new OioEventLoopGroup()).channel(
OioDatagramChannel.class).handler(
new SimpleChannelInboundHandler<DatagramPacket>() {
@Override
public void channelRead0(ChannelHandlerContext ctx,
DatagramPacket msg) throws Exception {
// Do something with the packet
}
}
);
ChannelFuture future = bootstrap.bind(new InetSocketAddress(0));

// 2. NIO版本
// 服务端:
final NioEventLoopGroup nioEventLoopGroup = new NioEventLoopGroup();
Bootstrap bootstrap = new Bootstrap();
bootstrap.channel(NioDatagramChannel.class);
bootstrap.group(nioEventLoopGroup);
bootstrap.handler(new ChannelInitializer<NioDatagramChannel>() {...});
ChannelFuture sync = bootstrap.bind(9009).sync();
Channel udpChannel = sync.channel();
sync.closeFuture().await();// 等待关闭。
// 客户端:
final NioEventLoopGroup nioEventLoopGroup = new NioEventLoopGroup();
Bootstrap bootstrap = new Bootstrap();
bootstrap.channel(NioDatagramChannel.class);
bootstrap.group(nioEventLoopGroup);
bootstrap.handler(new ChannelInitializer<NioDatagramChannel>() {...});
ChannelFuture sync = bootstrap.bind(0).sync();
Channel udpChannel = sync.channel();
String data = "data";
udpChannel.writeAndFlush(new DatagramPacket(Unpooled.copiedBuffer(data.getBytes(Charset.forName("UTF-8"))), new InetSocketAddress("192.168.2.29", 9008)));
sync.closeFuture().await();// 等待关闭。

可以看出客户端和服务端是一样的。
都是用Bootstrap,bind方法。

关闭

1
2
3
4
 //shutdownGracefully()方法将释放所有的资源,并且关闭所有的当前正在使用中的 Channel
Future<?> future = group.shutdownGracefully();
// block until the group has shutdown
future.syncUninterruptibly();

此外之前也可以用channel.close()手动关闭一些channel

Netty in action第七章-EventLoop和线程模型-笔记

线程模型

Executor API(java 5)

java 5引入的Executor的执行逻辑是:池化线程,做成一个线程池,复用线程。

优点:
消除了创建和销毁线程的开销;

缺点:
高负载下上下文切换开销大。

事件循环: EventLoop接口

事件循环如下。所谓事件循环就是一个死循环,1次批量处理所有ready的事件,而不是像之前Executor接口那样每个任务切换一次。可以看出高负载的时候比较有优势,低负载的时候有cpu空转。

1
2
3
4
5
6
7
8
9
10
11
12
public static void executeTaskInEventLoop() {
boolean terminated = true;
//...
while (!terminated) {
//阻塞,直到有事件已经就绪可被运行
List<Runnable> readyEvents = blockUntilEventsReady();
for (Runnable ev: readyEvents) {
//循环遍历,并处理所有的事件
ev.run();
}
}
}

看代码可以看出一个事件循环(EventLoop)就是某一个线程在那死循环执行任务。
所以如果要有多个线程干活,就要多个EventLoop,就组成了EventLoopGroup。(可以理解成一种批处理任务的线程池)。 看类层次也能发现,EventLoopGroup继承自AbstractExecutorService
相应的类层次如下:

执行顺序

事件/任务执行顺序是FIFO的。

Netty IO和事件处理

Netty3:

木有EventLoop.
入站事件: IO线程中处理;// 类似于EventLoop
出站事件: 调用线程处理;

缺点:
上下文切换开销;
同步困难(例如当出站事件触发入站事件)。

Netty4:

用EventLoop;
给定EvenLoop,一个线程处理所有事件。
优点:
无需同步(除非是Sharable),上下文开销降低。

任务调度(外部接口)

有两种方式:

  1. JDK API;
  2. Netty API.

1. 使用JDK API

使用java.util.concurrent.Executors包里的api。
如果要设定一个60s后执行的任务:

1
2
3
4
5
6
7
8
9
10
11
12
13
public static void schedule() {
// 线程池:
ScheduledExecutorService executor =
Executors.newScheduledThreadPool(10);
ScheduledFuture<?> future = executor.schedule(
new Runnable() {
@Override
public void run() {
System.out.println("Now it is 60 seconds later");
}
}, 60, TimeUnit.SECONDS);
executor.shutdown();
}

缺点:
高负载下性能不足。

使用EventLoop调度任务

如果要设定一个60s后执行的任务:

1
2
3
4
5
6
7
8
9
10
public static void scheduleViaEventLoop() {
Channel ch = CHANNEL_FROM_SOMEWHERE; // get reference from somewhere
ScheduledFuture<?> future = ch.eventLoop().schedule(
new Runnable() {
@Override
public void run() {
System.out.println("60 seconds later");
}
}, 60, TimeUnit.SECONDS); // 60s后
}

由于EventLoopScheduledExecutorService的子接口,因此有它一样的对外接口。
使用起来没啥区别。

如果要设定一个每隔60s运行的任务:

1
2
3
4
5
6
7
8
9
10
public static void scheduleFixedViaEventLoop() {
Channel ch = CHANNEL_FROM_SOMEWHERE; // get reference from somewhere
ScheduledFuture<?> future = ch.eventLoop().scheduleAtFixedRate(
new Runnable() {
@Override
public void run() {
System.out.println("Run every 60 seconds");
}
}, 60, 60, TimeUnit.SECONDS);
}

实现细节(内部细节)

线程管理

确定当前执行的线程是否是分配给当前Channel的线程。
// 一个Channel的所有事件会在同一个EventLoop里头。

1
2
3
4
if(当前线程 in 匹配EventLoop中的线程) 直接执行;
else{
任务放入内部队列。
}

优点:
(1) 避免了线程同步。(只会执行当前Channel的任务)
(2) 减少了上下文切换。(有时候能够不进任务队列,直接执行)

缺点:
单个事件可能阻塞整个Channel:
由于一个Channel的所有事件都由同一个EventLoop处理,因此要求EventLoop不能阻塞(不然其他事件就无法处理了)。

解决方案
长时间运行或阻塞的任务=>创建一个EventExecutor来消费掉,以便从EventLoop中移除,Netty提供了一个默认的DefaultEventExecutorGroup来支持这种操作。把它add进pipeline即可。
// TODO

EventLoop/线程分配

一个Channel的事件由同一个EventLoop处理。Channel和EventLoop的对应关系由EventLoopGroup分配。

异步传输

特点:
EventLoop数量少于Channel数量。// 多个Channel共享一个EventLoop。
EventLoop数量固定,不新增。

因为异步,所以少量线程数就能支撑。
具体分配Channel的时候,用round-robin实现即可,比较粗糙的负载均衡。

限制
由于1个EventLoop用于多个Channel, 意味着Threadlocal对象会被多个Channel共享。
需要注意这一点。

同步传输

特点
EventLoop数量等于Channel数量。 // 不共享EventLoop
EventLoop数量不断增加,每次新增Channel,就新增EventLoop。

Netty in action第六章-ChannelHandler和pipeline-笔记

ChannelHandler和ChannelPipeline

Channel生命周期 / 状态自动机

ChannelUnregisterd=>ChannelRegistered => ChannelActive => ChannelInactive => ChannelUnregisterd
每一个状态转化都会产生相应事件。

ChannelUnregistered:刚创建;
ChannelRegistered: (创建以后),已注册到EventLoop;
ChannelActive: 已经连接到远程节点;
ChannelInactive: 没有连接到远程节点。

ChannelHeadler 生命周期

handlerAdded: ChannelHeadler添加到pipeline时调用;
handlerRemoved: 移除时;
exceptionCaught: 发生错误时。

ChannelInboundHandler接口 (入站事件)

省略别的常见事件:

ChannelWritabilityChanged: 可写状态发生改变事件
userEventTriggered: 调用ChannelInboundHandler.fireUserEventTriggered()时触发。用于用户自定义事件。

可写状态与高低水位:

high watermark机制: 写太快时达到高水位线时,转变为不可写;
// is_full()是根据当前是否大于等于high water mark来判断,如果full会wait。
low watermark机制: 达到低水位线时,转变为可写。

// 其他地方low watermark的含义: 设定最小时间戳,低于低水位线的数据不再接收。

高低水位设置:

1
2
Channel.config.setWriteHighWaterMark();
Channel.config.setWriteLowWaterMark();

ChannelConfig默认的水位配置为低水位32K,高水位64K。

资源释放

第五章里提到了bufferBuf的释放问题:
pipeline里最后一个Handler要负责释放收到的数据:

1
bufferBuf.release();

落实到入站事件中, 如果重写了ChannelRead()事件,这个方法需要负责释放池化的ByteBuf:

1
2
3
4
5
6
7
8
9
10
11
12
@Override
public void channelRead(ChannelHandlerContext ctx, Object msg) {
//通过调用 ReferenceCountUtil.release()方法释放资源
ReferenceCountUtil.release(msg);
}
// 底层调的是这个:
public static boolean release(Object msg) {
if (msg instanceof ReferenceCounted) {
return ((ReferenceCounted) msg).release();
}
return false;
}

SimpleChannelInboundHandler的自动释放

如果不想每次在ChannelRead()方法里释放消息,可以直接使用SimpleChannelInboundHandler,它会自动释放收到的消息。
相对的,由于有了自动释放,后续就无法再访问到了,因此使用SimpleChannelInboundHandler的时候消息引用会失效。

小结:

  1. 不使用SimpleChannelInboundHandler: 记得在一个ChannelRead释放消息数据;
  2. 使用SimpleChannelInboundHandler: 注意会被自动释放,引用会失效。

ChannelOutboundHandler接口(出站事件)

类似的,出站事件也有很多,省略一些常见,列出几个特别的:

1
2
3
flush: 将数据冲刷到远程节点时被调用;
write: 将数据写到远程节点时被调用;
// 一旦ByteBuf 被写入到远程端, 它立即自动地放回原来的buffer池中.

与入站事件相对的,需要在write方法中释放消息:

1
2
3
4
5
6
7
@Override
public void write(ChannelHandlerContext ctx,
Object msg, ChannelPromise promise) {
ReferenceCountUtil.release(msg);
//通知 ChannelPromise数据已经被处理了
promise.setSuccess();
}

注意到write方法比channelRead多一个ChannelPromise参数:

1
ChannelPromise(子接口) -> ChannelFuture(父接口)

ChannelPromise与ChannelFuture

设计模式:
实际上出站事件基本都多了这个ChannelPromise参数。
为了避免程序员写bug,netty4用ChannelPromise接口来更改任务完成状态,
而在那些只需要读/查询的场景,返回ChannelFuture接口。

此外,ChannelFuture中比jdk的普通Future多了一些信息,状态有4种:

1
Uncompleted => success/fail/cancelled

每种状态的判定:(其实就是字面上的意思,猜也知道)

状态 判定条件
Uncompleted isDone():false,isSuccess():false,isCancelled():false,cause():null
success isDone():ture,isSuccess():ture
fail isDone():ture,isSuccess():false,cause():non-null
cancelled isDone():ture,isCancelled():true

入站事件和出站事件的区别

再次强调一件事:

出站事件基本比入站事件都多了1个ChannelPromise参数。

本质上也就是出站事件要多一个通知机制:
ChannelPromise,ChannelFutureChannelFutureListener

  • 那么为什么两者要这样区别呢?
    根本原因是出站中有write,flush这样的io操作,比较费时而且依赖于复杂因素,需要设计成异步的。
    而入站事件基本都是在自己的内存里搞定,同步就够用了。

理解了这一点,我们就能心平气和地接受出站事件的通知机制了。

通知机制

  1. 每个出站操作返回一个ChannelFuture,注册到它的ChannelFutureListener将在操作完成的时候被通知成功还是失败;
  2. 出站操作传入一个ChannelPromise,可以进行立即通知(更改状态): setSuccess/setFailure

注册ChannelFutureListener的两种姿势:

  1. 对channel进行操作,获取ChannelFuture,然后注册Listener; // 可以用于某一次写的定制化操作;
  2. 出站事件中,在传入的ChannelPromise上注册Listener。 // 应用于某类型的所有操作。

相应的代码如下:

1
2
3
4
5
6
7
8
9
10
11
12
13
14
15
16
17
18
19
20
21
22
23
24
25
26
27
// 方法1:
io.netty.channel.ChannelFuture future = channel.write(someMessage);
future.addListener(new ChannelFutureListener() {
@Override
public void operationComplete(io.netty.channel.ChannelFuture f) {
if (!f.isSuccess()) {
f.cause().printStackTrace();
f.channel().close();
}
}
});
// 方法2:
public class OutboundExceptionHandler extends ChannelOutboundHandlerAdapter {
@Override
public void write(ChannelHandlerContext ctx, Object msg,
ChannelPromise promise) {
promise.addListener(new ChannelFutureListener() {
@Override
public void operationComplete(ChannelFuture f) {
if (!f.isSuccess()) {
f.cause().printStackTrace();
f.channel().close();
}
}
});
}
}

ChannelHandler适配器

netty提供了handler的基本实现:ChannelInboundHandlerAdapterChannelOutboundHandlerAdapter。(入站和出站)

ChannelPipeline接口

1个Channel <=> 对应1个固定的ChannelPipeline

在一个ChannelHandler中如何访问pipeline?:

通过context获取到pipeline即可。

传播事件

测试下一个ChannelHandler的类型是否与方向一致。

pipeline编排

1
2
3
4
5
6
7
8
9
10
11
12
13
14
15
16
17
18
public static void modifyPipeline() {
ChannelPipeline pipeline = CHANNEL_PIPELINE_FROM_SOMEWHERE; // get reference to pipeline;
//创建一个 FirstHandler 的实例
FirstHandler firstHandler = new FirstHandler();
//将该实例作为"handler1"添加到ChannelPipeline 中
pipeline.addLast("handler1", firstHandler);
//将一个 SecondHandler的实例作为"handler2"添加到 ChannelPipeline的第一个槽中。这意味着它将被放置在已有的"handler1"之前
pipeline.addFirst("handler2", new SecondHandler());
//将一个 ThirdHandler 的实例作为"handler3"添加到 ChannelPipeline 的最后一个槽中
pipeline.addLast("handler3", new ThirdHandler());
//...
//通过名称移除"handler3"
pipeline.remove("handler3");
//通过引用移除FirstHandler(它是唯一的,所以不需要它的名称)
pipeline.remove(firstHandler);
//将 SecondHandler("handler2")替换为 FourthHandler:"handler4"
pipeline.replace("handler2", "handler4", new FourthHandler());
}

pipeline的事件API

主要用于触发下一个handler的事件,触发下一个入站事件一般带个前缀fire,触发出站事件则没有这个前缀。
例如:
fireChannelRegistered: 触发pipeline中下一个channelInboundHandler的channelRegistered事件。(注意是Inbound)
connect: 将channel连接到一个远程地址,将调用下一个channelOutboundHandler的connect方法。(注意是outbound)

ChannelHandlerContext接口

ChannelHandlerContext记录channelHandlerchannel的联系,类似于一个弱实体。
它也有很多事件API,含义与其他类的不同,是基于当前上下文的,也就是说:
从当前关联的ChannelHandler开始,传播给下一个

ChannelHandlerContext部分API:
// Channel相关:
alloc: 返回ChannelByteBufAllocator;
executor: 返回调度事件的EventExecutor;
// handler相关:
fireChannelRead: 触发下一个InboundHanlderChannelRead方法;(入站)
write: 通过当前实例写入消息,并经过pipeline。

1
public interface ChannelHandlerContext extends AttributeMap, ChannelInboundInvoker, ChannelOutboundInvoker

如上所示,这个接口其实继承了inbound和outbound,所以出站方法也有。

综上所述,如果要从某一个ChannelHandlerA开始传递事件,要先获得它的上一个handler的context。如上图所示,调用pipeline或者channel上的事件的话,事件就会从1号位置开始流动,调用channelContext上的事件则会从2,3号位置(也就是下一个)开始流动。

优势:

  1. 减少事件传播开销;
  2. 避开一些handler的处理。

上述API可能的具体用途:

  1. 动态切换协议.
  2. 其他用途(暂时不知道还有啥)

Sharable

可以将一个ChannelHandler绑定到多个pipeline(此时会产生多个ChannelHandlerContext)。这样做的场景: 比如需要收集跨越多个Channel的统计信息时。

加上@Sharable注解的ChannelHandler(语法上)可以绑定到多个pipeline上,但程序员需要注意解决线程安全的问题。// 要么无状态不可变,要么加锁,要么CAS,要么threadlocal。

异常处理

参考前文中出站事件的通知机制,因此出站事件中的异常也是封装在ChannelFuture中的,而不是像入站事件用exceptionCaught
// 换言之, ChannelOutboundHandler没有exceptionCaughtAPI。

入站事件异常:// 消费完异常才不会向尾端传播

1
2
3
4
5
6
@Override
public void exceptionCaught(ChannelHandlerContext ctx,
Throwable cause) {
cause.printStackTrace();
ctx.close();
}

出站事件异常:

1
2
3
4
5
6
7
@Override
public void operationComplete(io.netty.channel.ChannelFuture f) {
if (!f.isSuccess()) {
f.cause().printStackTrace();
f.channel().close();
}
}

Netty in Action第五章-ByteBuf笔记

目录

ByteBuf-Netty的数据容器
API详细信息
用例
内存分配

ByteBuffer: JAVA NIO使用的字节容器,使用复杂;
ByteBuf: Netty提供的字节容器,更简单灵活。

ByteBuf API

优点

  • 用户可以自定义缓冲区类型扩展
  • 透明的零拷贝
  • 容量按需增长
  • 读写切换不需要flip()方法
  • 读写使用不同索引
  • 支持方法链式调用
  • 支持引用计数
  • 支持池化

外部接口:

  1. Channel或者ctx获取ByteBuffAllocator,然后再分配;
  2. Unpooled工具类直接创建。
    1
    2
    3
    4
    5
    6
    7
    8
    9
    10
    // 1. 从channel:
    Channel channel = ...;
    ByteBufAllocator allocator = channel.alloc(); //1
    ByteBuf buf=allocator.heapBuffer();
    // 2. 从ctx:
    ChannelHandlerContext ctx = ...;
    ByteBufAllocator allocator2 = ctx.alloc(); //2
    ByteBuf buf=allocator.heapBuffer();
    // 3.
    ByteBuf buf=Unpooled.buffer();

内部工作机制

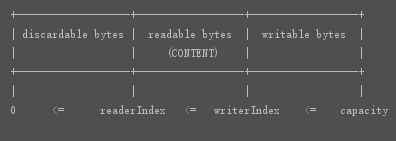
维护两个索引: readerIndex,writerIndex
// 这样就省得用flip来回切换读写状态了。

如上图,起始为空,读的时候发现readerIndex>=writerIndex,因此失败。

使用模式

堆缓冲区-使用模式 (也称支撑数组backing array)

(heap buffer)

最常用,将数据存储在JVM堆中。

1
2
3
4
5
6
7
8
9
10
11
12
13
14
15
16
17
18
private final static Random random = new Random();
private static final ByteBuf BYTE_BUF_FROM_SOMEWHERE = Unpooled.buffer(1024);
private static final Channel CHANNEL_FROM_SOMEWHERE = new NioSocketChannel();
private static final ChannelHandlerContext CHANNEL_HANDLER_CONTEXT_FROM_SOMEWHERE = DUMMY_INSTANCE;
public static void heapBuffer() {
ByteBuf heapBuf = BYTE_BUF_FROM_SOMEWHERE; //get reference form somewhere
//检查 ByteBuf 是否有一个支撑数组
if (heapBuf.hasArray()) {
//如果有,则获取对该数组的引用
byte[] array = heapBuf.array();
//计算第一个字节的偏移量
int offset = heapBuf.arrayOffset() + heapBuf.readerIndex();
//获得可读字节数
int length = heapBuf.readableBytes();
//使用数组、偏移量和长度作为参数调用你的方法
handleArray(array, offset, length);
}
}

直接缓冲区-使用模式

(direct buffer)

堆外内存,directBuffer,性能最好,省去一次复制。
缺点时要注意管理堆外内存。

1
2
3
4
5
6
7
8
9
10
11
12
13
14
public static void directBuffer() {
ByteBuf directBuf = BYTE_BUF_FROM_SOMEWHERE; //get reference form somewhere
//检查 ByteBuf 是否由数组支撑。如果不是,则这是一个直接缓冲区
if (!directBuf.hasArray()) {
//获取可读字节数
int length = directBuf.readableBytes();
//分配一个新的数组来保存具有该长度的字节数据
byte[] array = new byte[length];
//将字节复制到该数组
directBuf.getBytes(directBuf.readerIndex(), array);
//使用数组、偏移量和长度作为参数调用你的方法
handleArray(array, 0, length);
}
}

复合缓冲区-使用模式

(composite buffer)

把上述两个模式复合,把多个ByteBuf聚合成一个视图处理。
消除了没有必要的复制,同时对外是一个通用的接口。

1
2
3
4
5
6
7
8
9
10
11
12
13
14
15
16
17
18
19
20
21
22
23
24
25
26
 public static void byteBufComposite() {
CompositeByteBuf messageBuf = Unpooled.compositeBuffer();
ByteBuf headerBuf = BYTE_BUF_FROM_SOMEWHERE; // can be backing or direct
ByteBuf bodyBuf = BYTE_BUF_FROM_SOMEWHERE; // can be backing or direct
//将 ByteBuf 实例追加到 CompositeByteBuf
messageBuf.addComponents(headerBuf, bodyBuf);
//...
//删除位于索引位置为 0(第一个组件)的 ByteBuf
messageBuf.removeComponent(0); // remove the header
//循环遍历所有的 ByteBuf 实例
for (ByteBuf buf : messageBuf) {
System.out.println(buf.toString());
}
}

public static void byteBufCompositeArray() {
CompositeByteBuf compBuf = Unpooled.compositeBuffer();
//获得可读字节数
int length = compBuf.readableBytes();
//分配一个具有可读字节数长度的新数组
byte[] array = new byte[length];
//将字节读到该数组中
compBuf.getBytes(compBuf.readerIndex(), array);
//使用偏移量和长度作为参数使用该数组
handleArray(array, 0, array.length);
}

CompositeByteBuf附加了许多功能。

字节级操作

随机访问 (可以重复消费)(getXXX之类的方法)

ByteBuf的随机访问与普通数组类似:

1
2
3
for(int i;i<buffer.capacity();i++){
byte b=buffer.getByte(i);
}

普通访问不会改变readerIndexwriterIndex
要改变需要调用readerIndex(index)writerIndex(index)

顺序访问 (不会重复消费)(readXXX/skipXXX之类的方法)

如上图所示,这种访问方式可以看作消费数据,通过移动readerIndex,扩大了可丢弃字节(已读),减少了可读字节。

1
2
3
4
5
//迭代缓冲区的可读字节。
ByteBuf buffer = ...;
while (buffer.isReadable()) {
System.out.println(buffer.readByte());
}

丢弃discardable bytes(类似于compact/gc)

1
2
//调用:
byteBuf.discardReadBytes();

丢弃已读部分回收空间,本质上是扩大了可写字节。
底层的实现是把可读的数据移动到首部,readerIndex=0;writerIndex-=readerIndex.,因此导致内存复制,有性能开销,所以尽量不要调用。

顺序写入:

1
2
3
4
// 1.
byteBuf.writeBytes(otherByteBuf);
// 2.
byteBuf.writeInt(26);

索引修改

readerIndexwriterIndex这俩变量,除了因为上述数据操作而间接发生改变,也可以直接强行改它们而不管数据:

1
2
3
4
5
6
7
8
9
10
11
12
13
14
15
16
17
18
19
markReaderIndex()// 标记为x
resetReaderIndex()// 回到x,注意不是0
markWriterIndex() // 标记为y
resetWriterIndex()// 回到y,注意不是0
clear() // 这个才是双双清0
readerIndex(int)
writerIndex(int)

@Override
public ByteBuf markReaderIndex() {
markedReaderIndex = readerIndex;
return this;
}

@Override
public ByteBuf resetReaderIndex() {
readerIndex(markedReaderIndex);
return this;
}

这些操作不改变数据,所以是O(1)的。

查找(类似于Scan And Filter操作)

1
2
3
4
5
//1:
int index = byteBuf.indexOf(xxx)
//2.
int index = byteBuf.forEachByte(ByteBufProcessor.FIND_CR);
// ByteBufProcessor 4.1版本改为 io.netty.util.ByteProcessor

派生缓冲区(类似于视图,可读写) // 浅拷贝

创建的方法:

1
2
3
4
5
duplicate()
slice(int,int)
Unpooled.unmodifiableBuffer(...)
order(ByteOrder)
readSlice(int)

这些派生的ByteBuf实例,底层数据是和原来共享的,只是有自己的读写索引。

深拷贝

1
copy(int,int)

ByteBufHolder接口

ByteBufHolder接口就是把ButeBuf再封装一层,只暴露几个大的API:

1
2
3
ByteBuf content()// 返回持有的ByteBuf
copy()
duplicate()// 浅拷贝

这样只需要声明实现这个接口,相当于宣布这个类内部有成员变量是ByteBuf,换言之就是一个承载数据的对象了。

ByteBuf分配

按需分配: ByteBufAllocator接口

channel或者ctx获得ByteBufAllocator,降低分配和释放内存的开销。

1
2
3
4
5
6
// 1. 从channel:
Channel channel = ...;
ByteBufAllocator allocator = channel.alloc(); //1
// 2. 从ctx:
ChannelHandlerContext ctx = ...;
ByteBufAllocator allocator2 = ctx.alloc(); //2

拿到分配器以后,可以进行的操作:

1
2
3
4
5
Buffer()
heapBuffer()
directBuffer()
compositeBuffer()
...// 总之就是各种创建ByteBuf的方法

netty的两个ByteBufAllocator的实现:

1
2
PooledByteBufAllocator  // 池化的,性能最高 
UnpooledByteBufAllocator // 非池化的

Channel具体返回的分配器是池化还是非池化,可以通过ChannelConfig配置,或者设定bootstrap参数。

Unpooled缓冲区

非网络项目时,或其他不能从channel,ctx获取BufAllocator时,可以用Unpooled工具类来创建未池化的ByteBuf实例。
它的方法与上述两个类似,只不过去掉了heapBuf,用buffer()方法代替,默认直接返回堆内存buf。

ByteBufUtil类

顾名思义,有一些用于ByteBuf的辅助方法,看起来比较有用包括:

1
2
3
4
5
firstIndexof
lastIndexof
hexdump()// 打印
equals(buf1,buf2)
...

引用计数 // ReferenceCounted

由于ByteBuf一般比较大,所以实际数据一般只会存一份,引用却会有很多。
然后引用的生命周期一般很长,。
所以netty除了gcroot的方法管理,还用了原始的引用计数:
ReferenceCounted接口。
上文中的ByteBufHolder接口就是它的子接口。

1
2
3
4
5
6
ByteBufHolder => ReferenceCounted
// 引用计数:
ByteBuf buf=allocator.directBuffer();
assert buffer.refCnt()==1;
// 释放:
boolean released = buffer.release();

四种ByteBuf:

1
2
3
4
UnpooledHeapByteBuf: 堆内存,可以被jvm gc;
UnpooledDirectByteBuf: 堆外,可以被jvm gc,但最好自己回收;
PooledHeapByteBuf: 不可以被jvm gc // 因为在池子里头
PooledDirectByteBuf: 不可以被jvm gc. // 因为在池子里头

换言之:
池化的jvm不管;
非池化的jvm可以管。

增加计数器的操作:

1
2
retain()
//或者刚出生的时候会有1.

减少计数器的操作:

1
release()

编程规范:

  1. pipeline里最后一个处理者要负责release()
  2. 中间某一个抛异常了,不往下传了,也要负责release()。
  3. 中间某一个往下传了别的数据,要负责release传入的原来那个数据。

内存泄露提示:

1
LEAK: ByteBuf.release() was not called before it’s garbage-collected. Enable advanced leak reporting to find out where the leak occurred. To enable advanced leak reporting, specify the JVM option ‘-Dio.netty.leakDetectionLevel=advanced’ or call ResourceLeakDetector.setLevel()

出现了这个说明有地方没有release().可以提高检测级别打印出具体泄露点。

参考:
http://chen-tao.github.io/2015/10/03/netty/
http://calvin1978.blogcn.com/articles/directbytebuffer.html

Netty in action第四章-传输-笔记

Netty通用api

Nettyoio/nio的传输实现封装了一个通用api
方便用户低成本切换。
代码见:
https://github.com/xiaoyue26/netty-in-action-cn/blob/ChineseVersion/chapter4/

使用netty的话,阻塞和非阻塞实现的切换只需两行:

1
2
3
4
5
6
7
// oio
NioEventLoopGroup group = new NioEventLoopGroup();
b.group(group).channel(OioServerSocketChannel.class)

// nio
NioEventLoopGroup group = new NioEventLoopGroup();
b.group(group).channel(NioServerSocketChannel.class)

也就是把EvenLoopGroupSeverSocketChannel的实现换一下。

Channel接口

Channel接口的父接口包括:

Comparable: 每个Channel是独一无二的,不可以相等,但是可以排序;
AttributeMap: 获得各种属性

依赖的接口:

ChannelPipeLine: 有个方法返回它的pipeline;// 实现上大多有这个成员
ChannelConfig: 有个方法返回它的config;

子接口:

ServerChannel
AbstractChannel: 如果引用不相等,保证当hash值相同时,CompareTo方法会抛出Error。

相关代码:

1
2
3
4
5
6
7
8
9
10
11
12
13
14
15
16
17
18
19
@Override
public final int compareTo(Channel o) {
if (this == o) {
return 0;
}
long ret = hashCode - o.hashCode();
if (ret > 0) {
return 1;
}
if (ret < 0) {
return -1;
}
ret = System.identityHashCode(this) - System.identityHashCode(o);
if (ret != 0) {
return (int) ret;
}
// Jackpot! - different objects with same hashes
throw new Error();
}

ChannelPipeLine中的设计模式: 拦截过滤器.(类似于Unix管道命令)

Netty提供的Channel实现都是线程安全的,可以支持多个线程并发写一个Channel

Netty提供的传输实现

包括:

1
2
3
4
5
NIO  : 基于选择器
Epoll: JNI驱动,支持linux上才有的特性,比NIO更快;
OIO : 阻塞流
Local: VM内部通过管道进行通信
Embedded: 测试时使用。

NIO传输实现

实现上基于选择器,类似于一个注册表,用户注册各种事件的处理函数。
可能的状态变化包括:
op_accept: 接受新连接并创建channel时;
op_connect: 建立一个连接时;
op_read: 可以读时;
op_write: 可以写时。

Epoll传输实现

性能比NIO更高。代码更改:

1
2
EpollEventLoopGroup
EpollServerSocketChannel.class

水平触发LT

只要有事件没消费完就一直提醒。(底层把没处理完的回调重新加入readylist)

边缘触发ET

有新事件才提醒。(底层省略了重新加入readylist那一步)

优缺点对比:

属性 水平触发(LT) 边缘触发(ET)
开销 较大 较小
时效性 时效性高 时效性较低
数据安全 无遗漏 需要小心编程,否则有遗漏风险

单线程时: 水平触发时效性好一些;
高并发时: 边缘触发并发度好一些。

jdk实现: 水平触发
netty实现: 边缘触发

OIO传输实现

Netty使用超时机制来让OIO和NIO的API统一。

Local传输实现

用于在同一个JVM中运行的客户端和服务端之间的通信。
服务端并不绑定物理网络地址,也不接受真正的网络流量。
可以一开始先使用Local传输实现,方便以后有需求的时候迁移到NIO,Epoll实现。

Embedded传输实现

用途: 创建单元测试。

传输的用例

Netty4支持的网络协议:

传输实现 TCP UDP SCTP UDT
NIO
Epoll X X
OIO
网络协议备注 串流控制传输协议,较冷门,目前主要应用在电信领域 基于UDP的可靠传输