AbstractBootstrap 引导: Bootstrapp
服务端: ServerBootstrap,一个父Channel创建多个子Channel;Bootstrap,一个普通Channel用于所有网络通信。
Bootstrap和ServerBootstrap都继承自AbstractBootstrap,具体声明如下:
1
2
3
4
5
public abstract class AbstractBootstrap <B extends AbstractBootstrap <B , C >, C extends Channel > implements Cloneable public class Bootstrap extends AbstractBootstrap <Bootstrap , Channel > public class ServerBootstrap extends AbstractBootstrap <ServerBootstrap , ServerChannel >
为什么语法看起来有点复杂呢?
为什么需要这样呢? (配置类的接口能返回自身的类型的引用)
根本目的是为了配置的时候实现流式语法糖,类似于builder的设计模式:1 2 3 4 5 6 7 8 9 10 bootstrap.group(group) .channel(NioSocketChannel.class ) .handler (new SimpleChannelInboundHandler <ByteBuf >() { @Override protected void channelRead0 ( ChannelHandlerContext channelHandlerContext, ByteBuf byteBuf) throws Exception System.out.println("Received data" ); } });
不理解的话,具体看接口就理解了。AbstractBootstrap的接口有两类。
第一类, 返回B的,参照上面的声明,这里的B类型其实就是自身的类型,具体映射如下:Bootstrap: B=Bootstrap,C=Channel;ServerBootstrap:B=ServerBootstrap,C=ServerChannel:
1 2 3 4 5 6 7 8 9 10 11 12 13 14 15 16 17 18 19 20 21 22 23 24 25 26 27 28 29 30 31 32 public B channel (Class<? extends C> channelClass) if (channelClass == null ) { throw new NullPointerException("channelClass" ); } return channelFactory(new ReflectiveChannelFactory<C>(channelClass)); } public B group (EventLoopGroup group) public B localAddress (SocketAddress localAddress) this .localAddress = localAddress; return (B) this ; } public B localAddress (String inetHost, int inetPort) return localAddress(SocketUtils.socketAddress(inetHost, inetPort)); } public <T> B option (ChannelOption<T> option, T value) { if (option == null ) { throw new NullPointerException("option" ); } if (value == null ) { synchronized (options) { options.remove(option); } } else { synchronized (options) { options.put(option, value); } } return (B) this ; } public <T> B attr (AttributeKey<T> key, T value) ;public B handler (ChannelHandler handler) ;
另一类接口是返回ChannelFuture的:
1 2 public ChannelFuture bind () public ChannelFuture connect ()
综上大致有两类接口:
进行全局配置;
进行具体action。
Bootstrap: 客户端/无连接服务端 Bootstrap一般用于客户端,也可以用于无连接协议的服务端。Bootstrap上的接口设置一些程序需要的组件具体实现是什么。
两种引导行为:bind: (服务端) 绑定本地服务到某个端口, 然后创建一个Channel,准备接受连接;connect: (客户端) 创建一个Channel,连接远端服务。
简单客户端:connect。
1 2 3 4 5 6 7 8 9 10 11 12 13 14 15 16 17 18 19 20 21 22 23 24 25 26 27 28 29 30 31 public void bootstrap () EventLoopGroup group = new NioEventLoopGroup(); Bootstrap bootstrap = new Bootstrap(); bootstrap.group(group) .channel(NioSocketChannel.class ) // NIO .handler (new SimpleChannelInboundHandler <ByteBuf >() { @Override protected void channelRead0 ( ChannelHandlerContext channelHandlerContext, ByteBuf byteBuf) throws Exception System.out.println("Received data" ); } }); ChannelFuture future = bootstrap.connect( new InetSocketAddress("xxx.com" , 80 )); future.addListener(new ChannelFutureListener() { @Override public void operationComplete (ChannelFuture channelFuture) throws Exception { if (channelFuture.isSuccess()) { System.out.println("Connection established" ); } else { System.err.println("Connection attempt failed" ); channelFuture.cause().printStackTrace(); } } }); }
ServerBootstrap: 服务端 ServerBootstrap比普通的Bootstrap多了几个接口:
1 2 3 childOption: 后续accept的子Channel的配置; childAttr: 设置给 已经accept 的子Channel属性; childHanlder: 设置给 已经accept 的子Channel的pipeline。
作为对比的三个接口:
1 2 3 option: 后续新建的serverChannel的配置; attr: 设置给当前serverChannel的属性; handler: 设置给当前serverChannel的pipeline。
容易混淆的就是Option用于配置固定的几个参数比如超时时间,Attr用于存自定义属性。
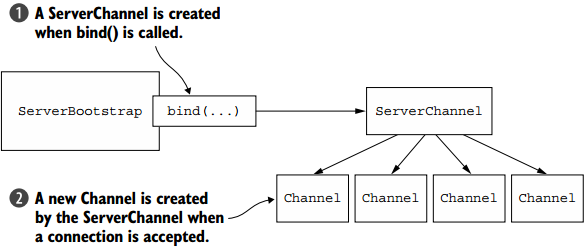
ServerChannel accept新连接后,ServerChannel创建子Channel。子Channel代表已被接受的连接
工程过程:
调用bind,创建ServerChannel, 绑定到本地端口开始提供服务;
接受1个新连接, ServerChannel创建1个新的子Channel。
简单服务端:bind。
1
2
3
4
5
6
7
8
9
10
11
12
13
14
15
16
17
18
19
20
21
22
23
24
25
26
27
28
29
30
31
32
public void bootstrap () NioEventLoopGroup group = new NioEventLoopGroup(); ServerBootstrap bootstrap = new ServerBootstrap(); bootstrap.group(group) .channel(NioServerSocketChannel.class ) .childHandler (new SimpleChannelInboundHandler <ByteBuf >() { @Override protected void channelRead0 (ChannelHandlerContext channelHandlerContext, ByteBuf byteBuf) throws Exception System.out.println("Received data" ); } }); ChannelFuture future = bootstrap.bind(new InetSocketAddress(8080 )); future.addListener(new ChannelFutureListener() { @Override public void operationComplete (ChannelFuture channelFuture) throws Exception { if (channelFuture.isSuccess()) { System.out.println("Server bound" ); } else { System.err.println("Bind attempt failed" ); channelFuture.cause().printStackTrace(); } } }); }
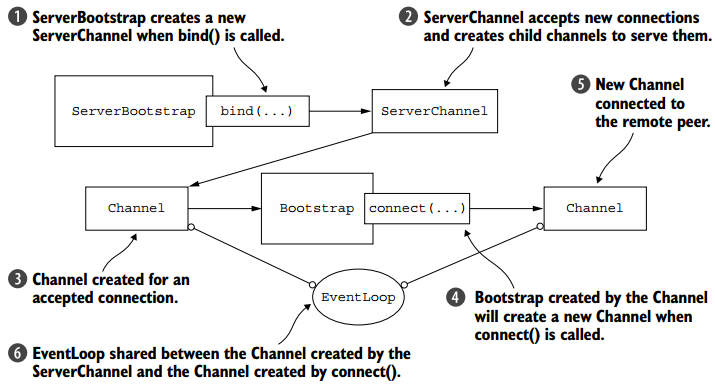
从Channel引导客户端(ServerBootstrap需要connect别的Server时) 假设我们有一个ServerBootstrap,提供服务,收到一个请求,发现需要另一个服务的帮助。(相当于我们需要提供代理)
再起一个Bootstrap,去connect另一个服务,获得结果再返回;
和1类似,稍有不同的时, 当前链路复用同一个EventLoop。
方案2的优点:
避免创建额外的线程;
减少上下文切换开销.
示意图如下:
相关代码如下。bootstrap.group(ctx.channel().eventLoop());EventLoop填充EventLoopGroup,类似于子类对象填入基类指针。EventLoop和EventLoopGroup的关系如下:
1 2 3 4 public interface EventLoop extends OrderedEventExecutor , EventLoopGroup @Override EventLoopGroup parent () ; }
代理服务器代码:
1 2 3 4 5 6 7 8 9 10 11 12 13 14 15 16 17 18 19 20 21 22 23 24 25 26 27 28 29 30 31 32 33 34 35 36 37 38 39 40 41 42 43 44 45 46 47 48 49 50 51 52 53 public void bootstrap () ServerBootstrap bootstrap = new ServerBootstrap(); bootstrap.group(new NioEventLoopGroup(), new NioEventLoopGroup()) .channel(NioServerSocketChannel.class ) .childHandler (// 注意是childHandler new SimpleChannelInboundHandler <ByteBuf >() { ChannelFuture connectFuture; @Override public void channelActive (ChannelHandlerContext ctx) throws Exception { Bootstrap bootstrap = new Bootstrap(); bootstrap.channel(NioSocketChannel.class ).handler ( // 注意是Handler new SimpleChannelInboundHandler <ByteBuf >() { @Override protected void channelRead0 ( ChannelHandlerContext ctx, ByteBuf in) throws Exception { System.out.println("Received data" ); } }); bootstrap.group(ctx.channel().eventLoop()); connectFuture = bootstrap.connect( new InetSocketAddress("xxx.com" , 80 )); } @Override protected void channelRead0 ( ChannelHandlerContext channelHandlerContext, ByteBuf byteBuf) throws Exception if (connectFuture.isDone()) { } } }); ChannelFuture future = bootstrap.bind(new InetSocketAddress(8080 )); future.addListener(new ChannelFutureListener() { @Override public void operationComplete (ChannelFuture channelFuture) throws Exception { if (channelFuture.isSuccess()) { System.out.println("Server bound" ); } else { System.err.println("Bind attempt failed" ); channelFuture.cause().printStackTrace(); } } }); }
可以注意到还有一个与之前不同的奇异点:
1 bootstrap.group(new NioEventLoopGroup(), new NioEventLoopGroup())
这里其实为ServerChannel和子Channel设置了不同的EventLoopGroup。以前都是设置成同一个的。
1 2 3 4 5 6 7 8 9 10 11 12 13 14 15 16 @Override public ServerBootstrap group (EventLoopGroup group) return group(group, group); } public ServerBootstrap group (EventLoopGroup parentGroup, EventLoopGroup childGroup) super .group(parentGroup); if (childGroup == null ) { throw new NullPointerException("childGroup" ); } if (this .childGroup != null ) { throw new IllegalStateException("childGroup set already" ); } this .childGroup = childGroup; return this ; }
此外,客户端使用handler,服务端使用childhandler。
ChannelInitialize 如果有多个ChannelHandler,一般会使用ChannelInitialize来添加:
childHandler里传入一个ChannelInitialize:
1 2 3 bootstrap.group(new NioEventLoopGroup(), new NioEventLoopGroup()) .channel(NioServerSocketChannel.class ) .childHandler (new ChannelInitializerImpl ()) ;
ChannelInitializerImpl里依次添加真正的handler:
1 2 3 4 5 6 7 8 final class ChannelInitializerImpl extends ChannelInitializer <Channel > @Override protected void initChannel (Channel ch) throws Exception ChannelPipeline pipeline = ch.pipeline(); pipeline.addLast(new HttpClientCodec()); pipeline.addLast(new HttpObjectAggregator(Integer.MAX_VALUE)); } }
这里用的是ChannelInitializer<Channel>,所以方法会应用到SocketChannel和Channel。SocketChannel,可以用ChannelInitializer<SocketChannel>。
ChannelOption,Attr ChannelOption: bootstrap的option方法可以用来设置之后创建的channel公用的配置项:
1 2 bootstrap.option(ChannelOption.SO_KEEPALIVE, true ) .option(ChannelOption.CONNECT_TIMEOUT_MILLIS, 5000 );
可以设置底层连接的超时时间以及缓冲区设置。
Attr attr则用来存储一些Channel公用自定义属性:
1 2 3 4 5 6 7 8 9 10 11 12 final AttributeKey<Integer> id = AttributeKey.newInstance("ID" );Bootstrap bootstrap = new Bootstrap(); bootstrap.attr(id, 123456 ); @Override public void channelRegistered (ChannelHandlerContext ctx) throws Exception { Integer idValue = ctx.channel().attr(id).get(); }
可以看出两者都是整个bootstrap共用的,换言之是所有Channel共用的。
// 对于服务端来说可以使用childOption和childAttr。
DatagramChannel/无连接 FileChannel:文件通道,用于文件的读写
1 2 3 4 5 6 7 8 9 10 11 12 13 14 15 16 17 18 19 20 21 22 23 24 25 26 27 28 29 30 31 32 33 34 35 Bootstrap bootstrap = new Bootstrap(); bootstrap.group(new OioEventLoopGroup()).channel( OioDatagramChannel.class ).handler ( new SimpleChannelInboundHandler <DatagramPacket >() { @Override public void channelRead0 (ChannelHandlerContext ctx, DatagramPacket msg) throws Exception } } ); ChannelFuture future = bootstrap.bind(new InetSocketAddress(0 )); final NioEventLoopGroup nioEventLoopGroup = new NioEventLoopGroup();Bootstrap bootstrap = new Bootstrap(); bootstrap.channel(NioDatagramChannel.class ) ; bootstrap.group(nioEventLoopGroup); bootstrap.handler(new ChannelInitializer<NioDatagramChannel>() {...}); ChannelFuture sync = bootstrap.bind(9009 ).sync(); Channel udpChannel = sync.channel(); sync.closeFuture().await(); final NioEventLoopGroup nioEventLoopGroup = new NioEventLoopGroup();Bootstrap bootstrap = new Bootstrap(); bootstrap.channel(NioDatagramChannel.class ) ; bootstrap.group(nioEventLoopGroup); bootstrap.handler(new ChannelInitializer<NioDatagramChannel>() {...}); ChannelFuture sync = bootstrap.bind(0 ).sync(); Channel udpChannel = sync.channel(); String data = "data" ; udpChannel.writeAndFlush(new DatagramPacket(Unpooled.copiedBuffer(data.getBytes(Charset.forName("UTF-8" ))), new InetSocketAddress("192.168.2.29" , 9008 ))); sync.closeFuture().await();
可以看出客户端和服务端是一样的。Bootstrap,bind方法。
关闭 1 2 3 4 Future<?> future = group.shutdownGracefully(); future.syncUninterruptibly();
此外之前也可以用channel.close()手动关闭一些channel。


