Netty in Action第五章-ByteBuf笔记

目录

ByteBuf-Netty的数据容器
API详细信息
用例
内存分配

ByteBuffer: JAVA NIO使用的字节容器,使用复杂;
ByteBuf: Netty提供的字节容器,更简单灵活。

ByteBuf API

优点

  • 用户可以自定义缓冲区类型扩展
  • 透明的零拷贝
  • 容量按需增长
  • 读写切换不需要flip()方法
  • 读写使用不同索引
  • 支持方法链式调用
  • 支持引用计数
  • 支持池化

外部接口:

  1. Channel或者ctx获取ByteBuffAllocator,然后再分配;
  2. Unpooled工具类直接创建。
    1
    2
    3
    4
    5
    6
    7
    8
    9
    10
    // 1. 从channel:
    Channel channel = ...;
    ByteBufAllocator allocator = channel.alloc(); //1
    ByteBuf buf=allocator.heapBuffer();
    // 2. 从ctx:
    ChannelHandlerContext ctx = ...;
    ByteBufAllocator allocator2 = ctx.alloc(); //2
    ByteBuf buf=allocator.heapBuffer();
    // 3.
    ByteBuf buf=Unpooled.buffer();

内部工作机制

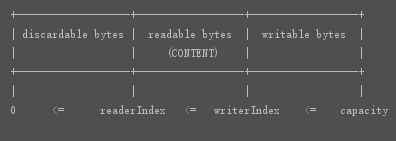
维护两个索引: readerIndex,writerIndex
// 这样就省得用flip来回切换读写状态了。

如上图,起始为空,读的时候发现readerIndex>=writerIndex,因此失败。

使用模式

堆缓冲区-使用模式 (也称支撑数组backing array)

(heap buffer)

最常用,将数据存储在JVM堆中。

1
2
3
4
5
6
7
8
9
10
11
12
13
14
15
16
17
18
private final static Random random = new Random();
private static final ByteBuf BYTE_BUF_FROM_SOMEWHERE = Unpooled.buffer(1024);
private static final Channel CHANNEL_FROM_SOMEWHERE = new NioSocketChannel();
private static final ChannelHandlerContext CHANNEL_HANDLER_CONTEXT_FROM_SOMEWHERE = DUMMY_INSTANCE;
public static void heapBuffer() {
ByteBuf heapBuf = BYTE_BUF_FROM_SOMEWHERE; //get reference form somewhere
//检查 ByteBuf 是否有一个支撑数组
if (heapBuf.hasArray()) {
//如果有,则获取对该数组的引用
byte[] array = heapBuf.array();
//计算第一个字节的偏移量
int offset = heapBuf.arrayOffset() + heapBuf.readerIndex();
//获得可读字节数
int length = heapBuf.readableBytes();
//使用数组、偏移量和长度作为参数调用你的方法
handleArray(array, offset, length);
}
}

直接缓冲区-使用模式

(direct buffer)

堆外内存,directBuffer,性能最好,省去一次复制。
缺点时要注意管理堆外内存。

1
2
3
4
5
6
7
8
9
10
11
12
13
14
public static void directBuffer() {
ByteBuf directBuf = BYTE_BUF_FROM_SOMEWHERE; //get reference form somewhere
//检查 ByteBuf 是否由数组支撑。如果不是,则这是一个直接缓冲区
if (!directBuf.hasArray()) {
//获取可读字节数
int length = directBuf.readableBytes();
//分配一个新的数组来保存具有该长度的字节数据
byte[] array = new byte[length];
//将字节复制到该数组
directBuf.getBytes(directBuf.readerIndex(), array);
//使用数组、偏移量和长度作为参数调用你的方法
handleArray(array, 0, length);
}
}

复合缓冲区-使用模式

(composite buffer)

把上述两个模式复合,把多个ByteBuf聚合成一个视图处理。
消除了没有必要的复制,同时对外是一个通用的接口。

1
2
3
4
5
6
7
8
9
10
11
12
13
14
15
16
17
18
19
20
21
22
23
24
25
26
 public static void byteBufComposite() {
CompositeByteBuf messageBuf = Unpooled.compositeBuffer();
ByteBuf headerBuf = BYTE_BUF_FROM_SOMEWHERE; // can be backing or direct
ByteBuf bodyBuf = BYTE_BUF_FROM_SOMEWHERE; // can be backing or direct
//将 ByteBuf 实例追加到 CompositeByteBuf
messageBuf.addComponents(headerBuf, bodyBuf);
//...
//删除位于索引位置为 0(第一个组件)的 ByteBuf
messageBuf.removeComponent(0); // remove the header
//循环遍历所有的 ByteBuf 实例
for (ByteBuf buf : messageBuf) {
System.out.println(buf.toString());
}
}

public static void byteBufCompositeArray() {
CompositeByteBuf compBuf = Unpooled.compositeBuffer();
//获得可读字节数
int length = compBuf.readableBytes();
//分配一个具有可读字节数长度的新数组
byte[] array = new byte[length];
//将字节读到该数组中
compBuf.getBytes(compBuf.readerIndex(), array);
//使用偏移量和长度作为参数使用该数组
handleArray(array, 0, array.length);
}

CompositeByteBuf附加了许多功能。

字节级操作

随机访问 (可以重复消费)(getXXX之类的方法)

ByteBuf的随机访问与普通数组类似:

1
2
3
for(int i;i<buffer.capacity();i++){
byte b=buffer.getByte(i);
}

普通访问不会改变readerIndexwriterIndex
要改变需要调用readerIndex(index)writerIndex(index)

顺序访问 (不会重复消费)(readXXX/skipXXX之类的方法)

如上图所示,这种访问方式可以看作消费数据,通过移动readerIndex,扩大了可丢弃字节(已读),减少了可读字节。

1
2
3
4
5
//迭代缓冲区的可读字节。
ByteBuf buffer = ...;
while (buffer.isReadable()) {
System.out.println(buffer.readByte());
}

丢弃discardable bytes(类似于compact/gc)

1
2
//调用:
byteBuf.discardReadBytes();

丢弃已读部分回收空间,本质上是扩大了可写字节。
底层的实现是把可读的数据移动到首部,readerIndex=0;writerIndex-=readerIndex.,因此导致内存复制,有性能开销,所以尽量不要调用。

顺序写入:

1
2
3
4
// 1.
byteBuf.writeBytes(otherByteBuf);
// 2.
byteBuf.writeInt(26);

索引修改

readerIndexwriterIndex这俩变量,除了因为上述数据操作而间接发生改变,也可以直接强行改它们而不管数据:

1
2
3
4
5
6
7
8
9
10
11
12
13
14
15
16
17
18
19
markReaderIndex()// 标记为x
resetReaderIndex()// 回到x,注意不是0
markWriterIndex() // 标记为y
resetWriterIndex()// 回到y,注意不是0
clear() // 这个才是双双清0
readerIndex(int)
writerIndex(int)

@Override
public ByteBuf markReaderIndex() {
markedReaderIndex = readerIndex;
return this;
}

@Override
public ByteBuf resetReaderIndex() {
readerIndex(markedReaderIndex);
return this;
}

这些操作不改变数据,所以是O(1)的。

查找(类似于Scan And Filter操作)

1
2
3
4
5
//1:
int index = byteBuf.indexOf(xxx)
//2.
int index = byteBuf.forEachByte(ByteBufProcessor.FIND_CR);
// ByteBufProcessor 4.1版本改为 io.netty.util.ByteProcessor

派生缓冲区(类似于视图,可读写) // 浅拷贝

创建的方法:

1
2
3
4
5
duplicate()
slice(int,int)
Unpooled.unmodifiableBuffer(...)
order(ByteOrder)
readSlice(int)

这些派生的ByteBuf实例,底层数据是和原来共享的,只是有自己的读写索引。

深拷贝

1
copy(int,int)

ByteBufHolder接口

ByteBufHolder接口就是把ButeBuf再封装一层,只暴露几个大的API:

1
2
3
ByteBuf content()// 返回持有的ByteBuf
copy()
duplicate()// 浅拷贝

这样只需要声明实现这个接口,相当于宣布这个类内部有成员变量是ByteBuf,换言之就是一个承载数据的对象了。

ByteBuf分配

按需分配: ByteBufAllocator接口

channel或者ctx获得ByteBufAllocator,降低分配和释放内存的开销。

1
2
3
4
5
6
// 1. 从channel:
Channel channel = ...;
ByteBufAllocator allocator = channel.alloc(); //1
// 2. 从ctx:
ChannelHandlerContext ctx = ...;
ByteBufAllocator allocator2 = ctx.alloc(); //2

拿到分配器以后,可以进行的操作:

1
2
3
4
5
Buffer()
heapBuffer()
directBuffer()
compositeBuffer()
...// 总之就是各种创建ByteBuf的方法

netty的两个ByteBufAllocator的实现:

1
2
PooledByteBufAllocator  // 池化的,性能最高 
UnpooledByteBufAllocator // 非池化的

Channel具体返回的分配器是池化还是非池化,可以通过ChannelConfig配置,或者设定bootstrap参数。

Unpooled缓冲区

非网络项目时,或其他不能从channel,ctx获取BufAllocator时,可以用Unpooled工具类来创建未池化的ByteBuf实例。
它的方法与上述两个类似,只不过去掉了heapBuf,用buffer()方法代替,默认直接返回堆内存buf。

ByteBufUtil类

顾名思义,有一些用于ByteBuf的辅助方法,看起来比较有用包括:

1
2
3
4
5
firstIndexof
lastIndexof
hexdump()// 打印
equals(buf1,buf2)
...

引用计数 // ReferenceCounted

由于ByteBuf一般比较大,所以实际数据一般只会存一份,引用却会有很多。
然后引用的生命周期一般很长,。
所以netty除了gcroot的方法管理,还用了原始的引用计数:
ReferenceCounted接口。
上文中的ByteBufHolder接口就是它的子接口。

1
2
3
4
5
6
ByteBufHolder => ReferenceCounted
// 引用计数:
ByteBuf buf=allocator.directBuffer();
assert buffer.refCnt()==1;
// 释放:
boolean released = buffer.release();

四种ByteBuf:

1
2
3
4
UnpooledHeapByteBuf: 堆内存,可以被jvm gc;
UnpooledDirectByteBuf: 堆外,可以被jvm gc,但最好自己回收;
PooledHeapByteBuf: 不可以被jvm gc // 因为在池子里头
PooledDirectByteBuf: 不可以被jvm gc. // 因为在池子里头

换言之:
池化的jvm不管;
非池化的jvm可以管。

增加计数器的操作:

1
2
retain()
//或者刚出生的时候会有1.

减少计数器的操作:

1
release()

编程规范:

  1. pipeline里最后一个处理者要负责release()
  2. 中间某一个抛异常了,不往下传了,也要负责release()。
  3. 中间某一个往下传了别的数据,要负责release传入的原来那个数据。

内存泄露提示:

1
LEAK: ByteBuf.release() was not called before it’s garbage-collected. Enable advanced leak reporting to find out where the leak occurred. To enable advanced leak reporting, specify the JVM option ‘-Dio.netty.leakDetectionLevel=advanced’ or call ResourceLeakDetector.setLevel()

出现了这个说明有地方没有release().可以提高检测级别打印出具体泄露点。

参考:
http://chen-tao.github.io/2015/10/03/netty/
http://calvin1978.blogcn.com/articles/directbytebuffer.html

推荐文章